
Build a multi-stage pipeline with PlanetScale and AWS
One of the foundational features of PlanetScale is the concept of branching — creating an isolated version of your production database to test schema changes before applying them to a production instance. Through the power of our CLI and some scripting, you can also automate the process of merging those changes and integrate it into your CI/CD pipelines.
In this article, we’ll step through creating a multi-environment pipeline powered by PlanetScale and AWS, triggered by a common developer flow in GitHub. We’ll start with a simple API written in Go, and build the pipeline around deploying it to two separate container services in Lightsail, driven by AWS CodeBuild.
Prerequisites
If you want to follow along with this article, you’ll need to have the following set up ahead of time:
- A PlanetScale account.
- A GitHub account.
- A Docker Hub account.
- Docker Desktop installed and running.
- An AWS account.
- The AWS CLI is installed & configured on your computer.
Please note that we will be creating resources in AWS which cost real money. Resources may be covered under the free tier for AWS users, so check your AWS plan.
The overall setup#
There are quite a few moving pieces to this demo. Before I dive into exactly how to pull this off, I want to take a moment to describe what each service is used for and generally how they contribute to the overall demo.
GitHub and the sample application
I’m using a small API written in Go, as it's my preferred type of project and language, but I’m also wrapping it up in Docker as a container that will be deployed to AWS Lightsail. The repository is hosted on GitHub and I’ll be using commits and pull requests to trigger the automation required to deploy new versions of the project.
AWS and the services used
AWS Lightsail will be used to run the containers for each environment. I’m choosing Lightsail over other container services since it has the most straightforward setup on AWS. I’ll also be using an Elastic Container Registry (ECR) to store images of the container. Lightsail will pull the most recent versions of an image tagged qa and prod for each environment when a deployment is triggered.
To handle the process of building and deploying the code, I’ll be using a combination of AWS CodeBuild and some bash scripting within the CodeBuild projects. CodeBuild will contain the definitions of how to build the image and trigger a deployment to the respective Lightsail environment. It will also be used to monitor the qa and main branches on the GitHub repository and execute a build when new commits are added to them. Here is a rundown of the CodeBuild steps used in each project:
QA Deployment Process
- A developer pushes new commits to GitHub in the
qabranch of the repository. - CodeBuild will detect the updated code in GitHub and start the build in the QA version of the project.
- CodeBuild will build the container image, deploy it to ECR tagged as
qa, and trigger a deployment to Lightsail.
Production deployment process
The above process is generally the same for the production environment, with the important addition of one step:
- When a PR is merged into the
mainbranch in GitHub, CodeBuild will start the deployment to production. - CodeBuild will first use the PlanetScale CLI to trigger a deployment request in PlanetScale to sync up any schema changes between the
devbranch and themainbranch of the databases. - Once the schema is synced up, CodeBuild will build the container image, deploy it to ECR tagged as
prod, and trigger a deployment to the production instance of the service Lightsail.
Now grab a cup of your favorite beverage, open a blank document (we’ll be recording A LOT of details), and let's get to it!
Throughout this article, there will be various checkpoints like this one. It means you should be adding something to that document to track throughout this guide.
Fork and review the code#
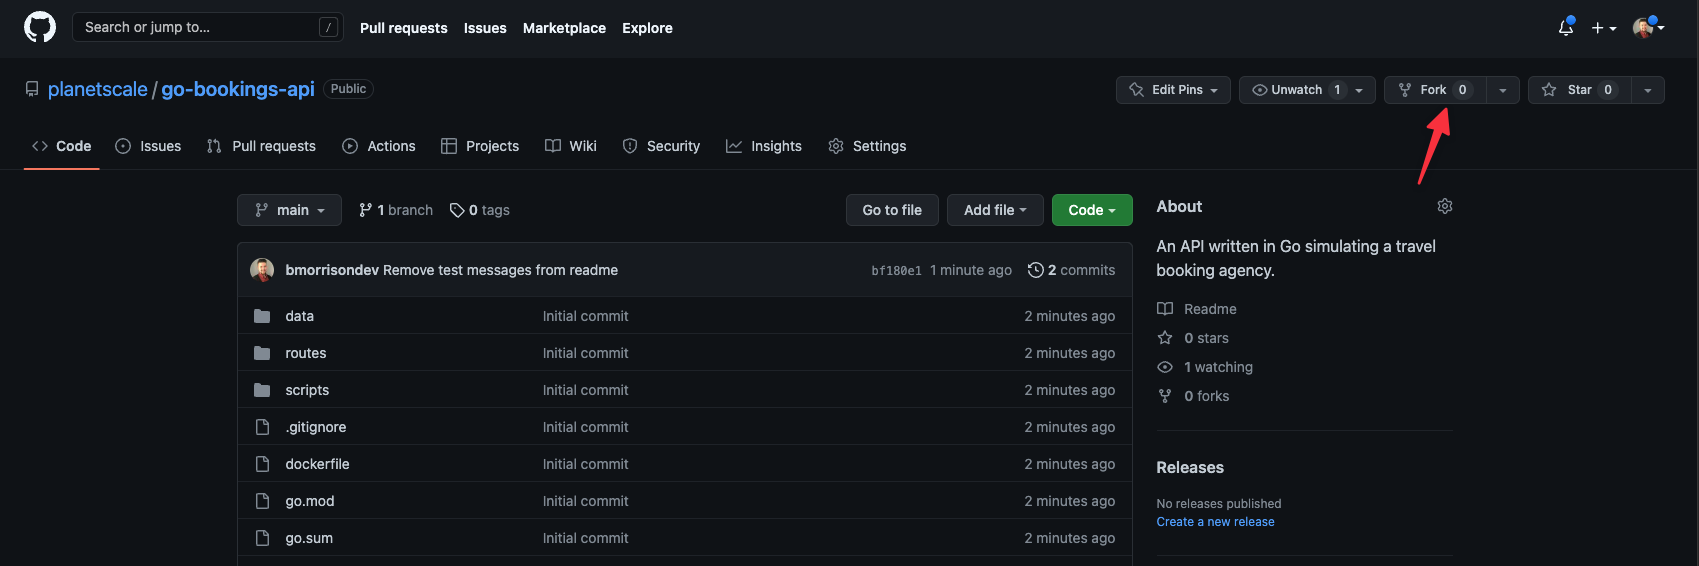
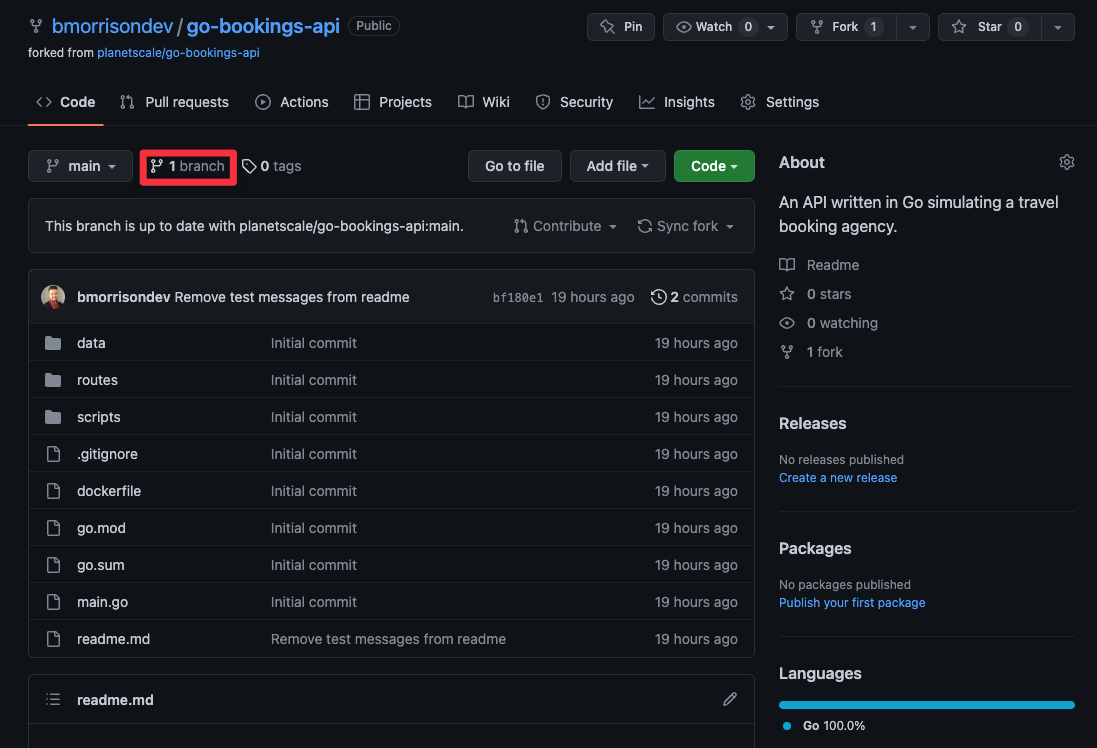
Since GitHub will be used as the start of this entire process, you can start by forking the sample repository in GitHub at https://github.com/planetscale/go-bookings-api. Click the “Fork” button in the upper right.
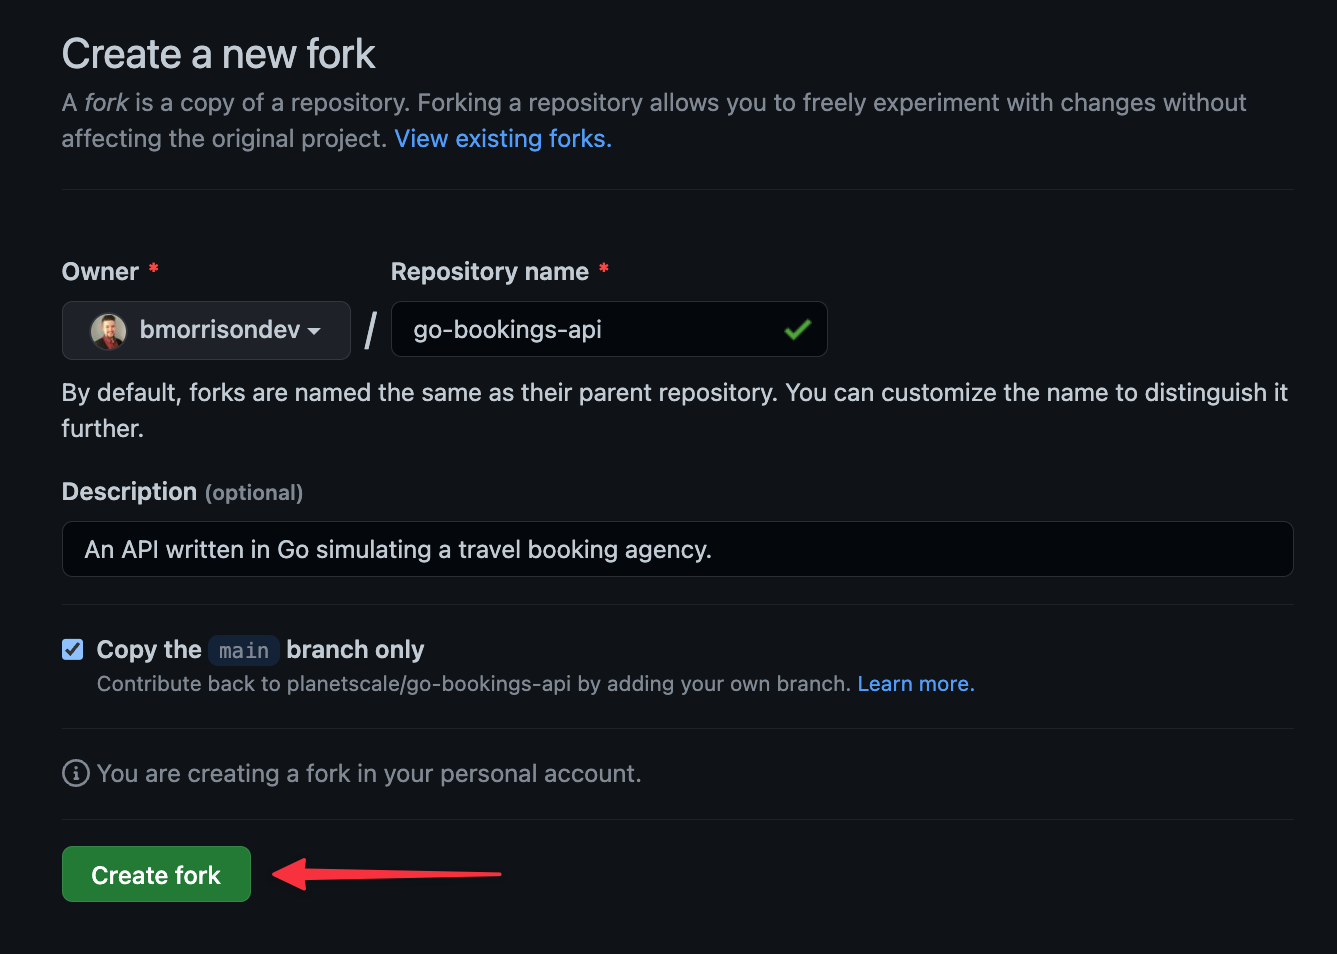
In the Create a new fork page, click “Create fork”, accepting all the defaults.
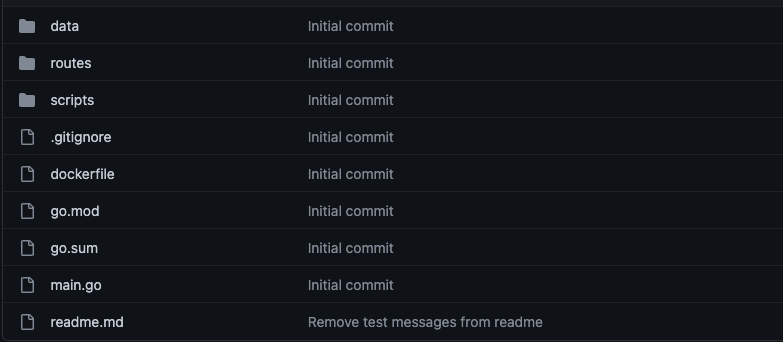
The code is fairly straightforward and should be simple enough to understand, even if you are not proficient in Go.
data- Contains functions for reading and writing data to PlanetScale, broken down by entity.routes— Contains functions that handle incoming HTTP requests, broken down by path.scripts— Stores various scripts that are used throughout this guide.
Before moving on, let’s create a qa branch since we’ll be pulling it for the QA environment in AWS. From the main view of the repository, click on where it says "1 branch."
Now click on "New branch" to open the Create a branch modal.
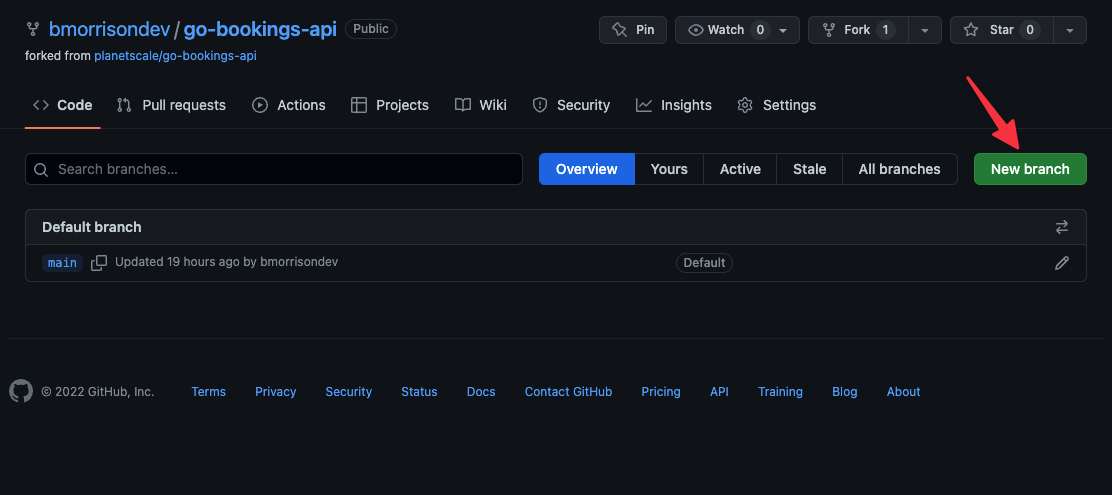
Finally, name the branch qa then click "Create branch".

Create the database in PlanetScale#
In this section, we’ll do the following:
- Create a new database in PlanetScale.
- Promote the
mainbranch to production. - Create a
devbranch that will be used for development & QA testing. - Add the schema to
devand merge it intomain. - Seed the
devbranch with a little bit of data.
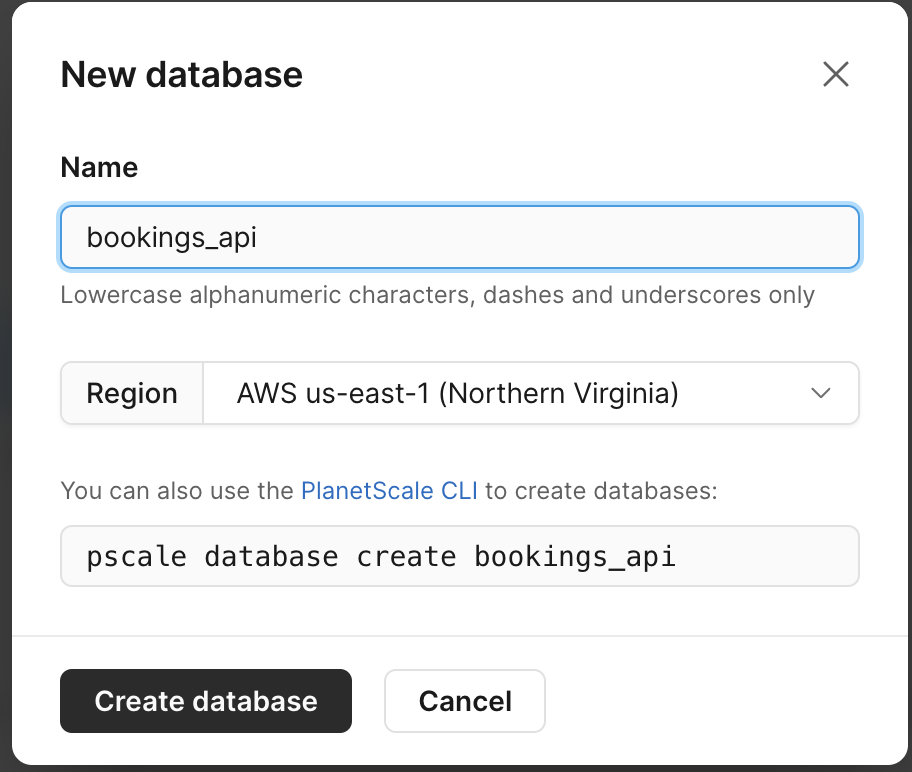
To start this process, let’s create a database in PlanetScale. I’ll be using bookings_api as the name of my database. From the dashboard, click on ”New database” > ”Create new database”.
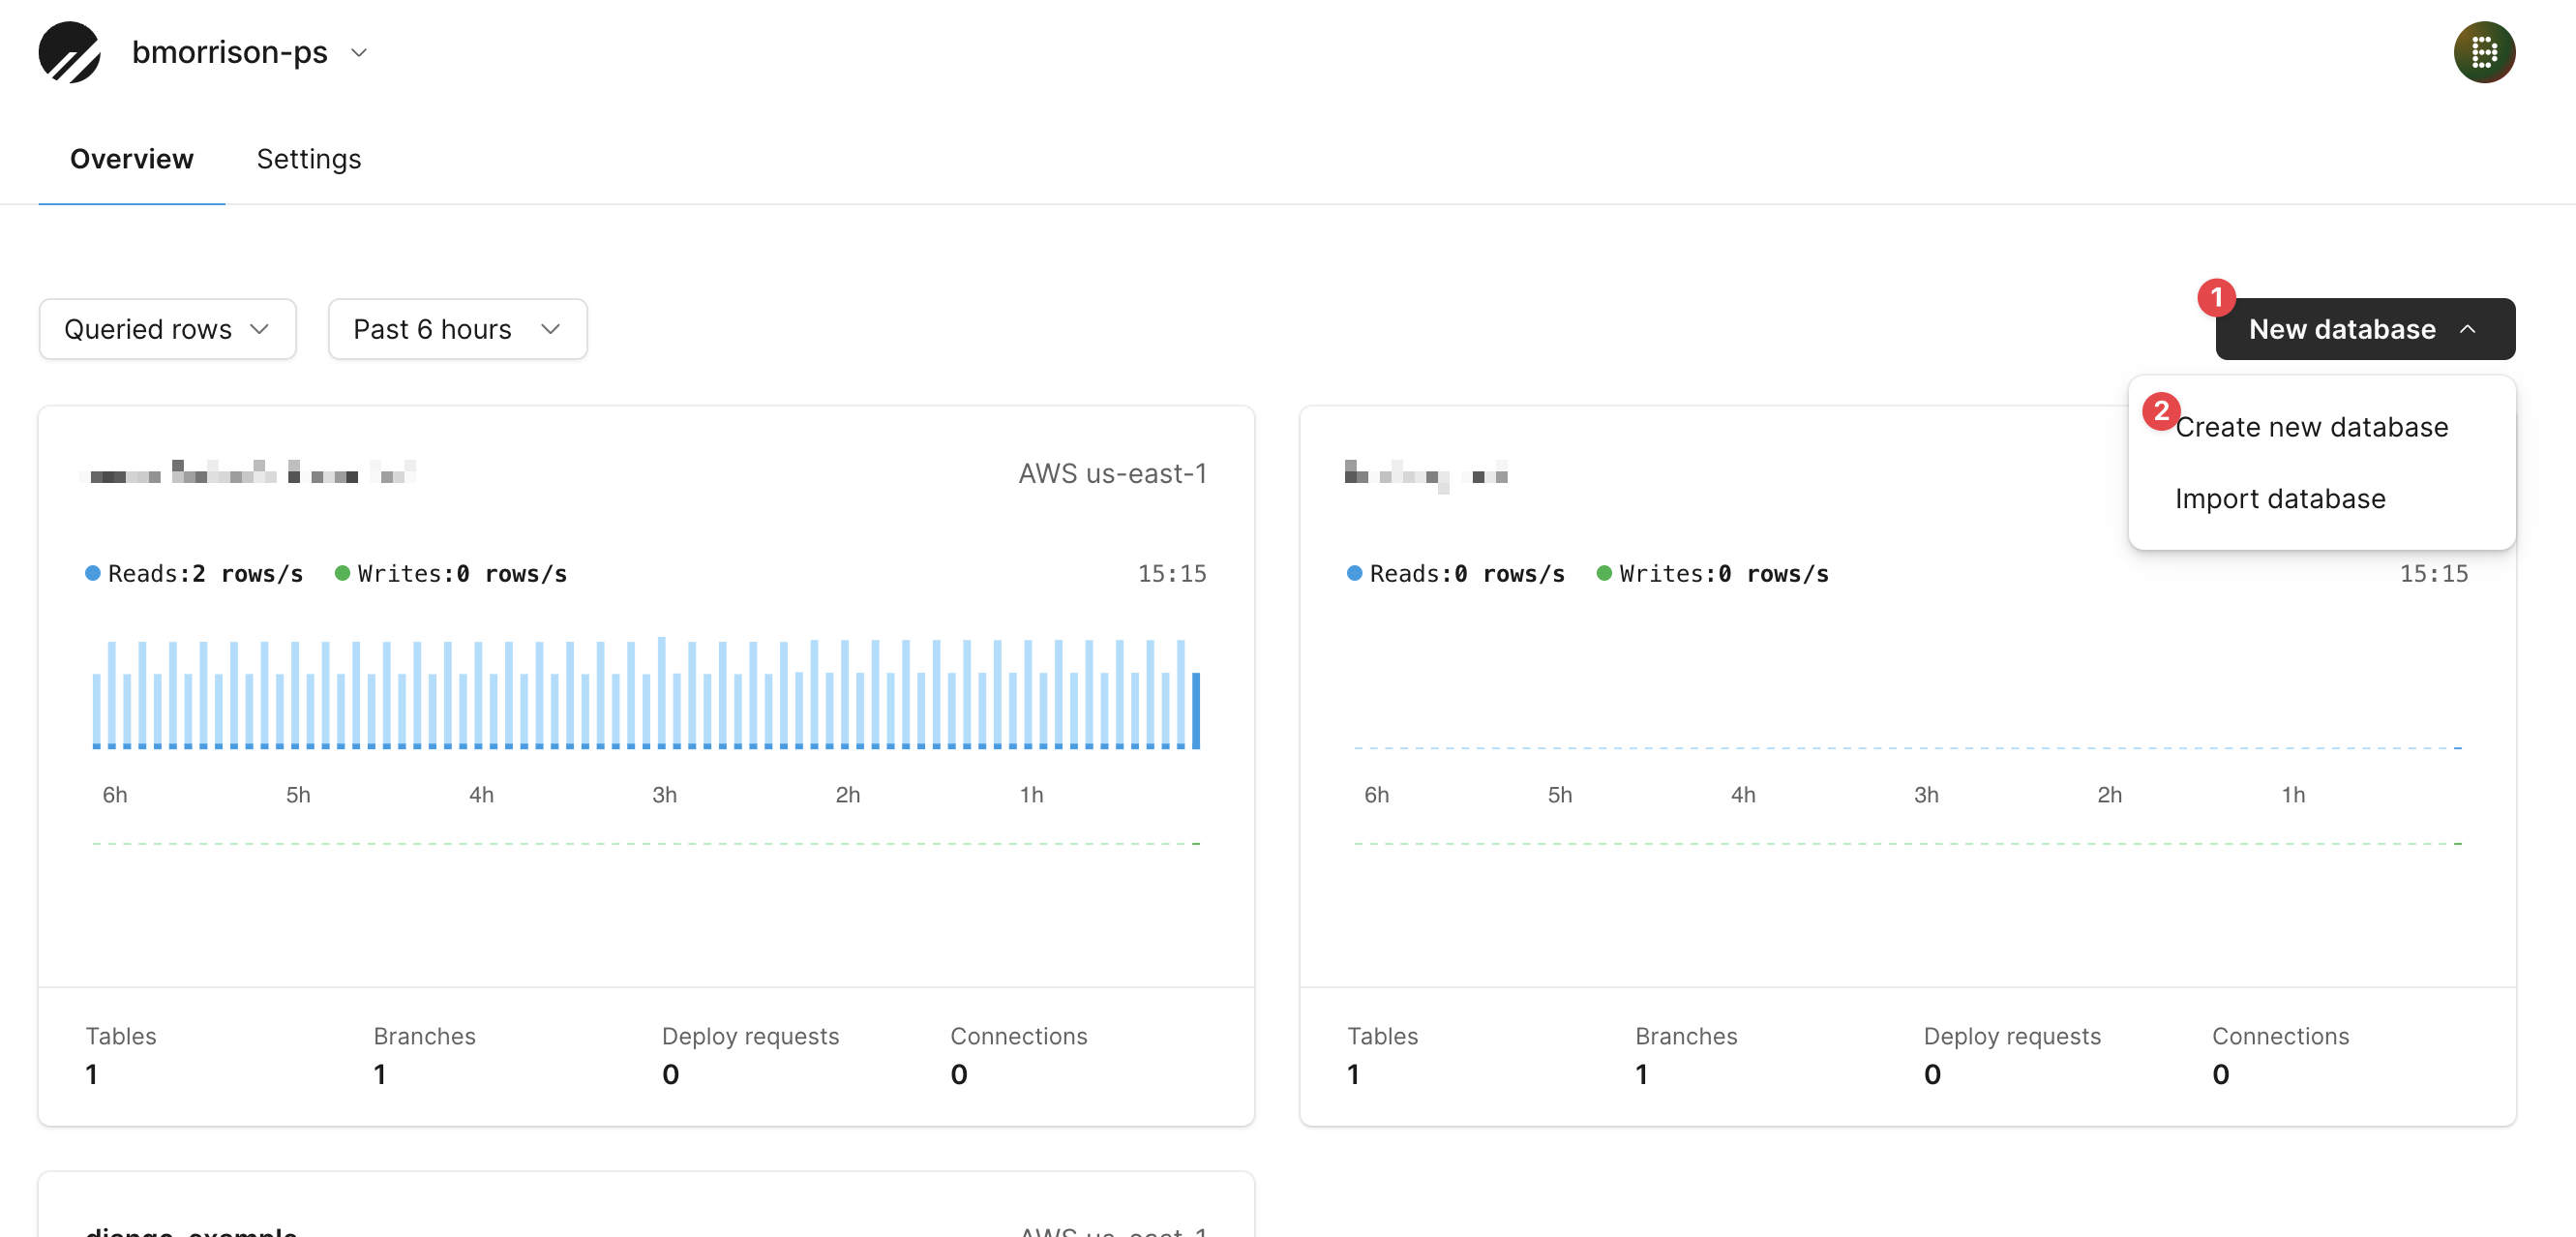
In the modal, name the database and click ”Create database”.
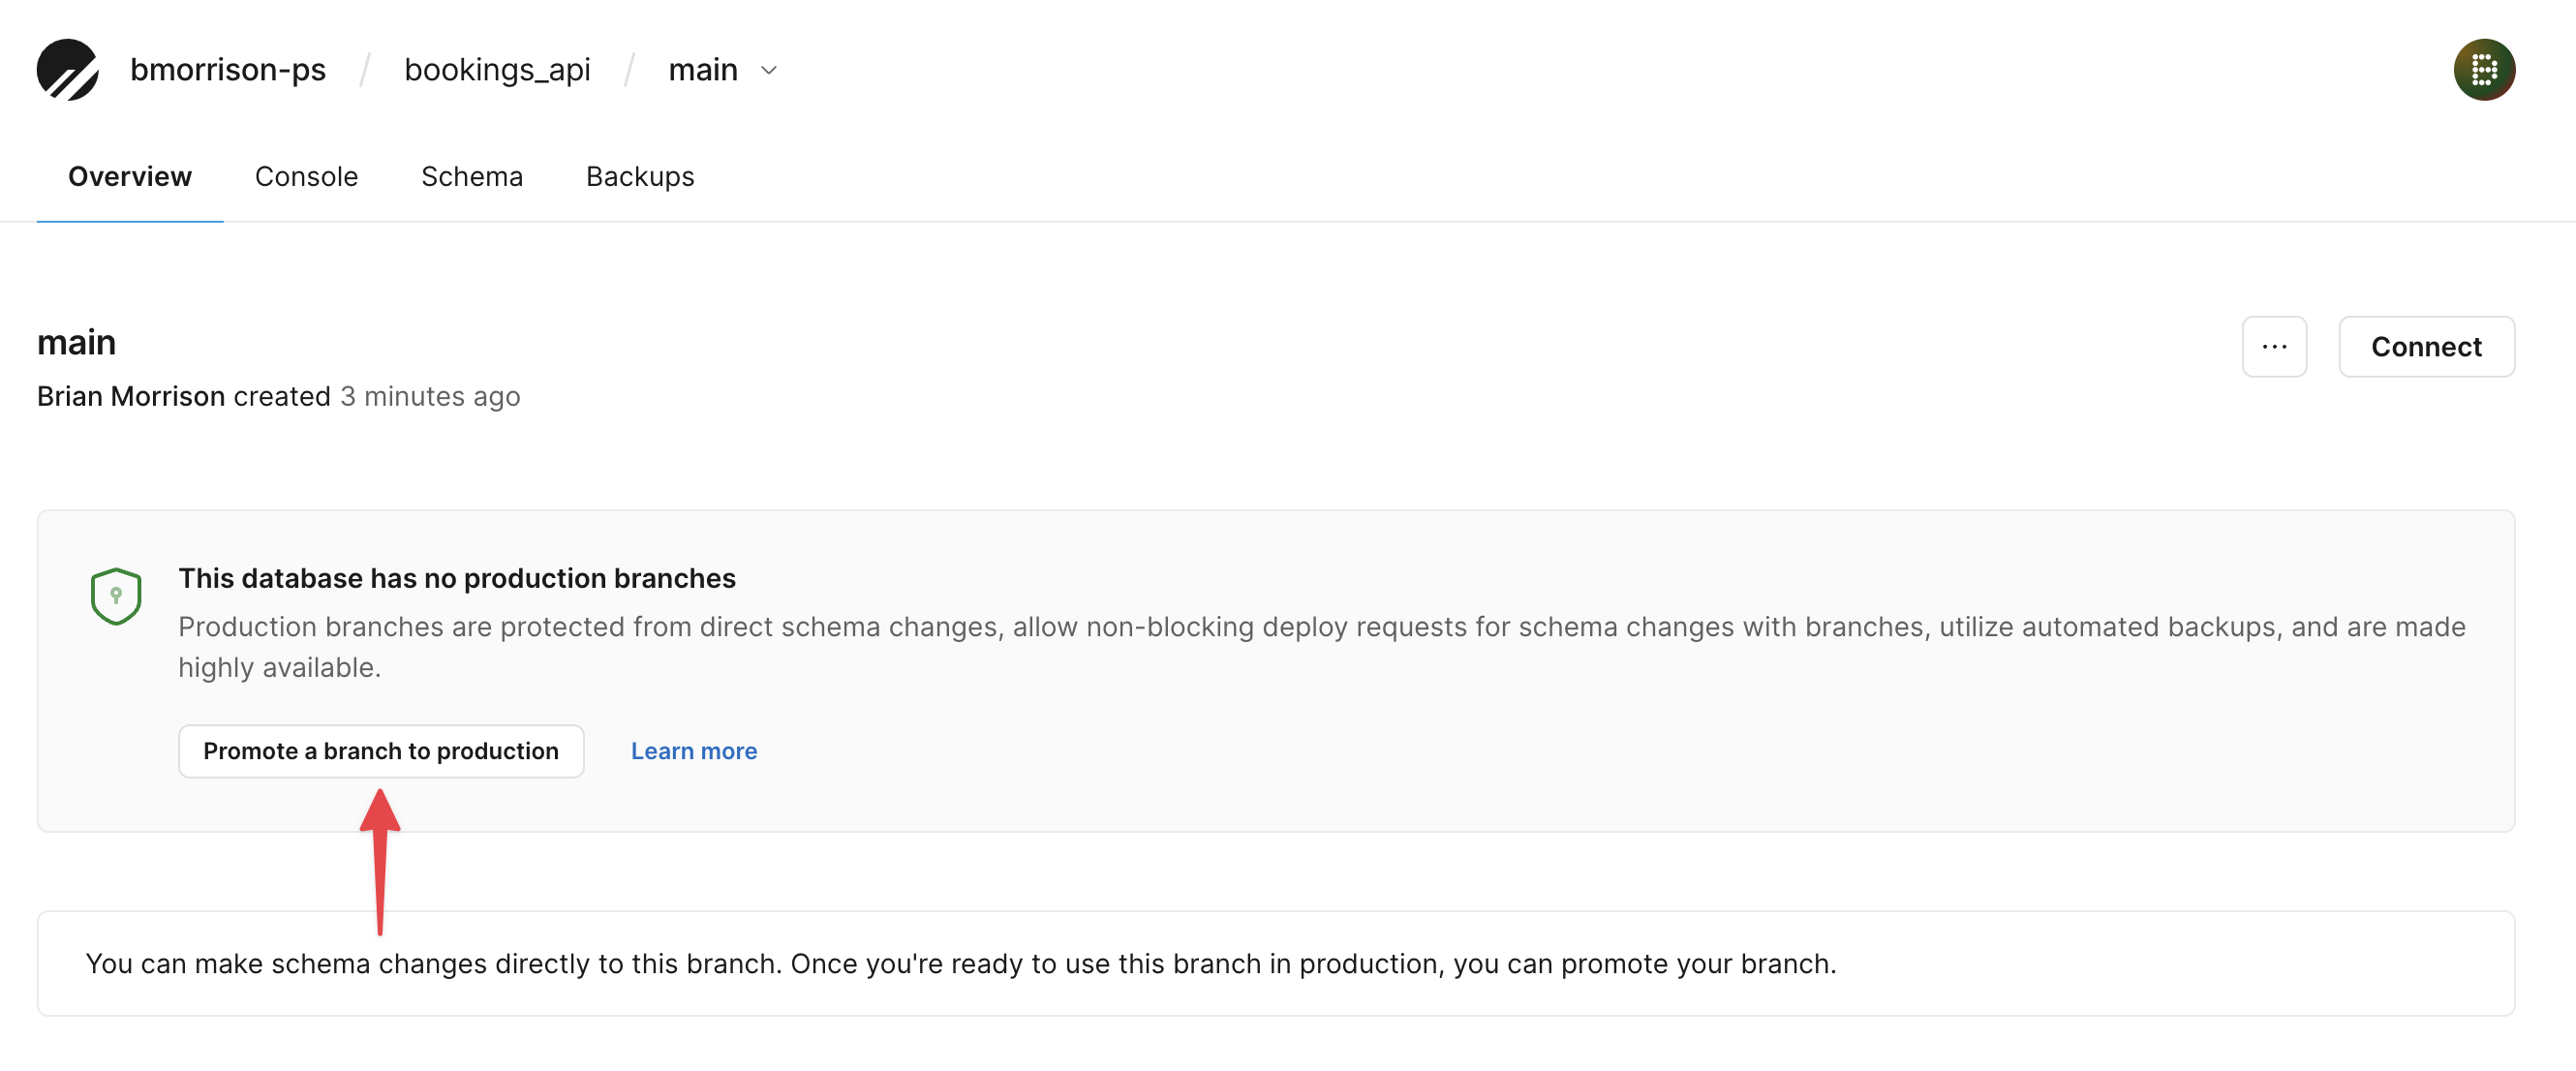
Once the main branch is finished initializing, click on the ”Branches” tab and select the main branch.
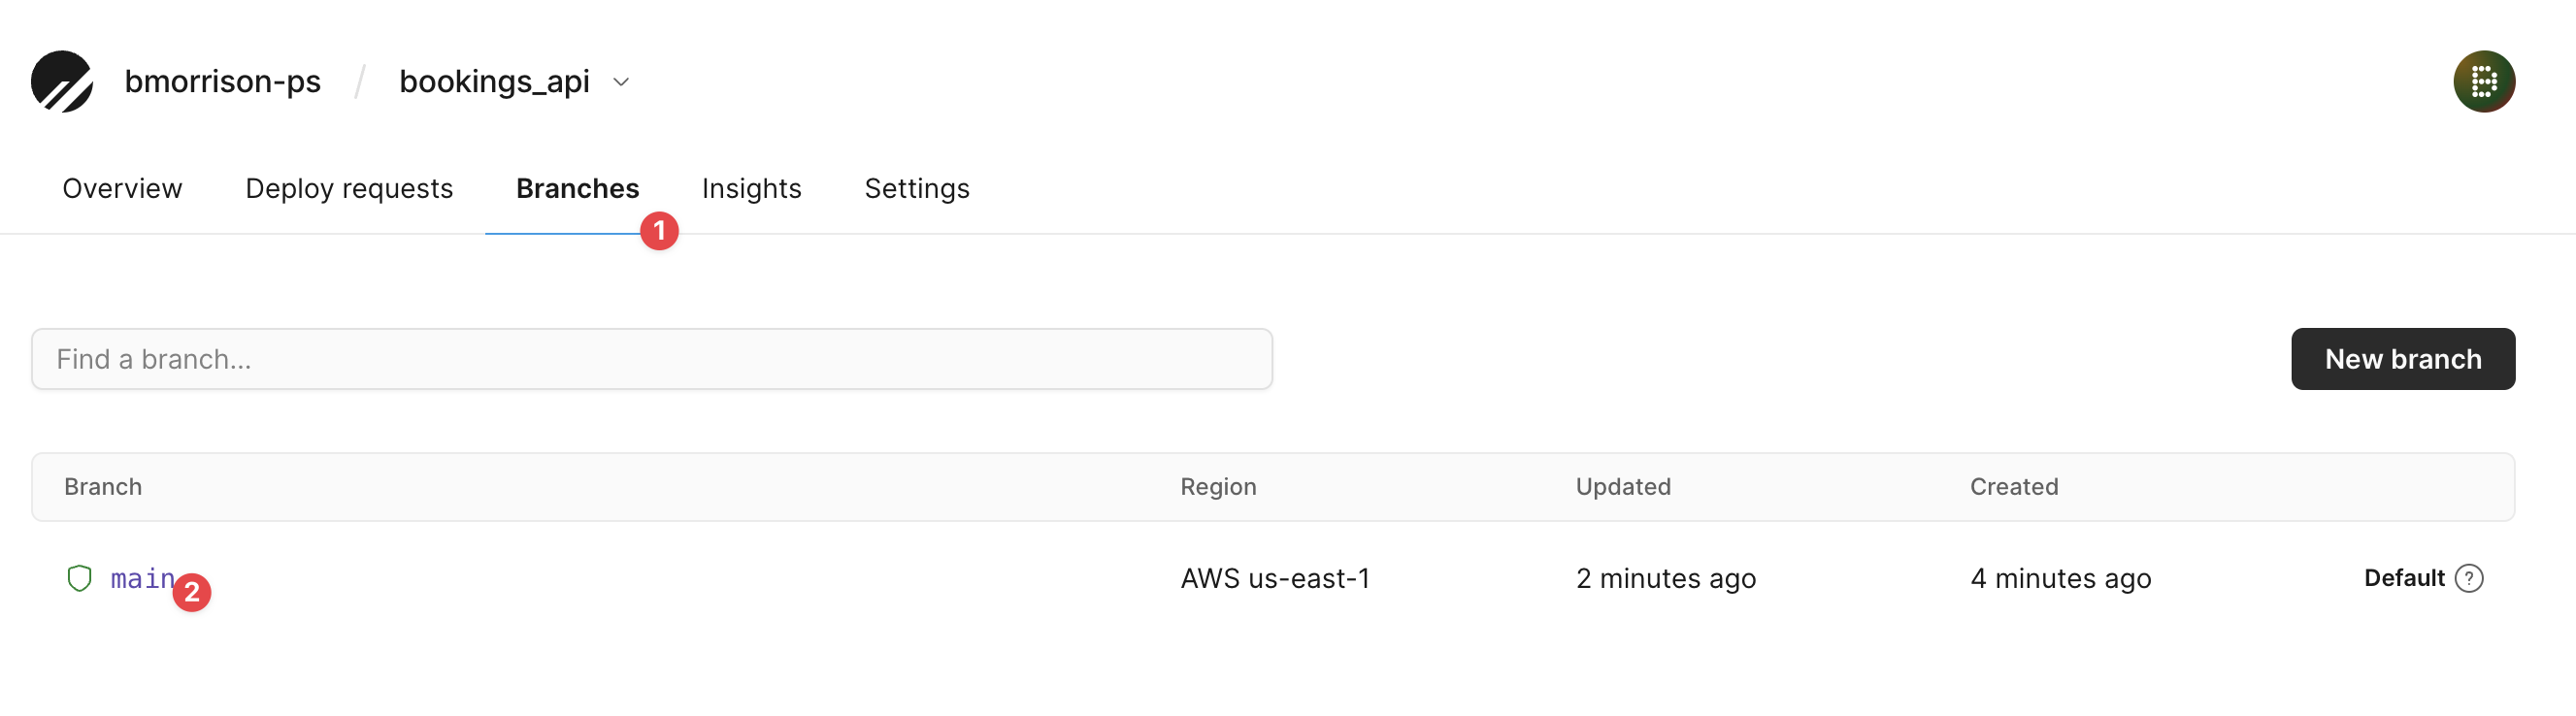
Click ”Promote a branch to production” and confirm on the modal which will appear.
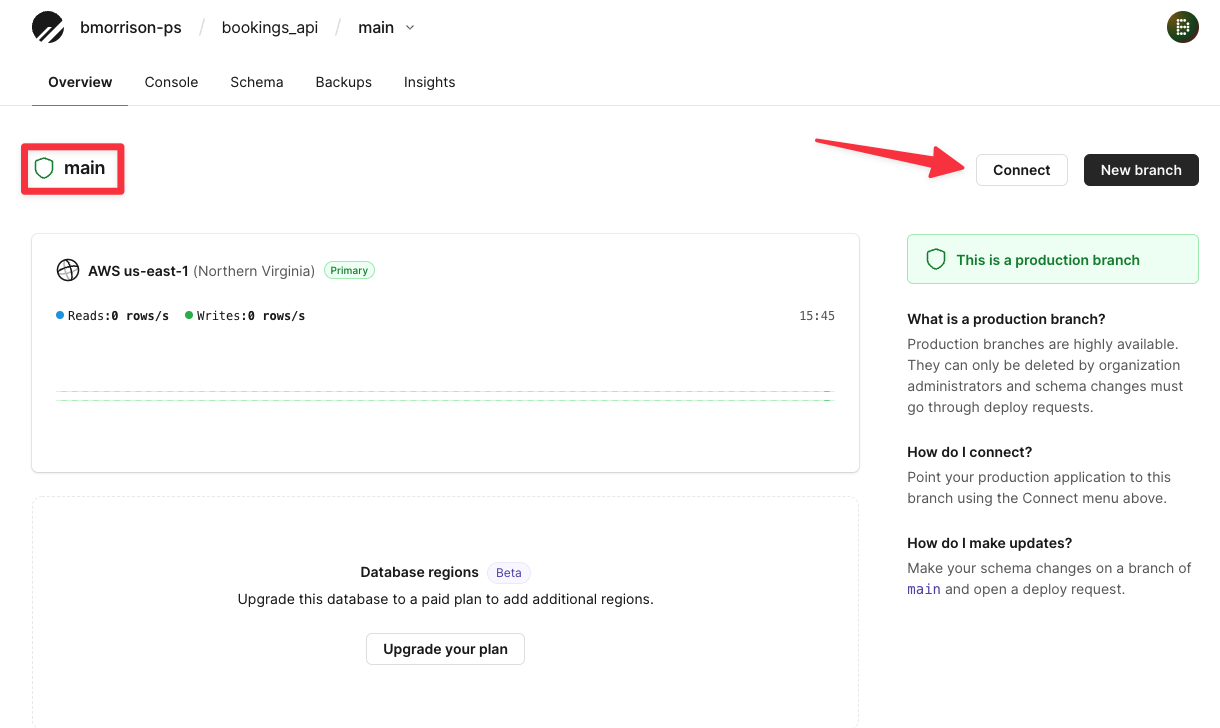
Once the branch has been promoted, click the “Connect” button from the Overview to grab the connection string for later.
Select ”Go” from the Connect with dropdown. If your password shows as a bunch of asterisks, click "New password" to generate a new set of credentials. Copy the DSN variable in the .env tab, and paste it in your document for later.
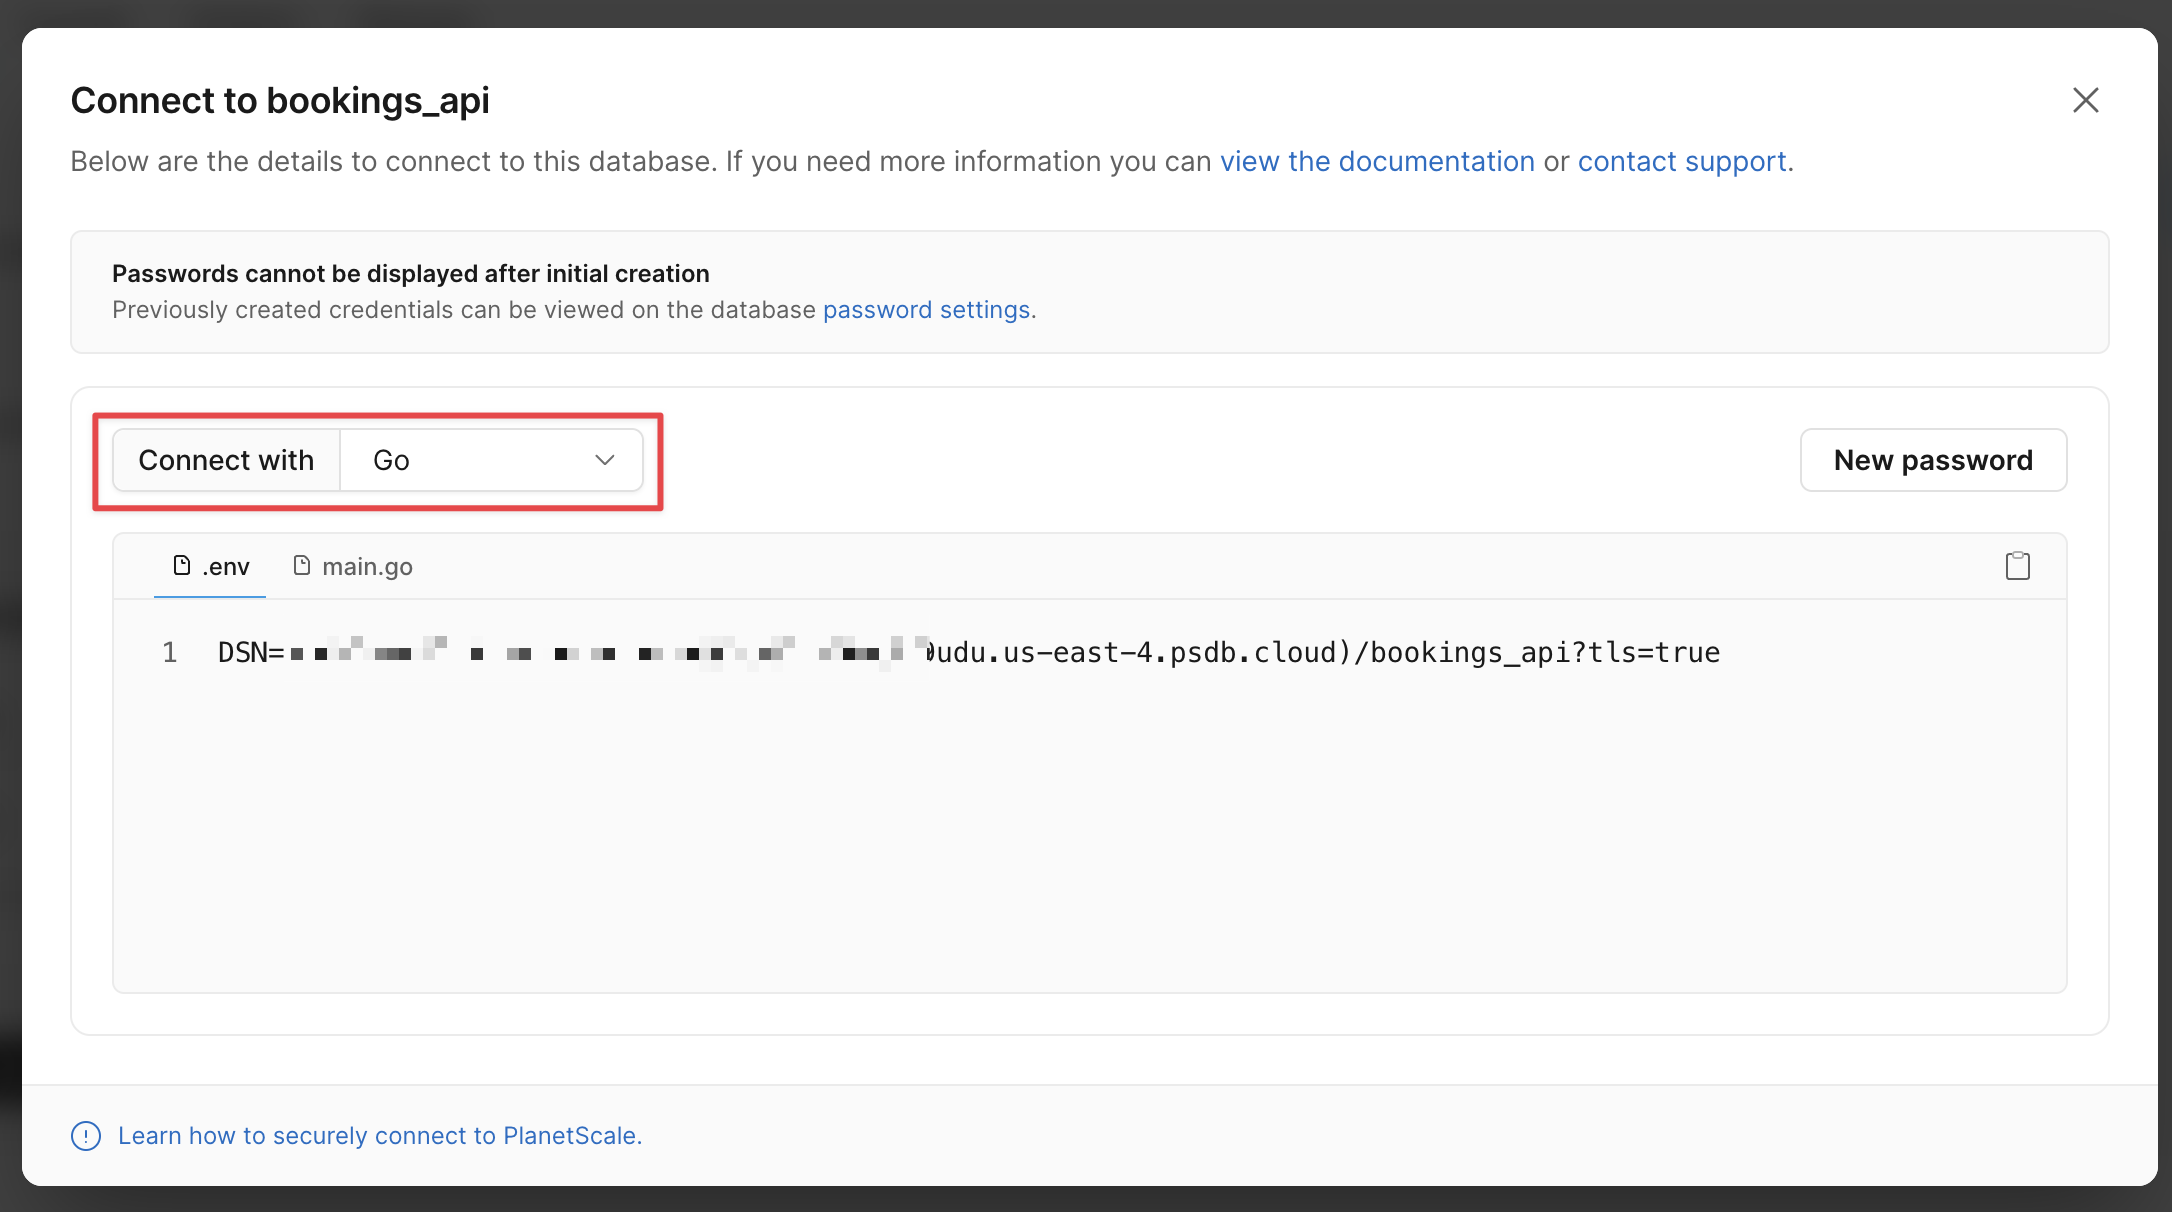
Make sure to add the connection string for main to your tracking document. Also make sure to add your org name, which can be found right next to the PlanetScale logo in the upper left of the screen
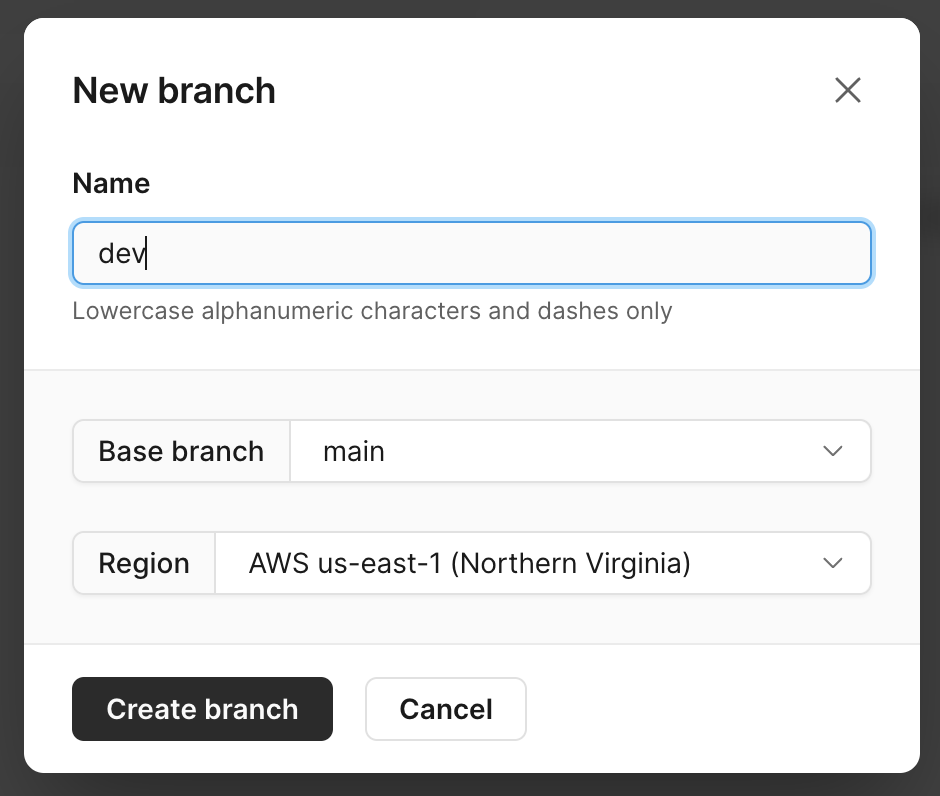
Now head back to Branches and click ”New branch”.
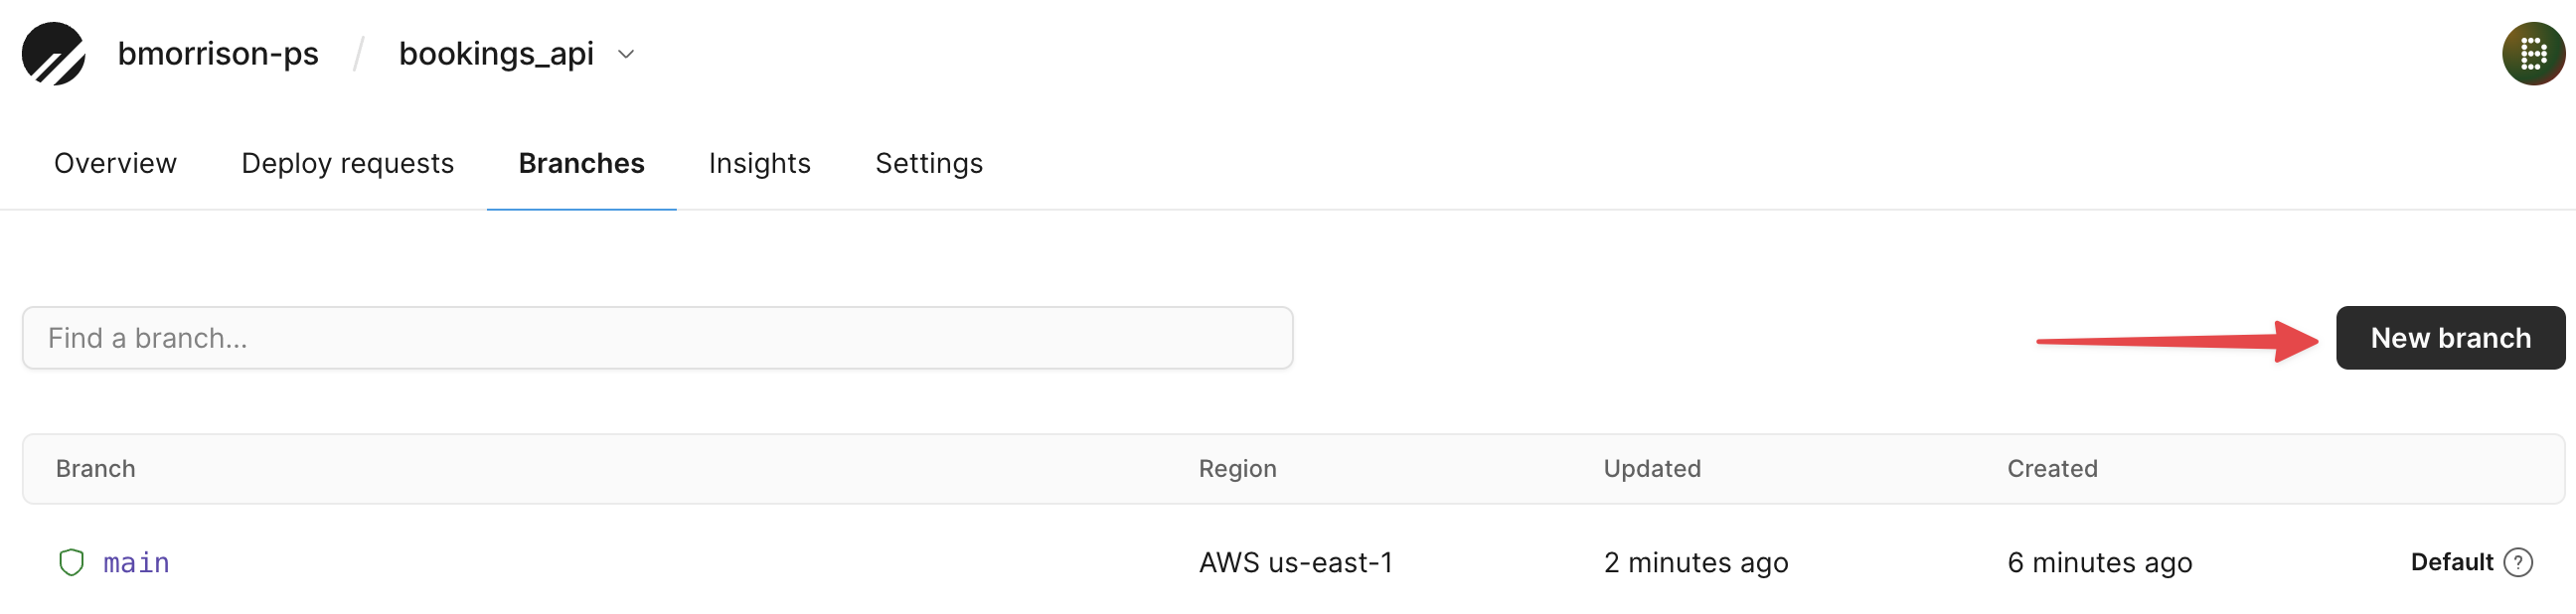
Name the new branch dev and click ”Create branch”.
Once the branch has initialized, click “Connect” here as well to grab the connection string from the dev branch.
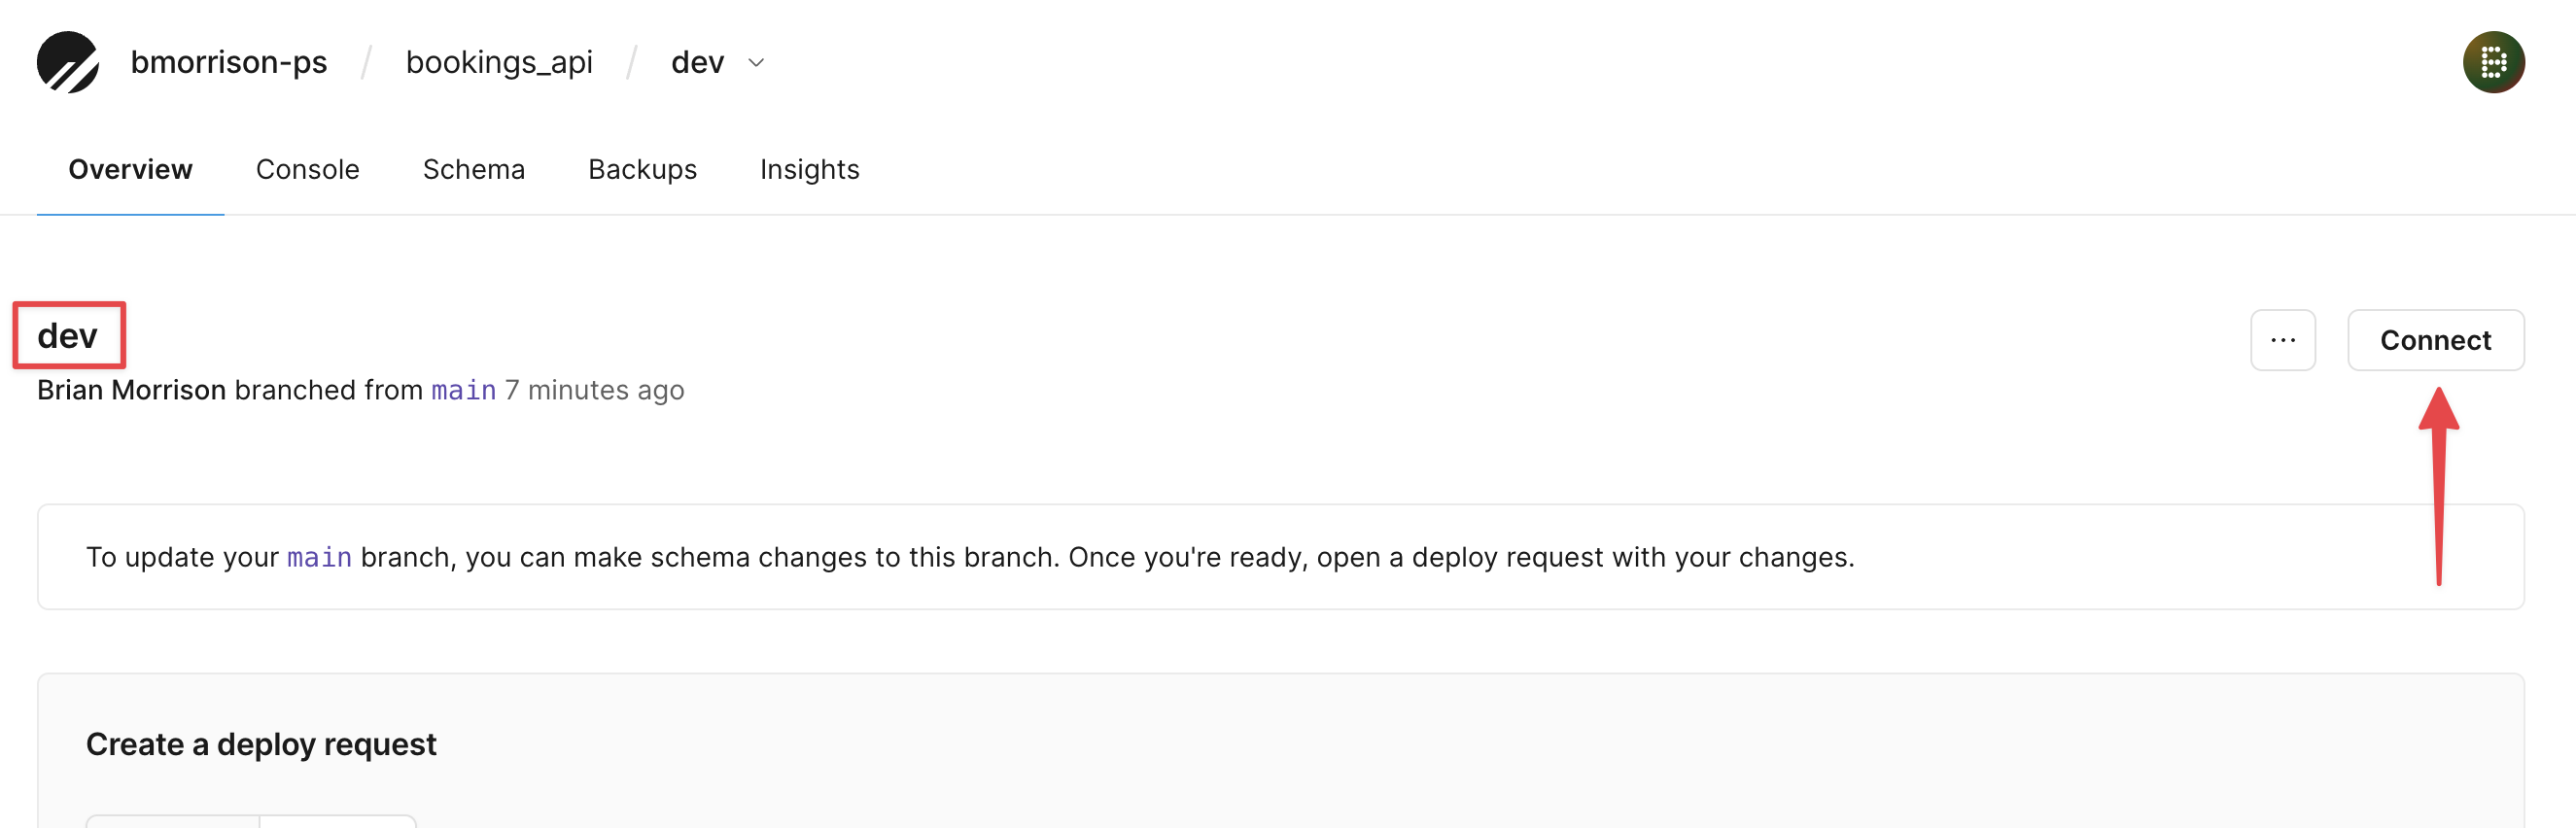
Make sure to add the dev connection string to your tracking document.
Now select the "Console" tab and run the following script to create a table.
CREATE TABLE hotels(
  id INT UNSIGNED PRIMARY KEY AUTO_INCREMENT,
  name VARCHAR(50) NOT NULL,
  address VARCHAR(50) NOT NULL,
  stars FLOAT(2) UNSIGNED
);
Now add some data to the table with this script.
INSERT INTO hotels (name, address, stars) VALUES
  ('Hotel California', '1967 Can Never Leave Ln, San Fancisco CA, 94016', 3.8),
  ('The Galt House', '140 N Fourth St, Louisville, KY 40202', 4);
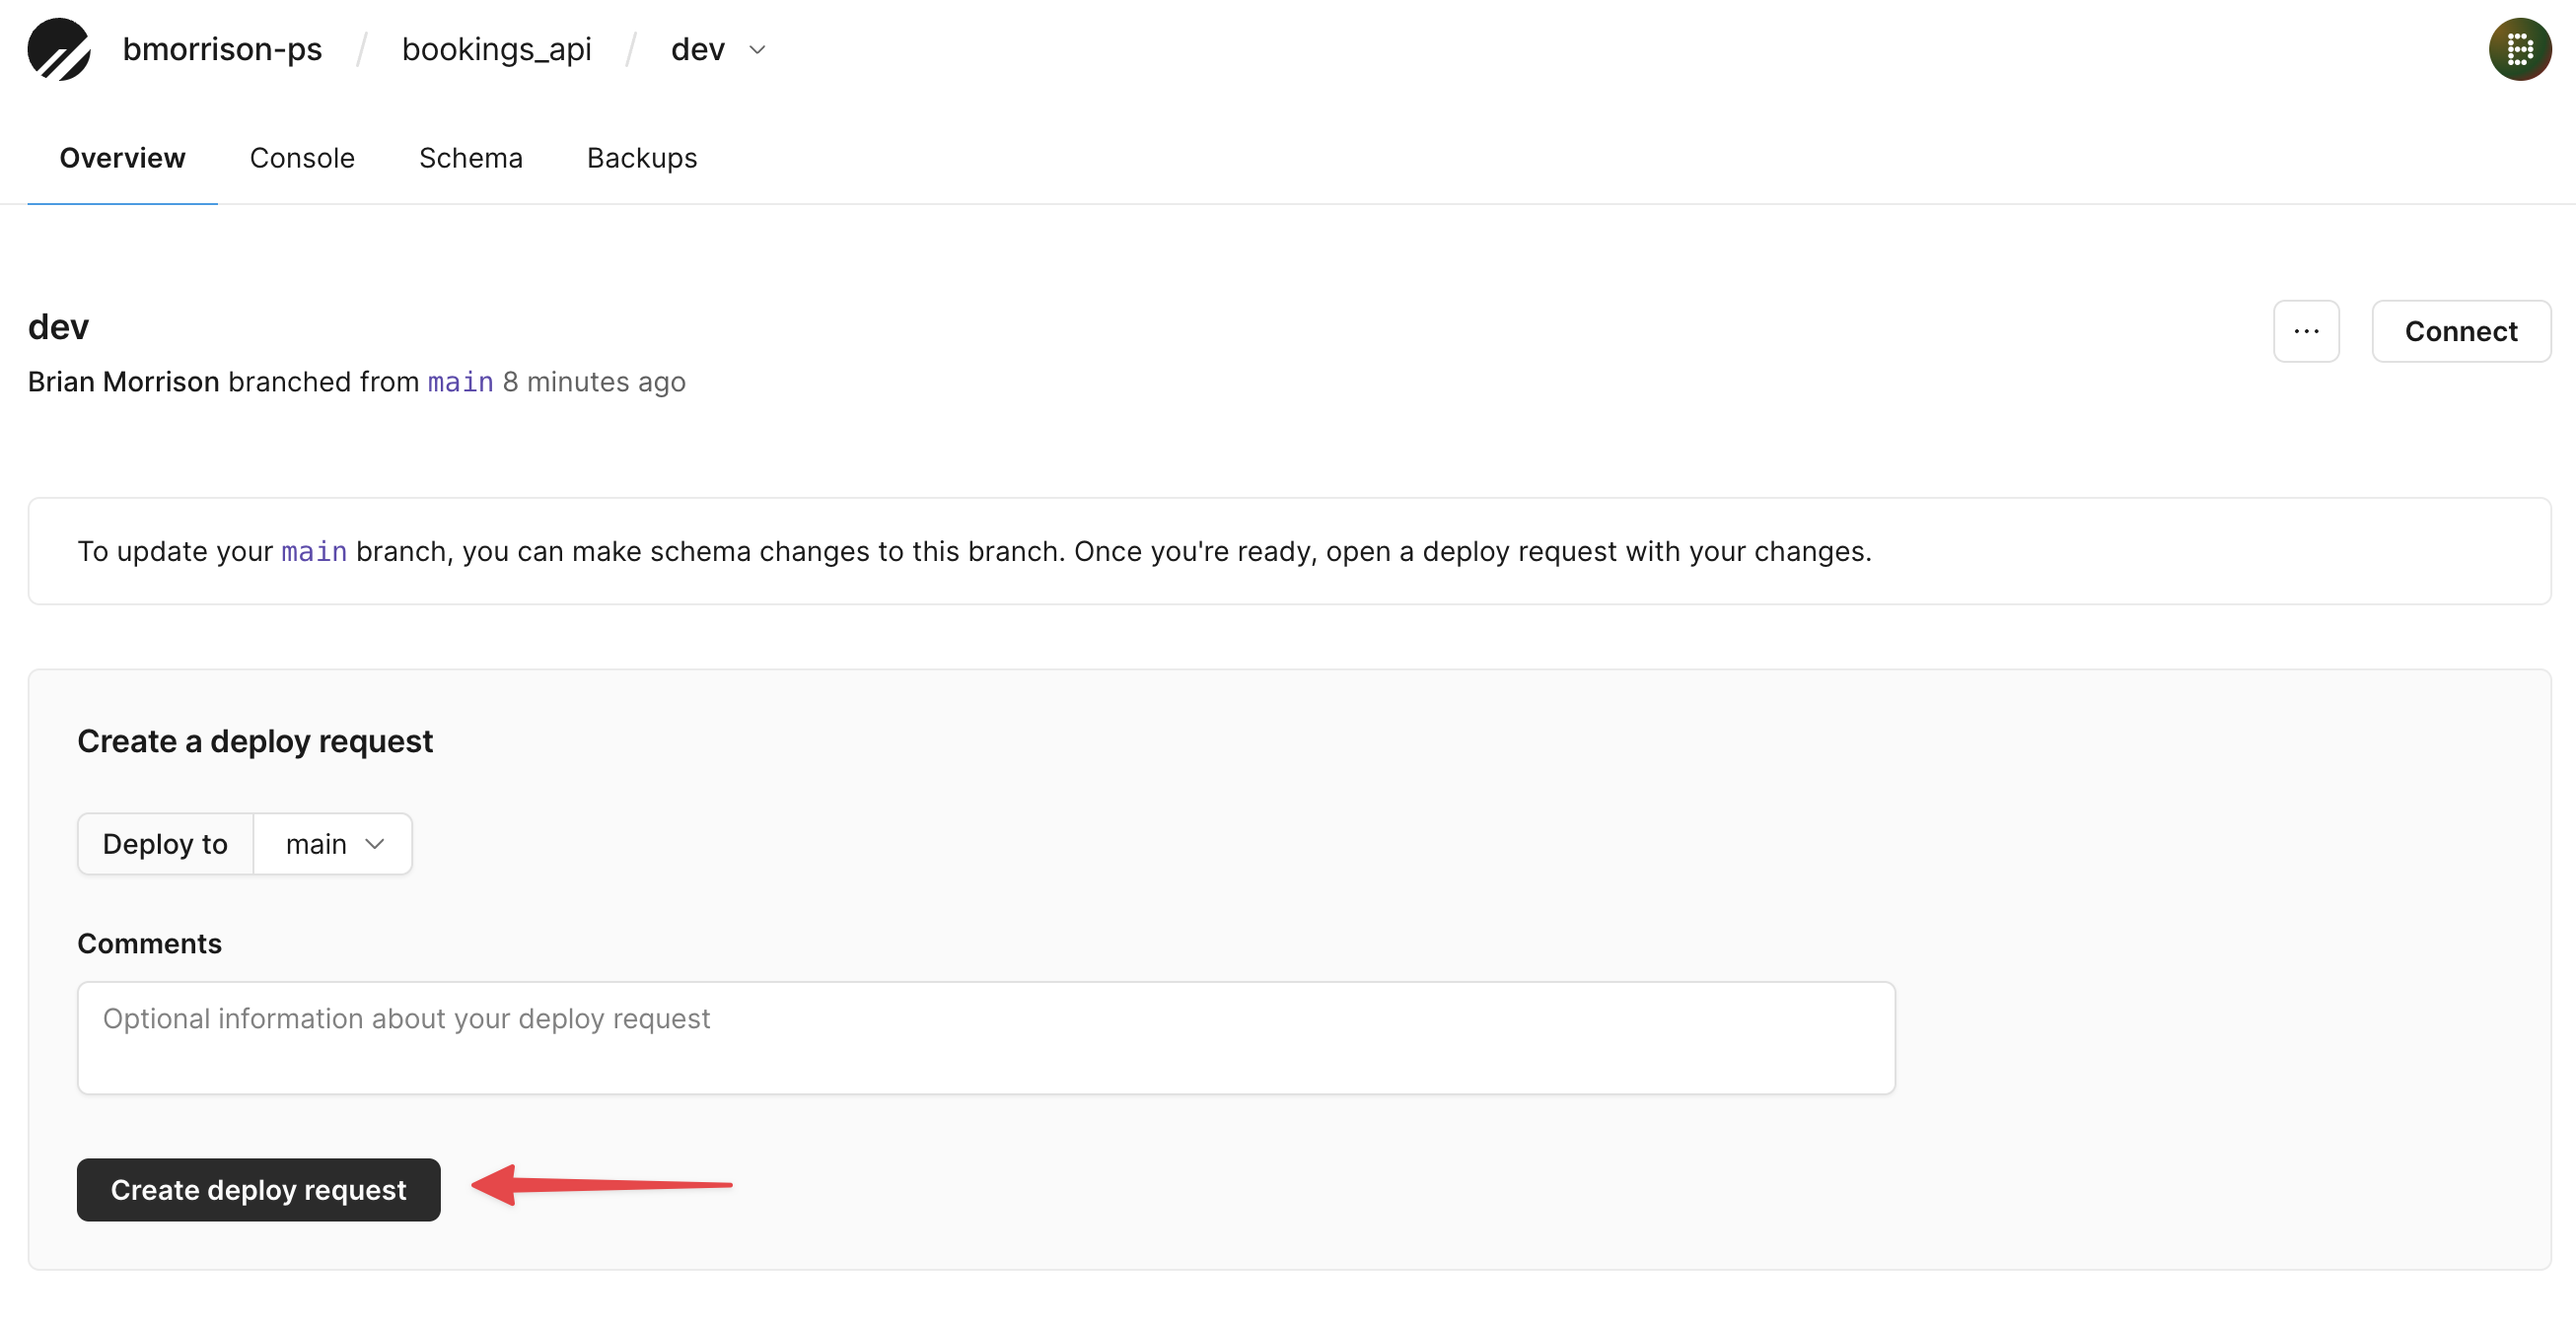
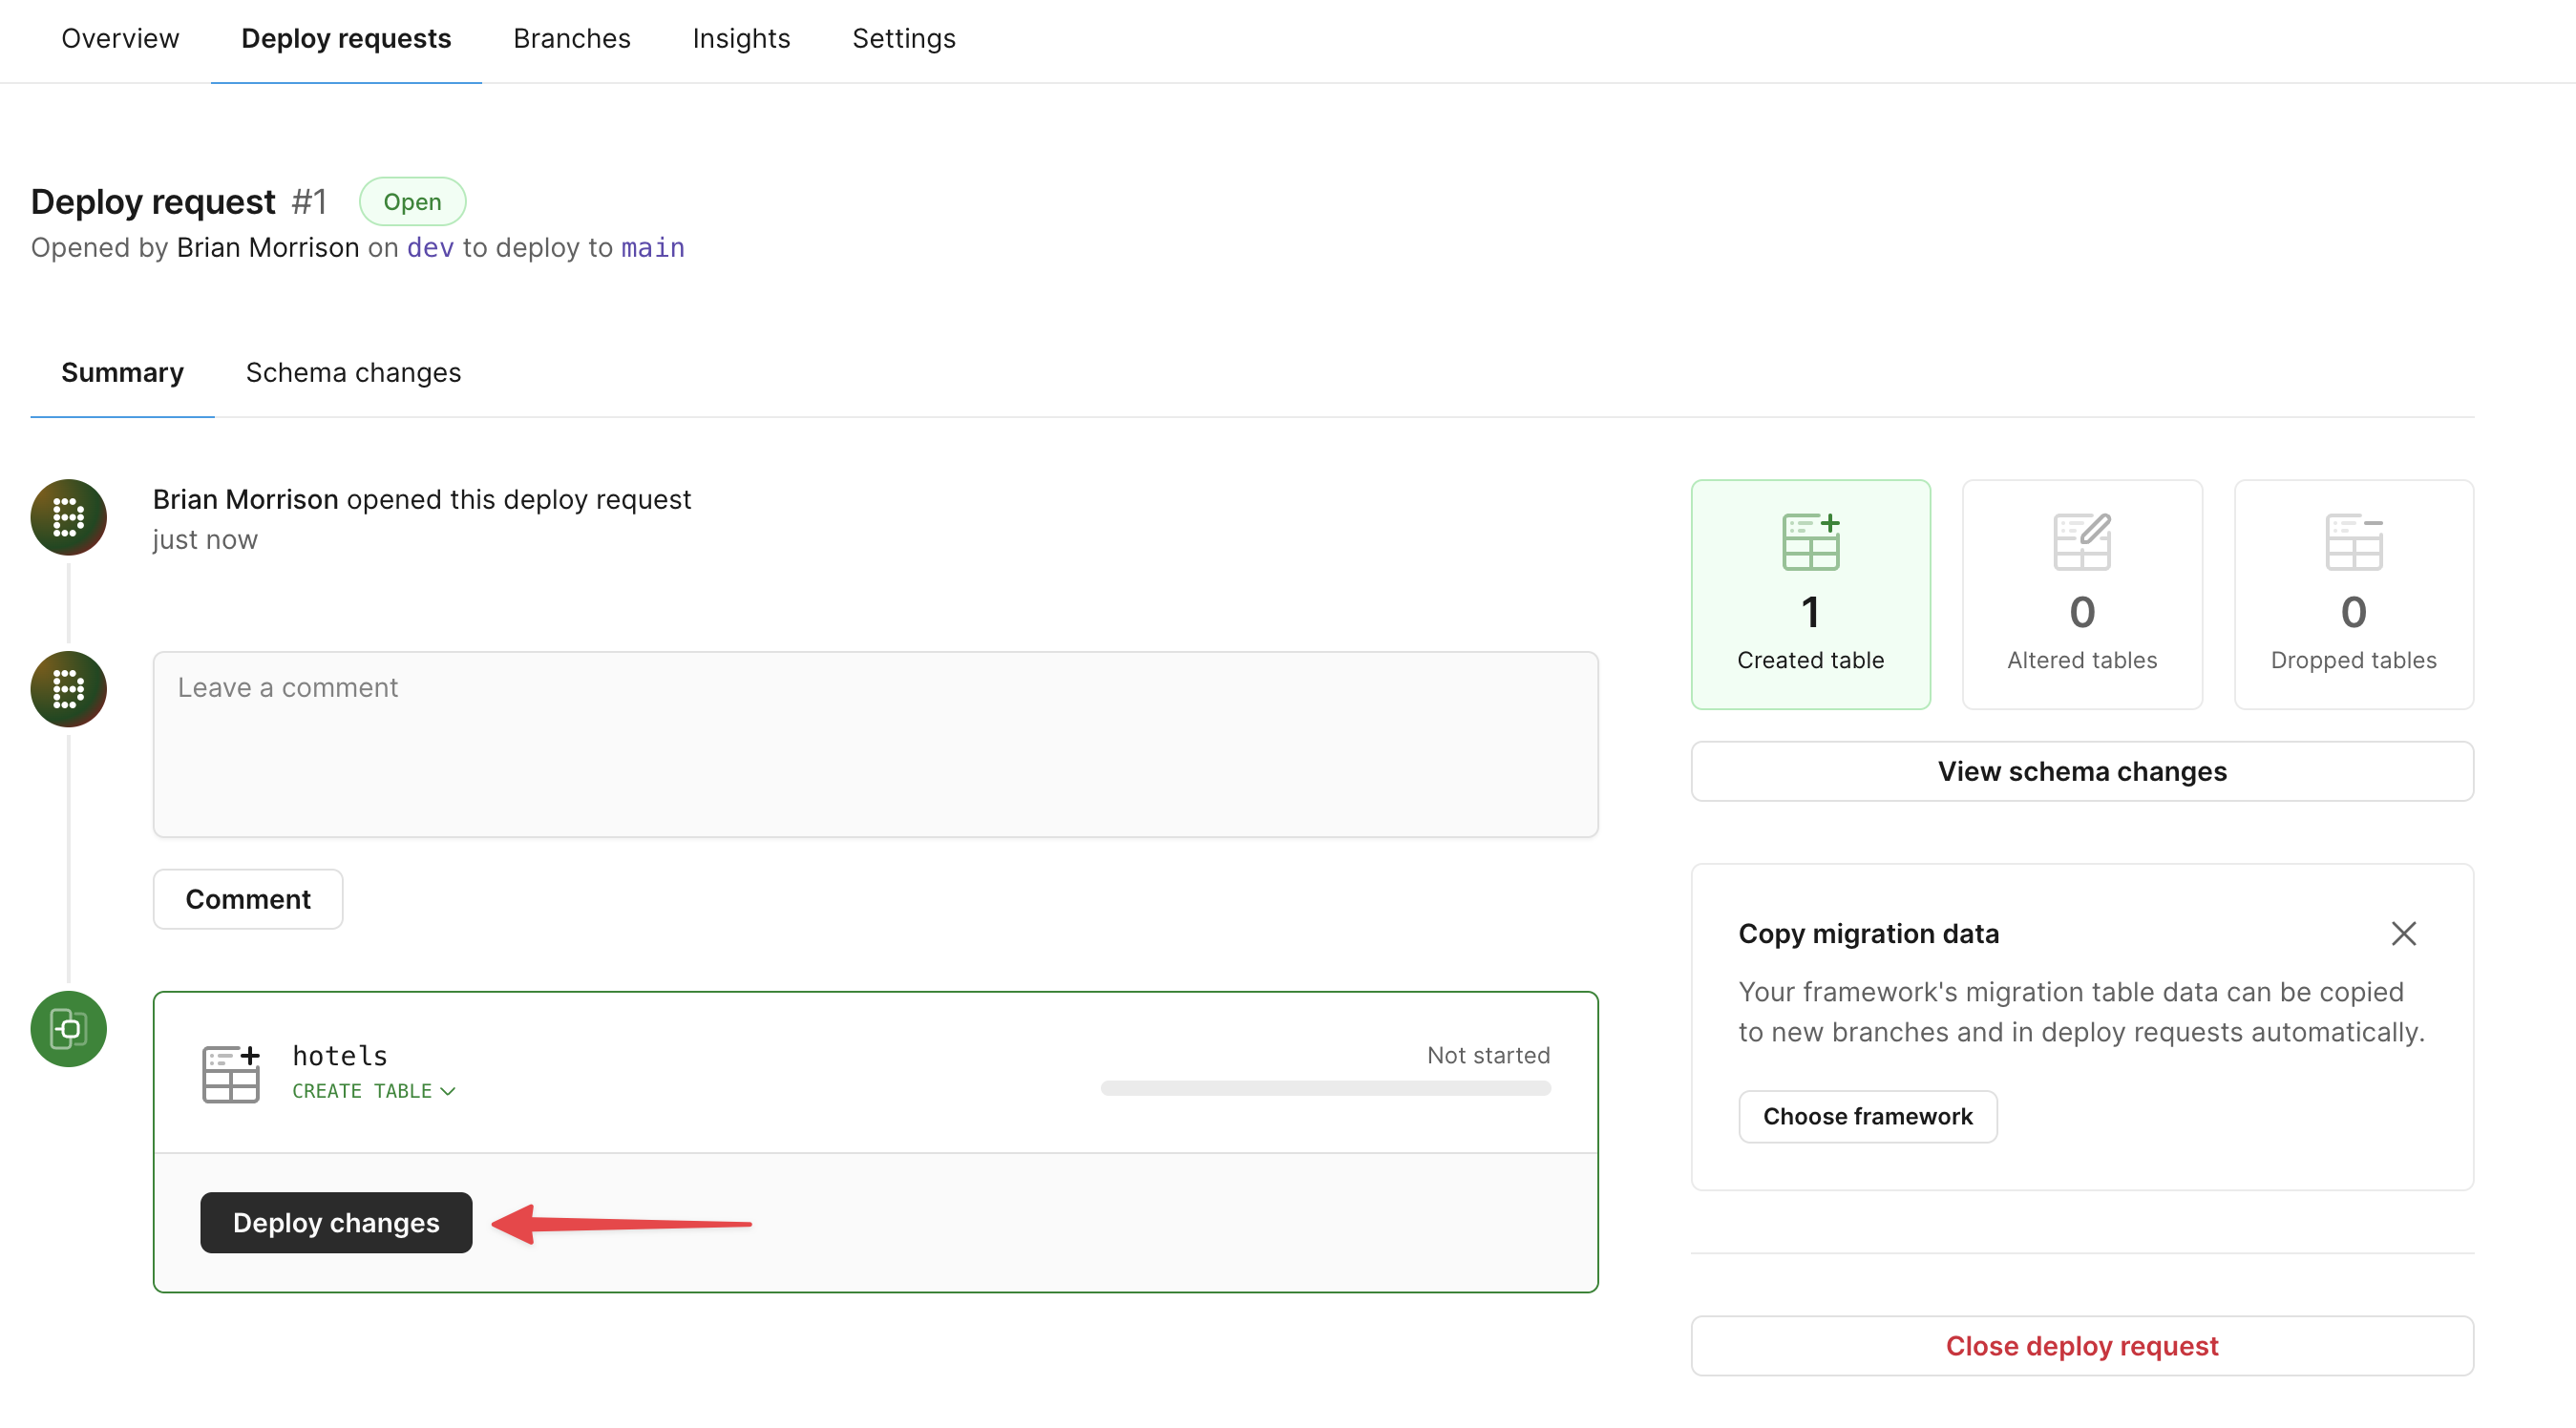
Next, let’s merge our dev branch into main. From the Overview tab of the dev branch, click on "Create deploy request".
Once PlanetScale has finished validating the changes, click "Deploy changes" and your schema changes will be applied to the main branch.
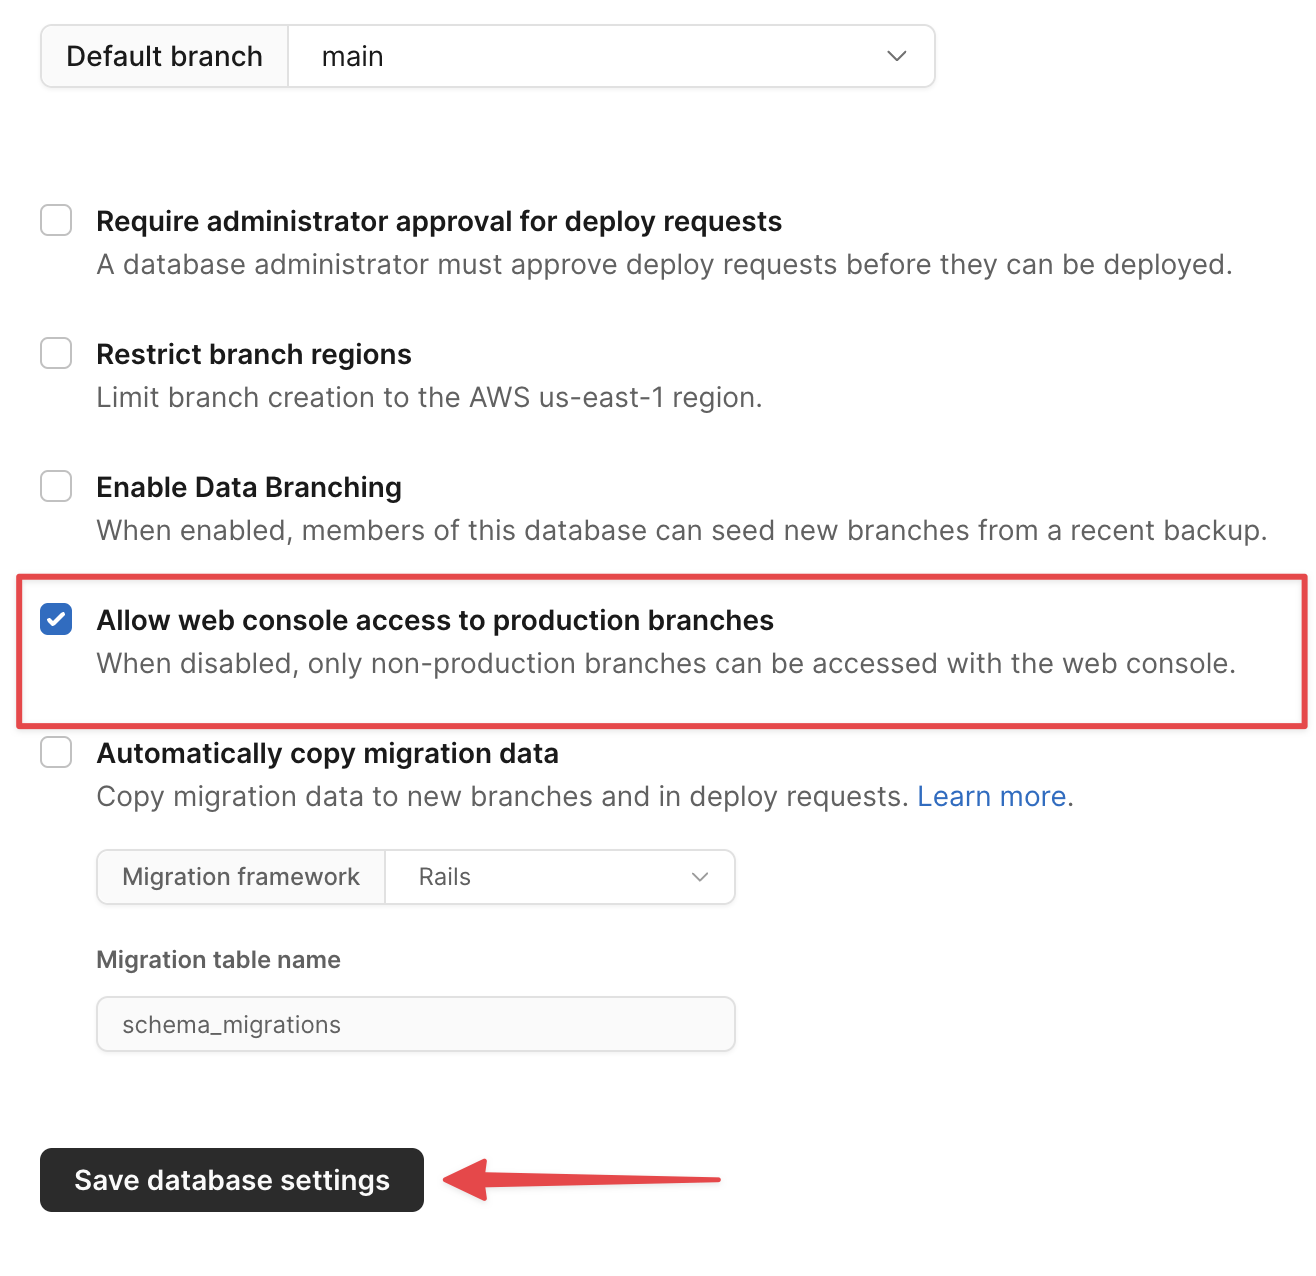
To validate that the changes have been successfully deployed, we can view the schema of the hotels table from the console. Since this database is new, we need to enable the functionality to use the console on the main branch, which is disabled by default. To do this, head to Settings and check the option for "Allow web console access to production branches". Click "Save database settings".
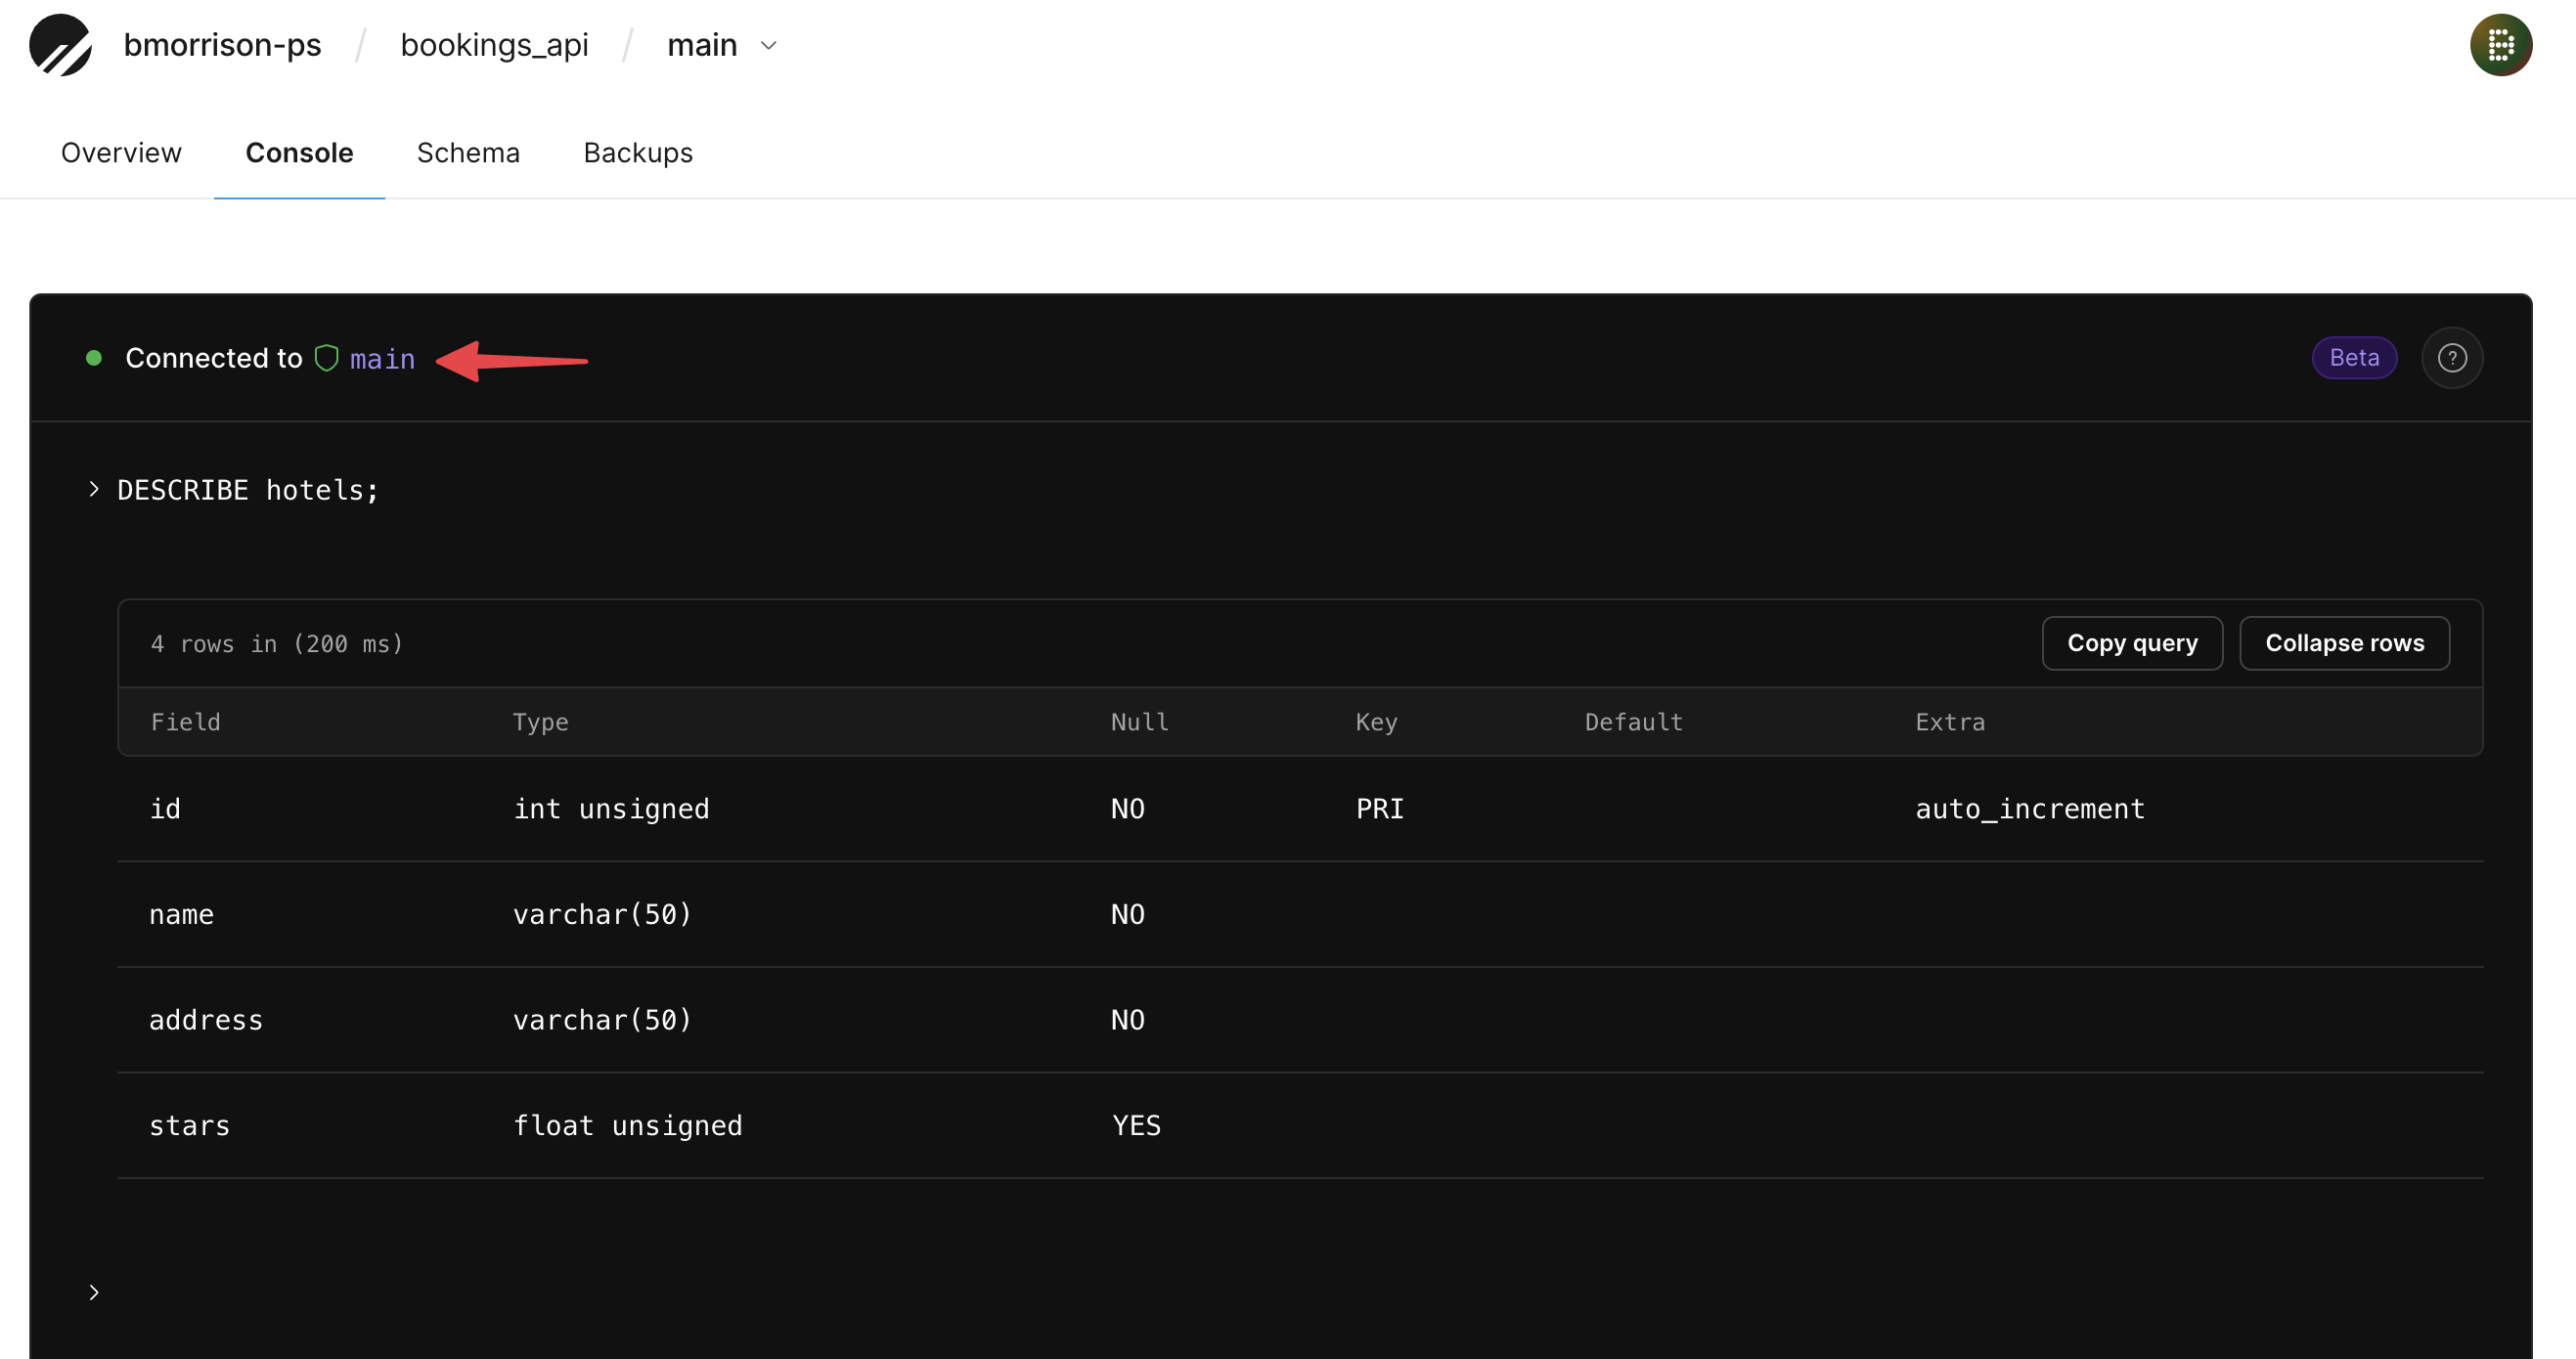
Now go to "Branches" > "main" > "Console", and run the following command.
DESCRIBE hotels;
You should see the columns that were created in the dev branch, even though you are connected to main.
Now that our database and branches are set up, we can move into configuring the necessary AWS services.
Set up AWS services#
In this section, we’ll configure a number of services in AWS:
- Elastic Container Registry (ECR) to store the Docker images for the environments.
- We’ll also manually upload the starting images to ECR.
- Two Lightsail container services will be configured, one for QA and one for Production.
Some AWS regions are not supported by Lightsail. To keep things consistent, we’ll be using the us-east-1 region throughout this guide. Before proceeding, make sure you've switched to us-east-1 using the region switcher in AWS.

Create the Elastic Container Registry
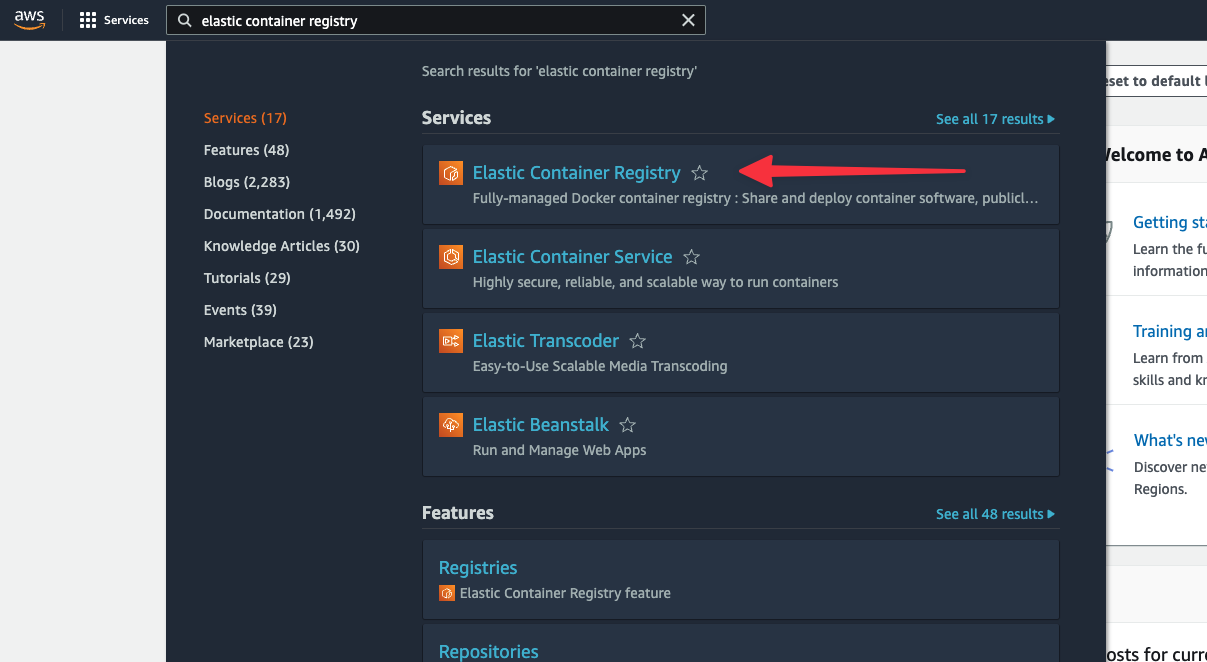
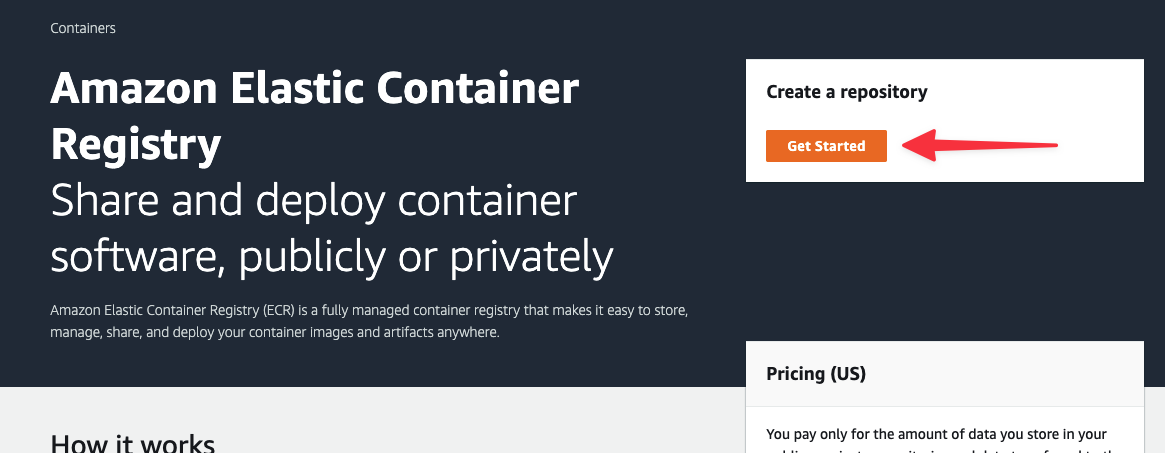
In the AWS global search, enter "Elastic Container Registry" and select that option from the results.
If you don’t have any registries created, click on "Get Started". Otherwise, click "Create repository".
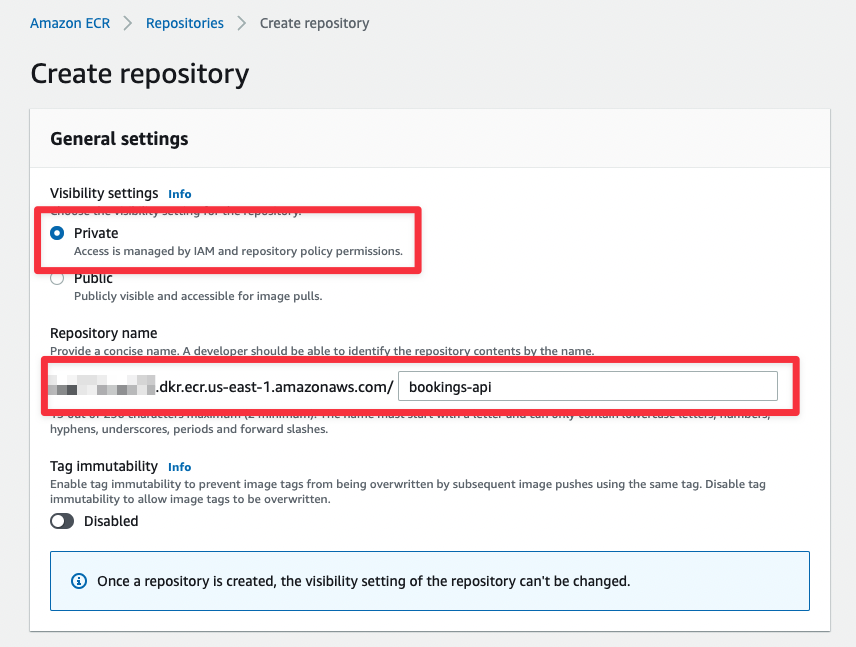
In the Create repository form, set the Visibility settings to "Private" and give the repository a name. I’ll be using bookings-api for the repository name. Scroll to the bottom and click "Create repository."
You should be redirected to your list of repositories. Grab the URI from the list and note it in that document.
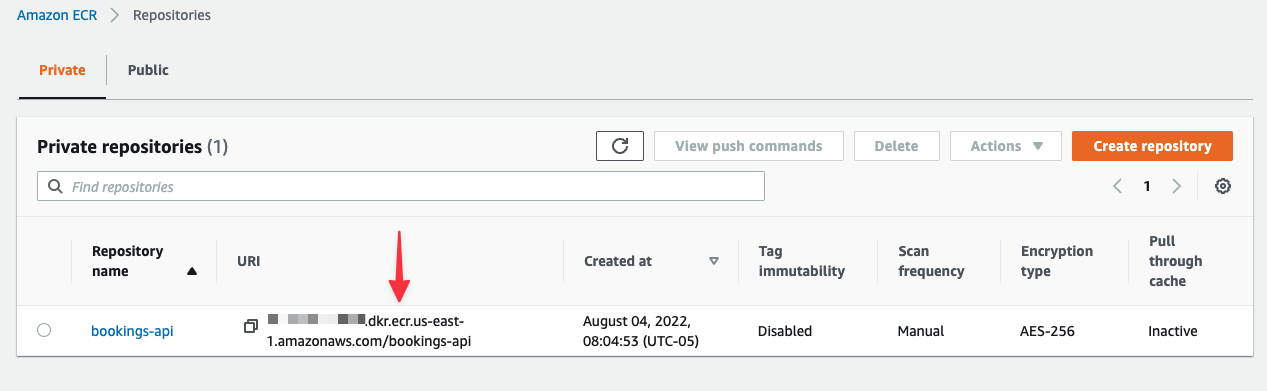
Make sure to add the Repository URI to your tracking document.
Open a terminal on your computer. Run the following command to authenticate with your new ECR repository, replacing <REPOSITORY_URI>. You should receive a message stating Login Succeeded.
aws ecr get-login-password --region us-east-1 | docker login --username AWS --password-stdin <REPOSITORY_URI>
The above command requires the AWS CLI. If you do not have it installed, follow the directions provided on AWS’s guide to installing the CLI.
Pushing to the ECR repository
Before we can deploy containers to Lightsail, we need to get an image of our container into ECR. If you haven’t done so yet, clone the forked repository to your computer. Then open a terminal in the project folder. Run the following commands to build & push the image to ECR, replacing the <REPOSITORY_URI> variable with the URI pulled from ECR.
# Build the image
docker build --platform=linux/amd64 -t bookings-api .

# Tag the 'qa' image to be pushed to ECR
docker tag bookings-api:latest <REPOSITORY_URI>:qa

# Push the 'qa' image to ECR
docker push <REPOSITORY_URI>:qa

# Tag the 'prod' image to be pushed to ECR
docker tag bookings-api:latest <REPOSITORY_URI>:prod

# Push the 'prod' image to ECR
docker push <REPOSITORY_URI>:prod
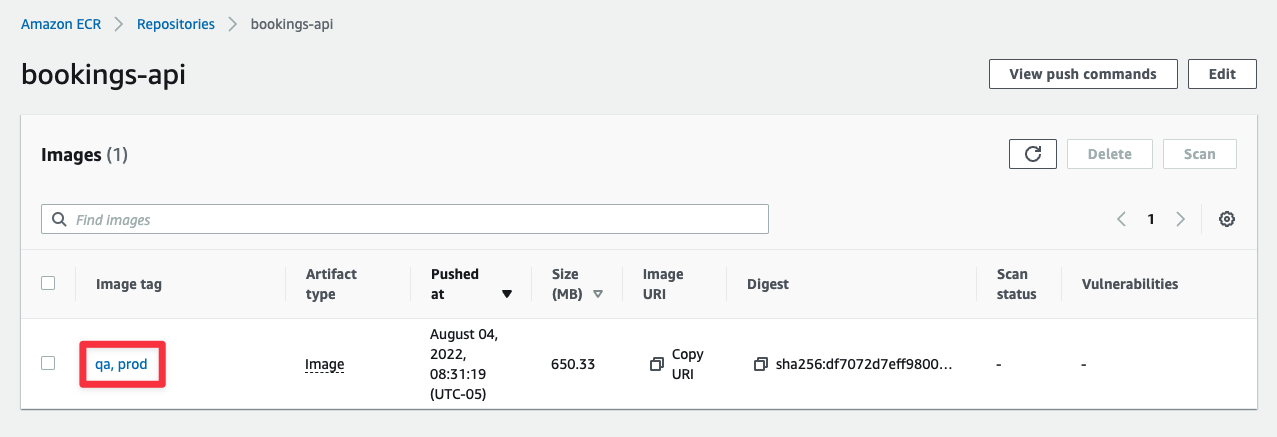
Now head back to the AWS console and open the repository you created earlier. If all was successful, you should see images tagged as prod and qa in the list.
Create the Lightsail instances
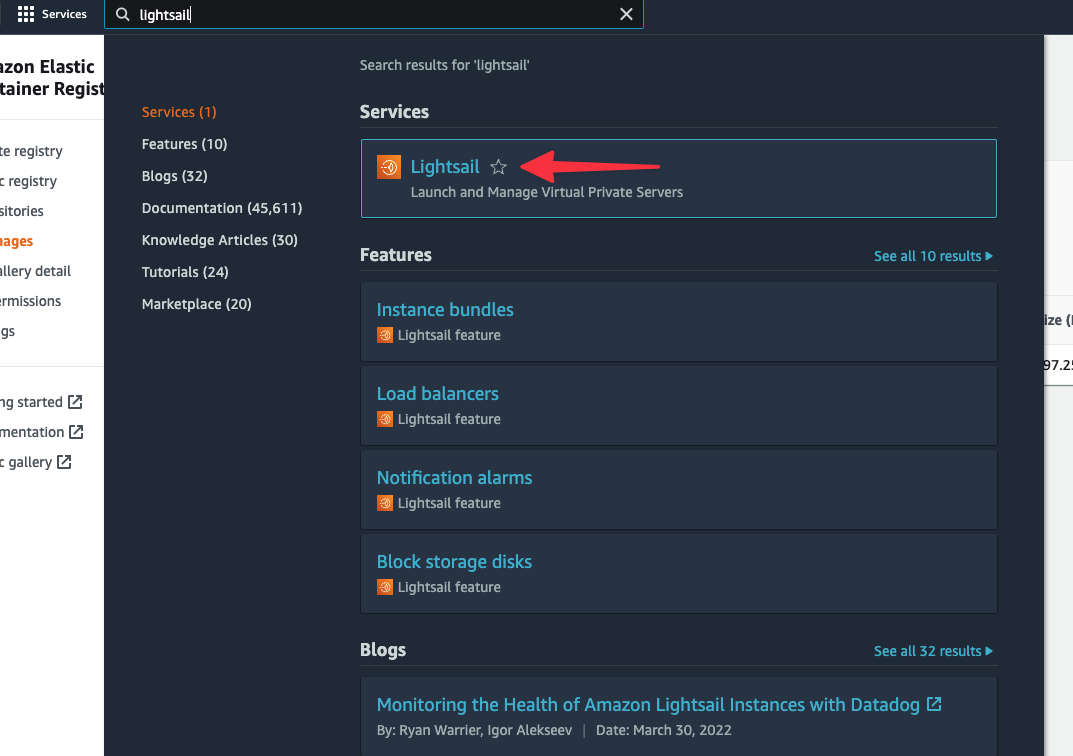
Use the AWS global search to find "Lightsail", and open it from the list of results. You’ll be redirected to a completely different UI from the standard AWS console, which is to be expected.
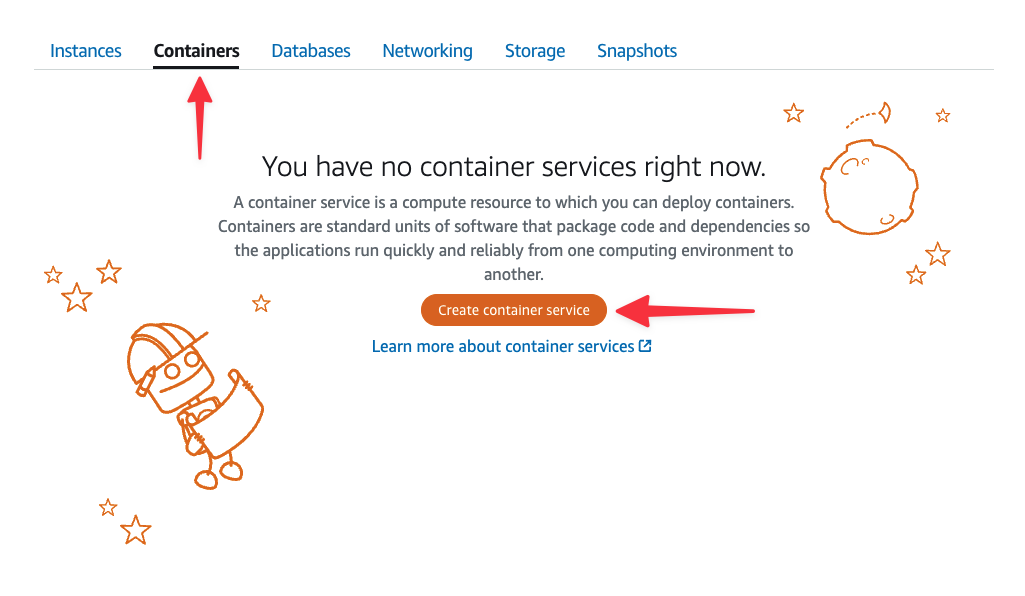
In the Lightsail dashboard, select the "Containers" tab, then "Create container service".
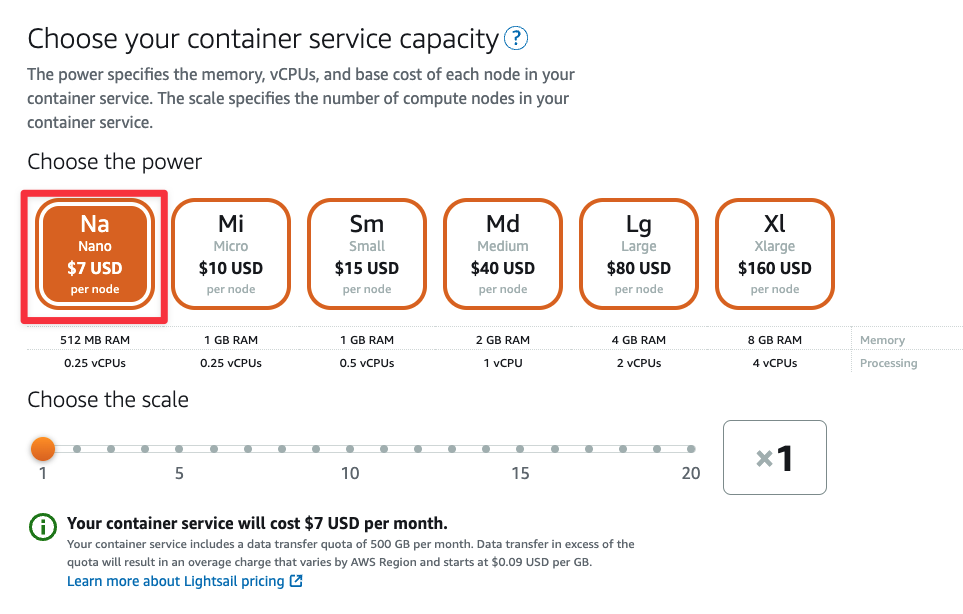
Make sure that the Container service location is set to Virginia, all zones (us-east-1). If not, click "Change AWS region" and select it from the list of available regions.
Under Choose the power, select the "Na" option to keep the cost as low as possible.
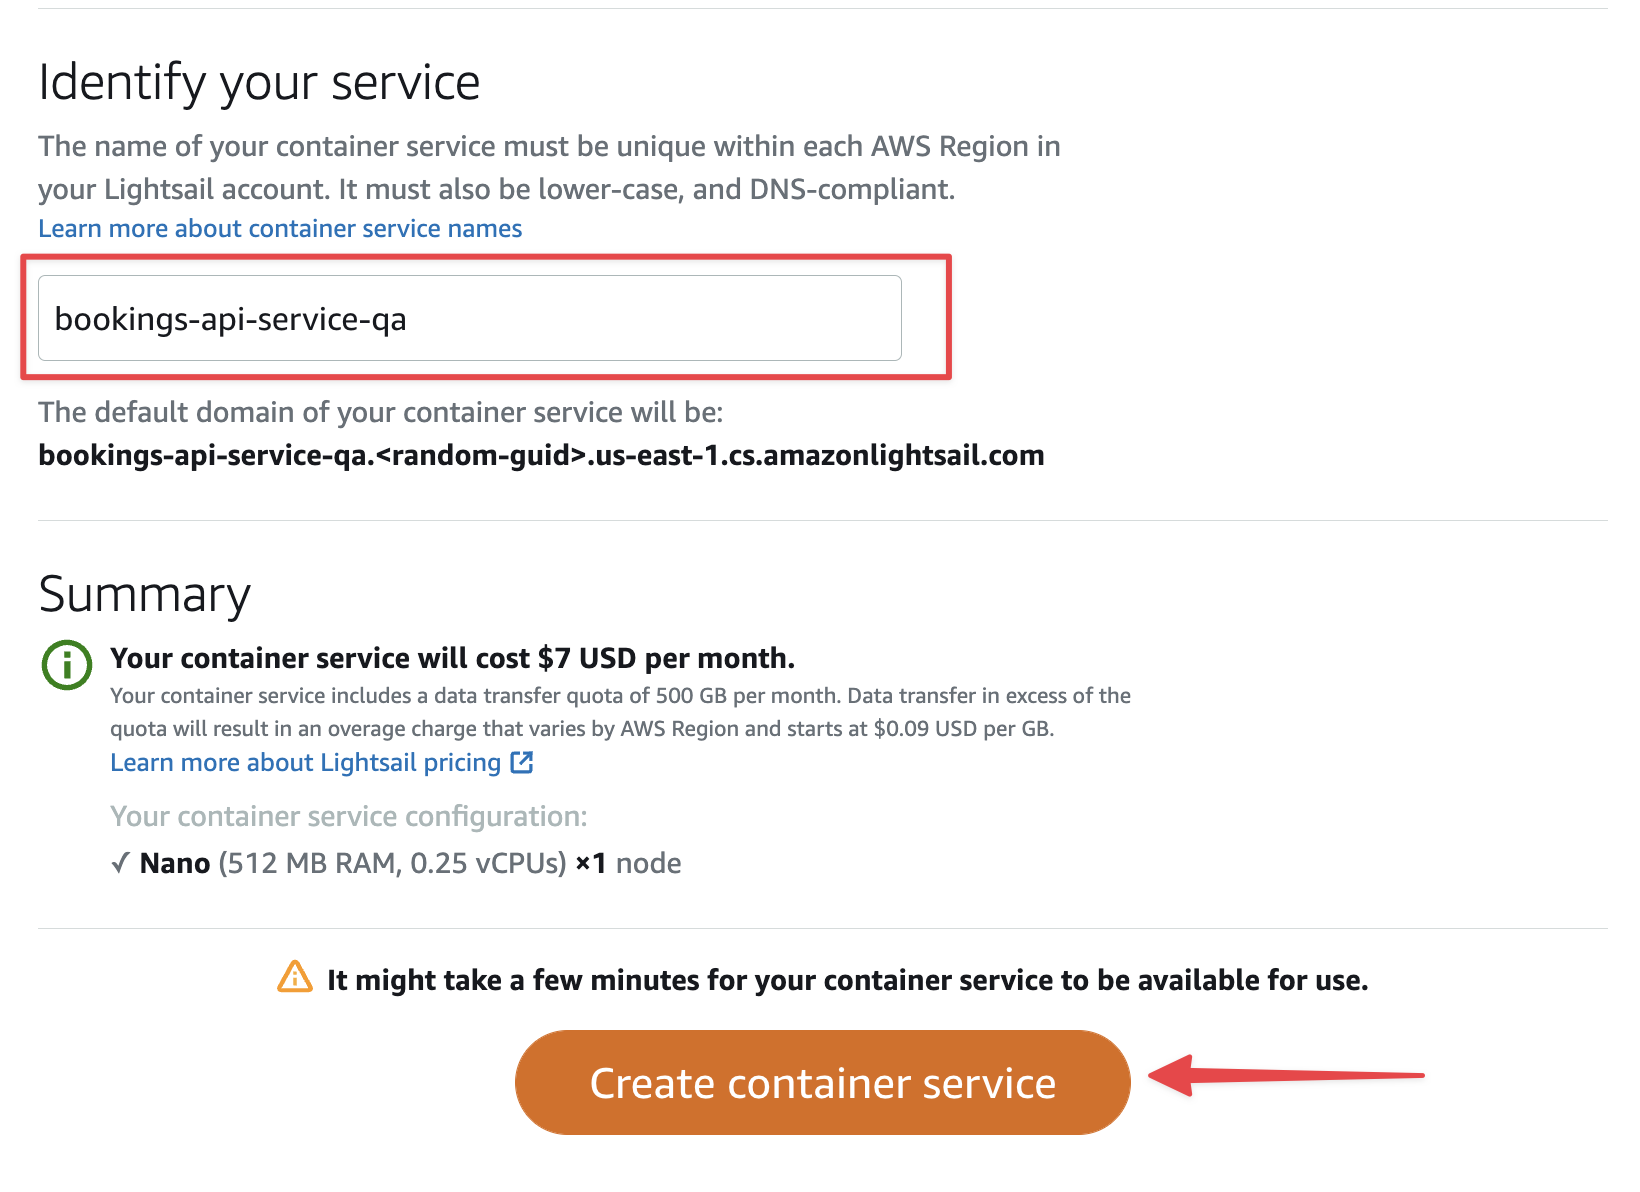
Skip the Set up your first deployment section for now. We need to configure access to our ECR instance before we can do that. Scroll down to Identify your service and give your service a name. I’ll name mine bookings-api-service-qa. Click "Create container service" to finish the setup.
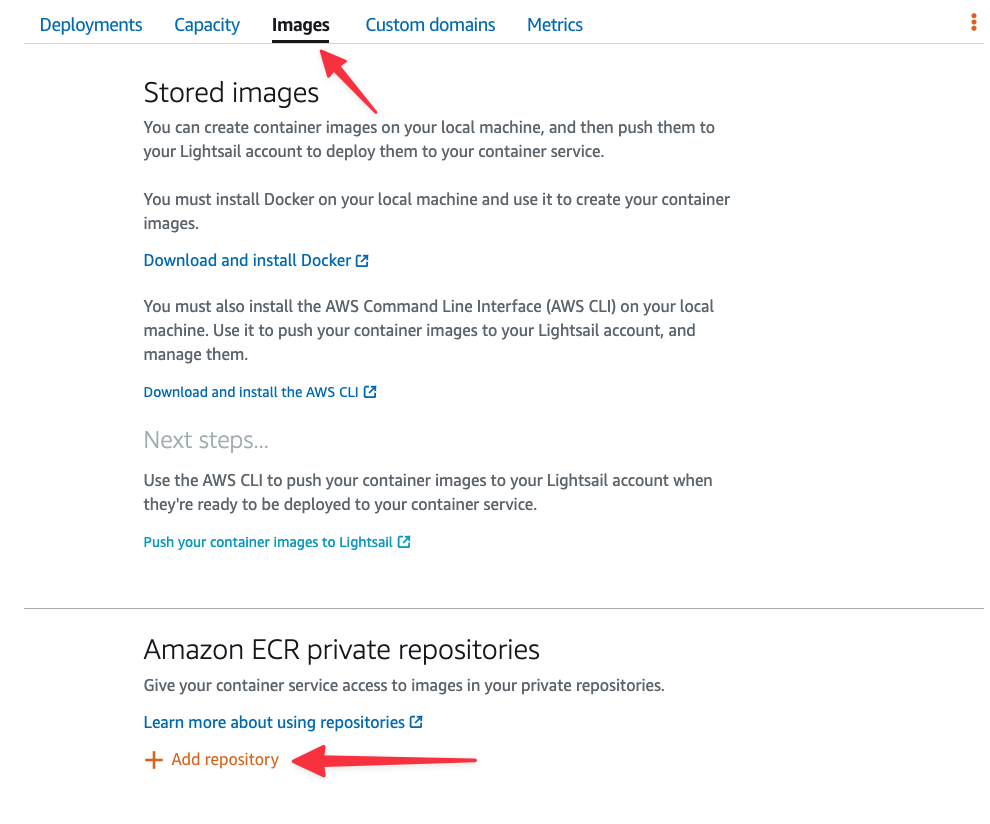
Once the container service has been created, you’ll be dropped into the dashboard for the container service. Select the Images tab, scroll to the bottom, and click "Add repository" under Amazon ECR private repositories.
Select the bookings-api repository from the list and click "Add".
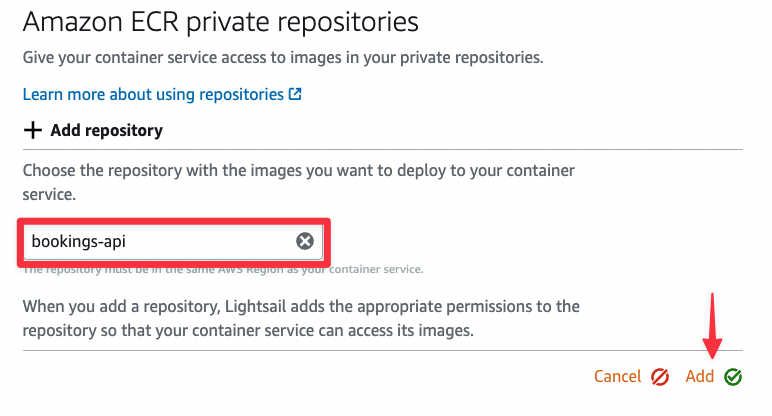
If the "Add" button is disabled, it is likely because there is a pending operation for your container service. Check the Status field in the header to make sure nothing is currently being done with the container service.
Lightsail will start provisioning the proper security permissions to permit itself to access the private ECR instance. This may take a few minutes.
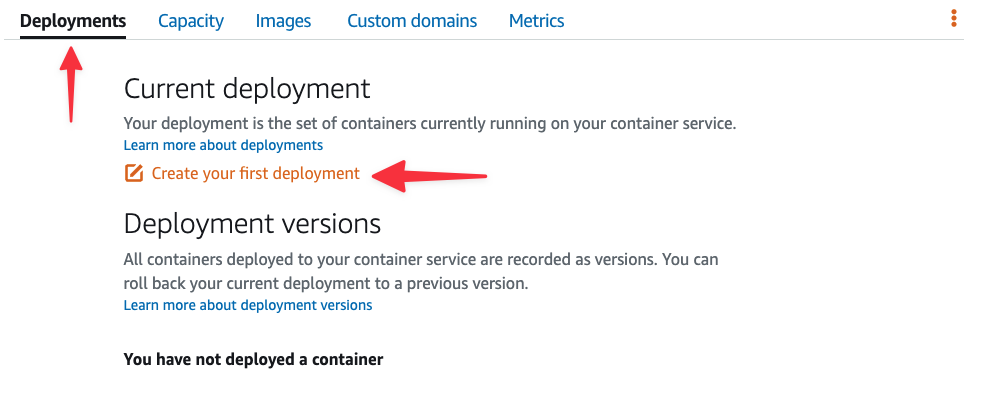
Next, select the Deployments tab and click "Create your first deployment".
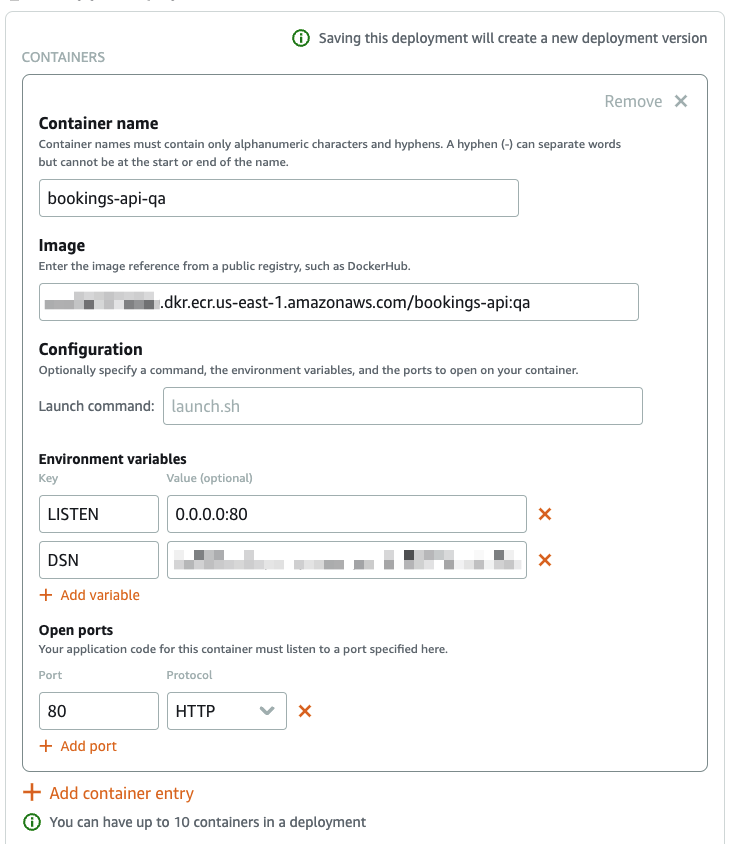
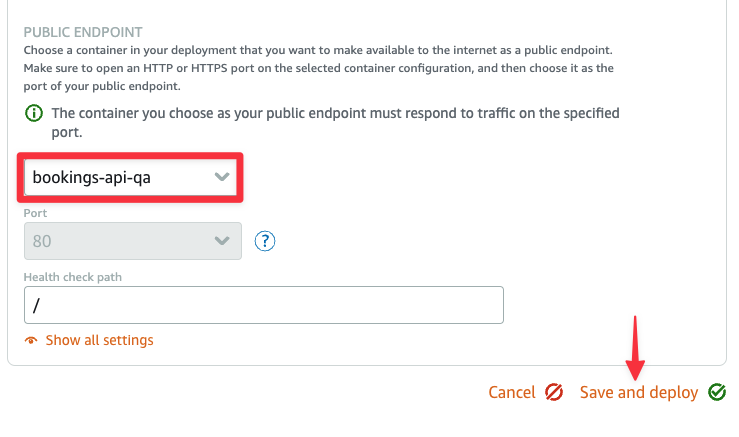
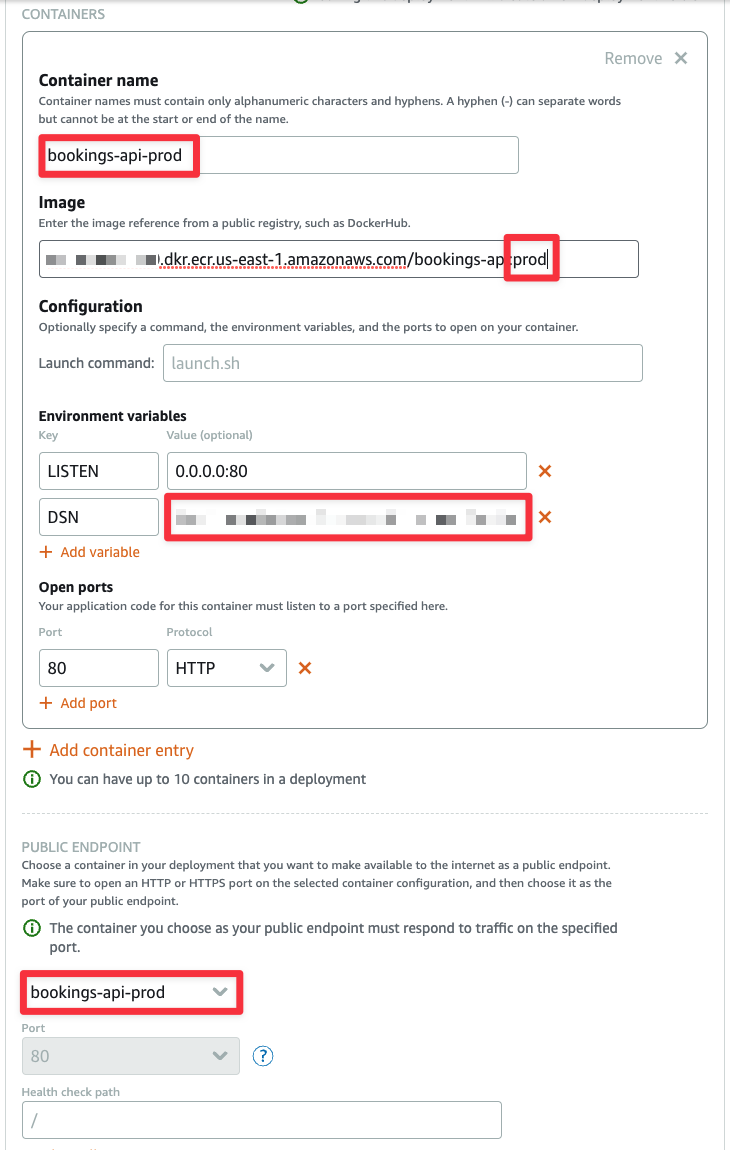
Complete the form like so:
- Container name: bookings-api-qa
- Image:
<REPOSITORY_URI>:qa - Environment variables:
- LISTEN: 0.0.0.0:80
- DSN:
<PLANETSCALE_DEV_BRANCH_CONNECTION_STRING>
- Open ports:
- 80: HTTP
In the Public endpoint section, select "bookings-api-qa". Finally, click "Save and deploy".
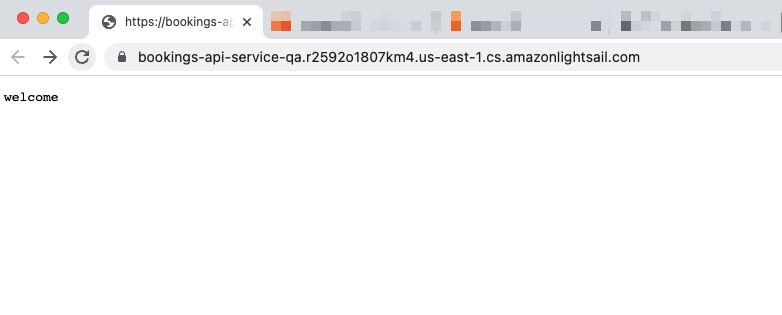
You can monitor the deployment status from the following page.

Once the status has changed to Running, you can click the URL next to Public domain to validate that things are working properly. You should receive a simple text response that says “welcome”.
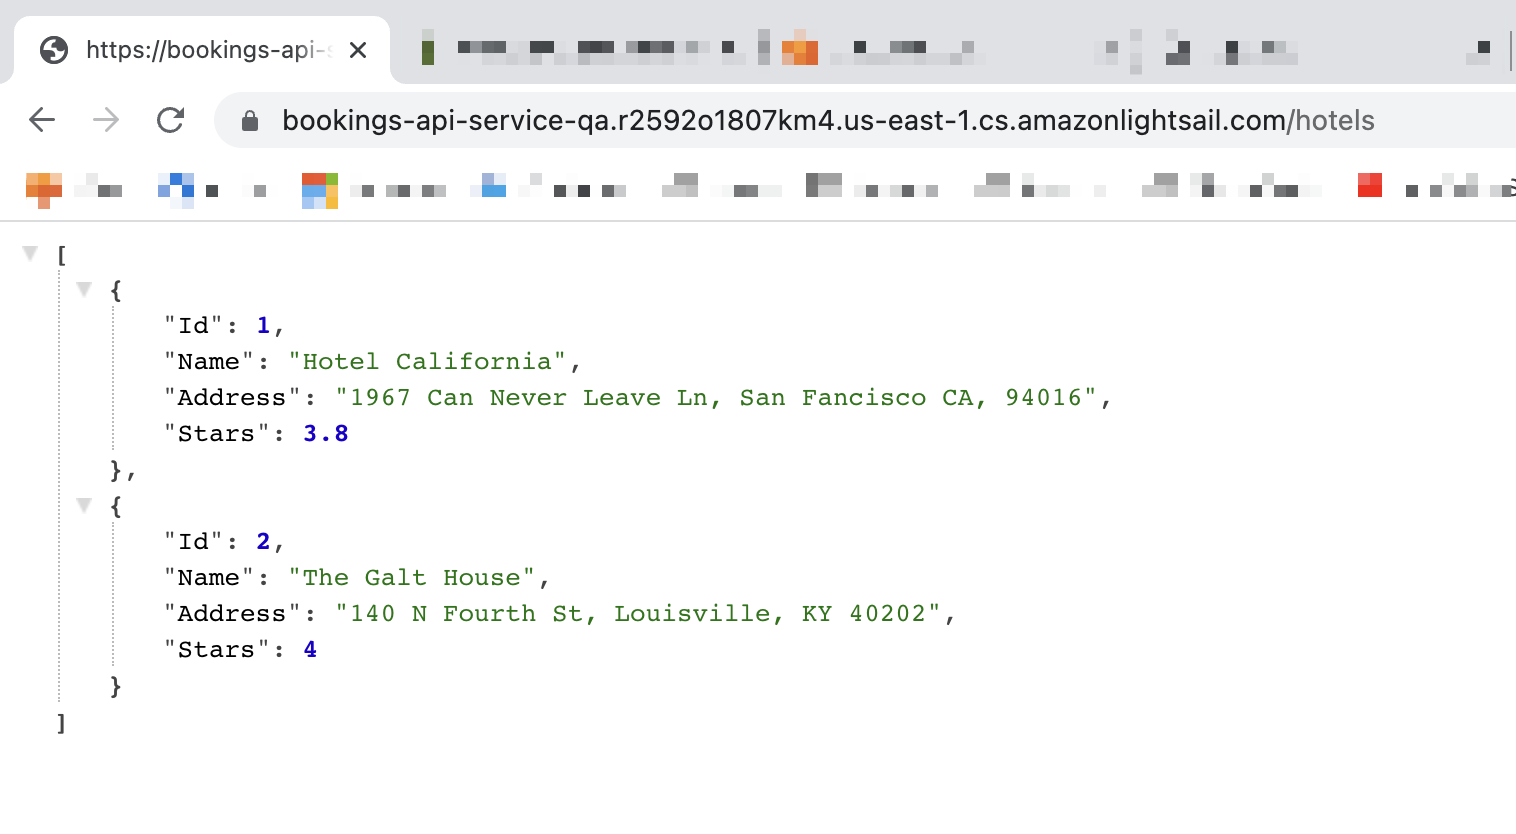
Add /hotels to the end of the URL and we should see the data from the PlanetScale database (specifically the dev branch).
Now you’ll need to essentially repeat these same steps (create a container service, create an image, and set up the deployment) for the production branch. The main difference will be when setting up the deployment. When creating the container service, set the name to bookings-api-service-prod.
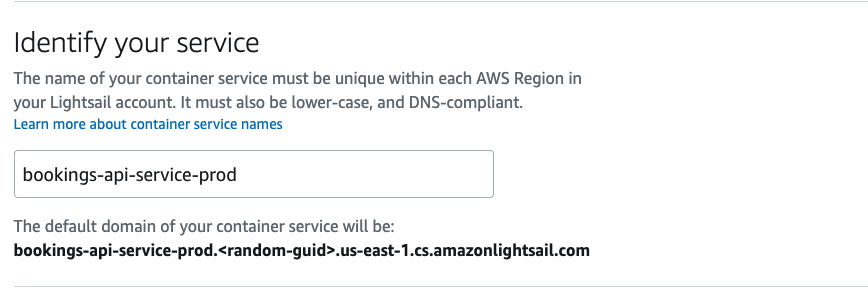
Make sure to permit access to your ECR instance before configuring the deployment. You’ll also need to make sure to update the image tag and the DSN environment variable with the connection string from the main branch of the PlanetScale database.
Generate a Docker Hub Token#
Now let’s take a detour and talk Docker Hub. Since Docker Hub limits image pulls based on IP address by default, the chances of our automated system in AWS having that limit already hit are pretty high since it’s a shared environment. In order to bypass this, we’ll need to generate a token for our user account and use that during the build process in AWS.
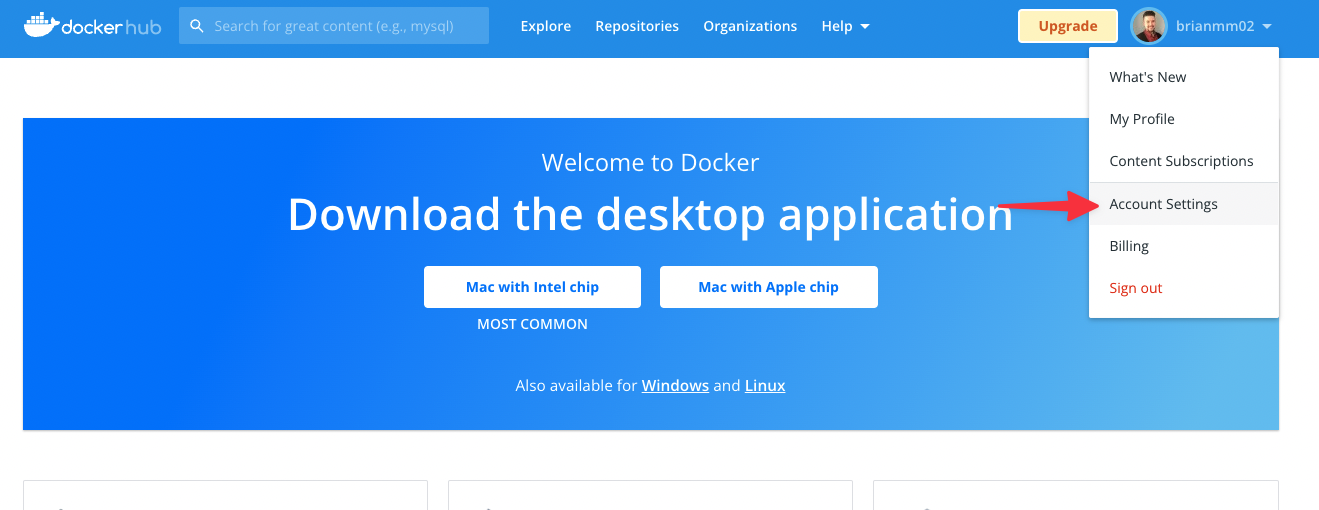
Log into Docker Hub and navigate to "Account Settings".
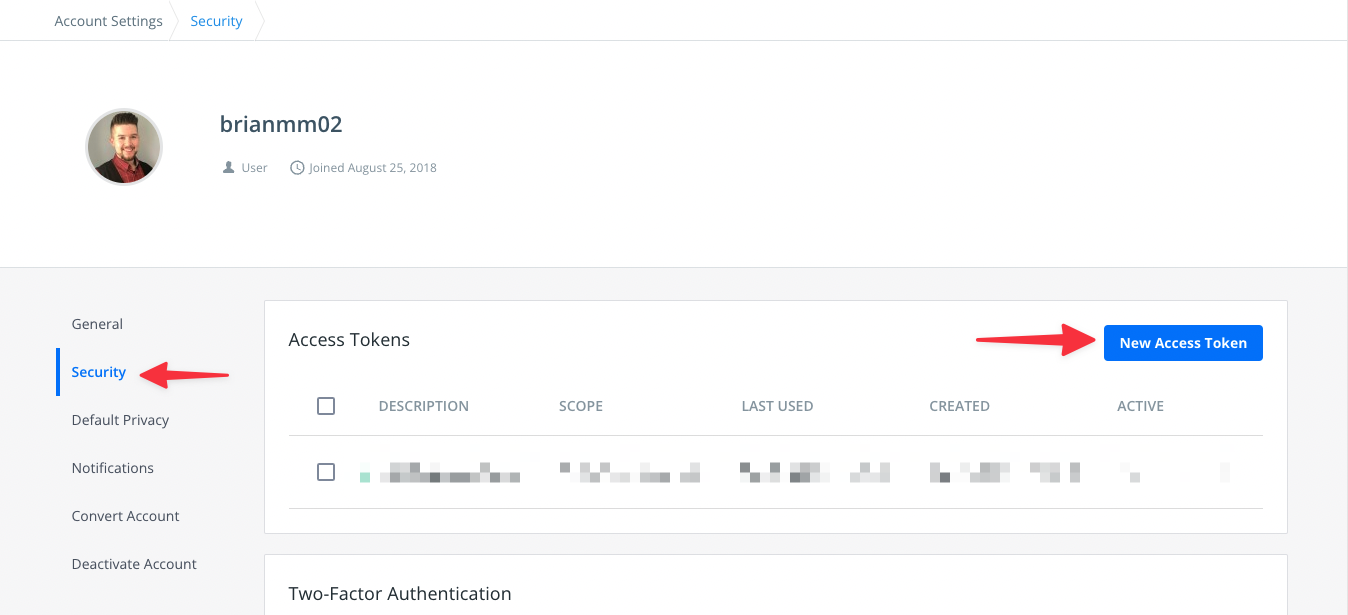
Now select "Security" from the left nav, then "New Access Token".
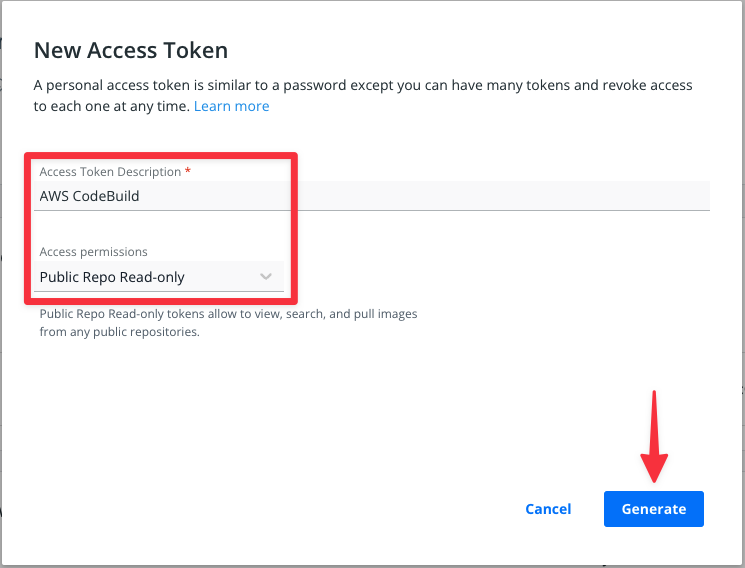
In the modal, give the access token a description and set the permissions to "Public Repo Read-only". This limits what the token can actually be used for with your account. Click "Generate" to get the token.
Take note of this token as it won't be able to be retrieved again (although you can pretty easily delete this one and create another). Once you are done, you can exit Docker Hub as we won't need to come back.
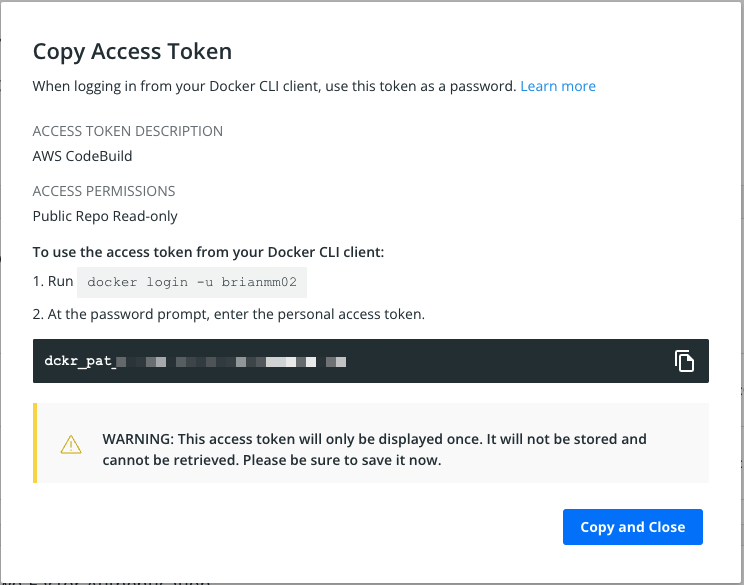
Make sure to add the Docker Hub token and your username to your tracking document
Build the pipeline in AWS#
Now that the resources to host the API are configured in AWS, we can start building the pipeline that will handle both deploying new versions of the code into each environment, but also promote schema updates to the database in PlanetScale. Here is a list of tasks we will accomplish in this section:
- Create a CodeBuild project for QA which will build and deploy the container to ECR and Lightsail.
- Modify the IAM role for QA to give it the necessary permissions to deploy to ECR and Lightsail.
- Create a CodeBuild project for Production which will do the same as above, as well as merge database changes in PlanetScale.
- Modify the IAM role for Production to give it the necessary permissions.
QA
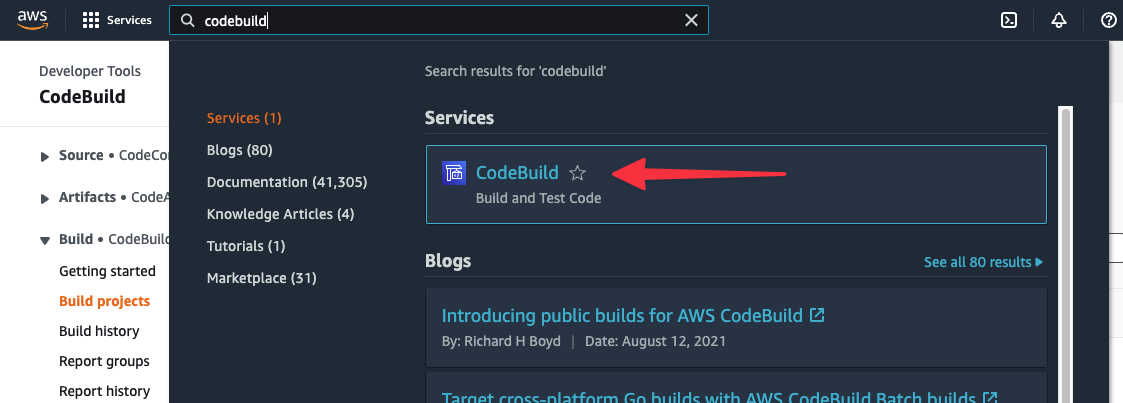
We’ll need to perform most of the following steps for both the QA and the Production builds, but we can start with the QA environment. Start by using the AWS search to find ‘CodeBuild’, and select it from the list of results.
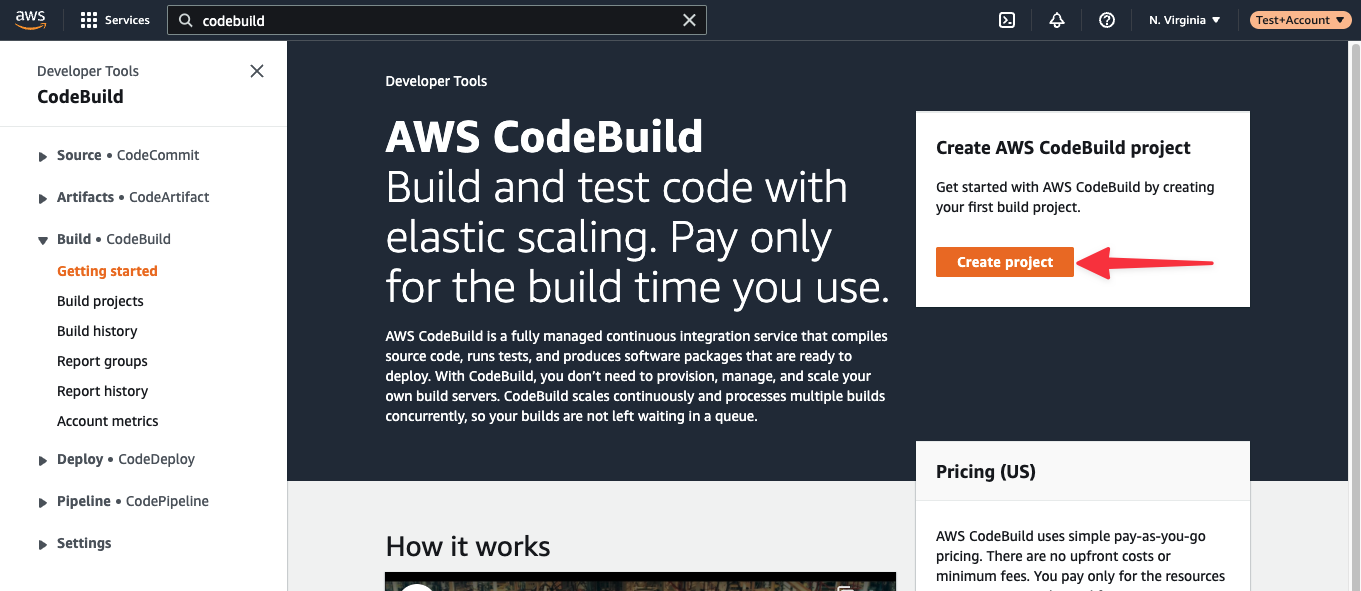
Click "Create project" to start building the QA project.
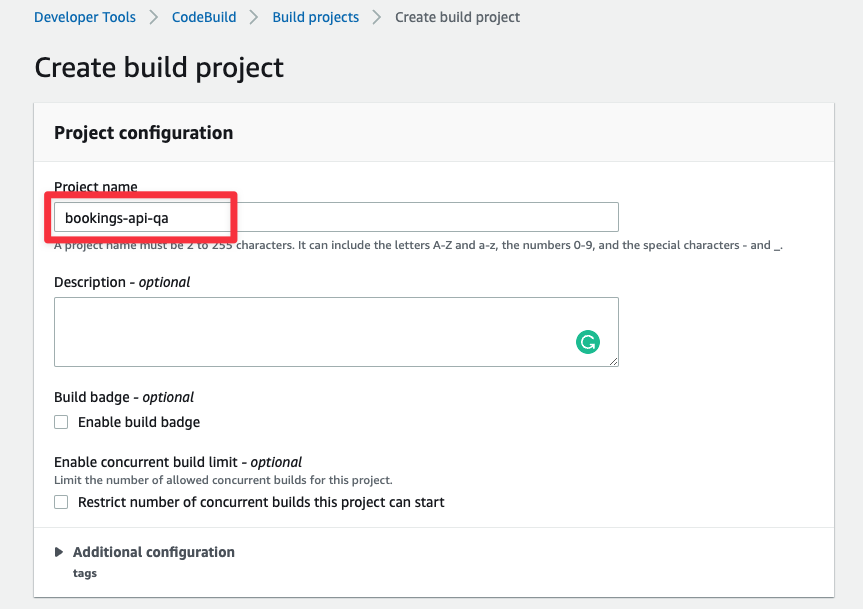
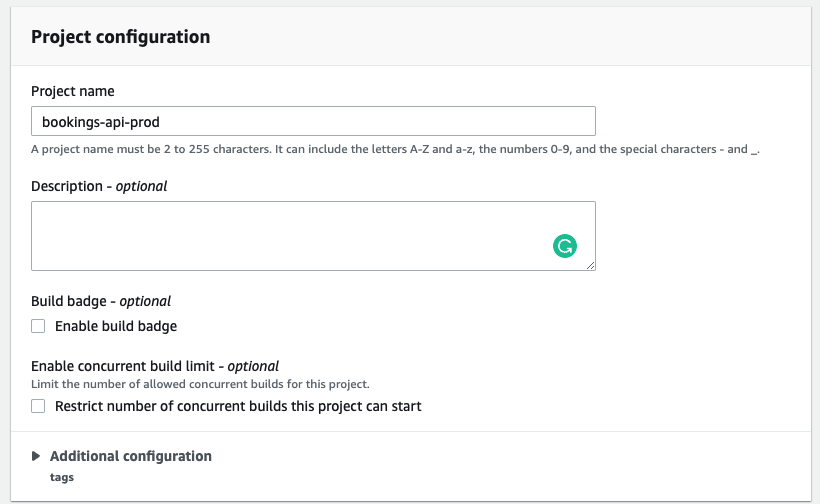
We’ll step through the Create build project form section by section as there are a number of things to set up here. Under Project configuration, name the project bookings-api-qa.
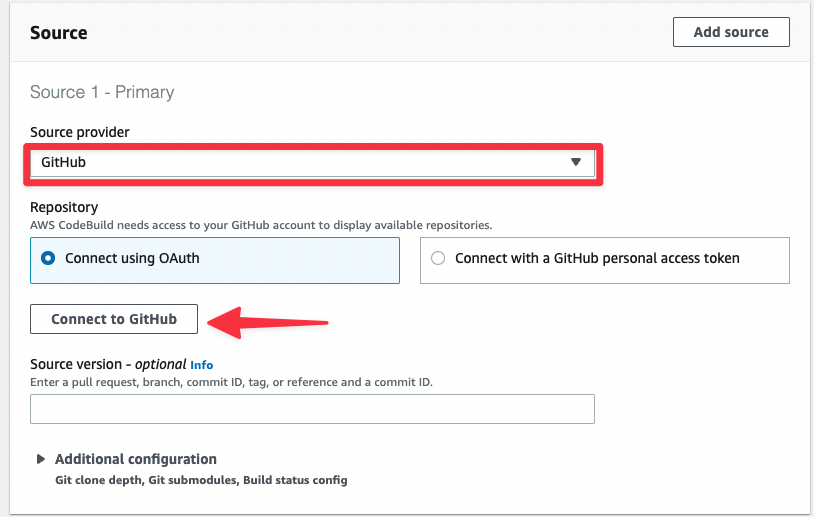
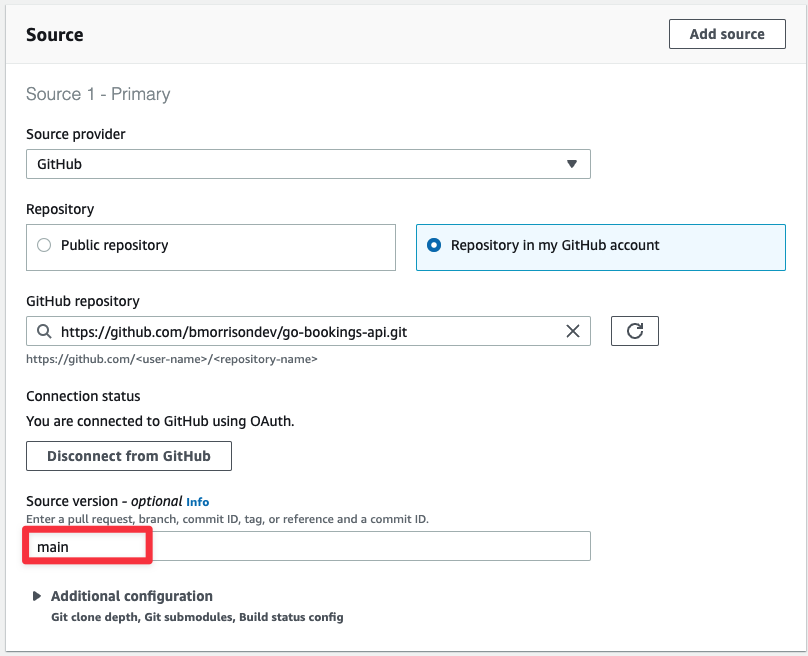
In the Source section, select "GitHub" from the Source provider dropdown. If you’ve already connected your GitHub account, you’ll be able to select from a list of repositories you own, otherwise, you can connect using the "Connect to GitHub" button. This will step you through connecting AWS CodeBuild to your GitHub account.
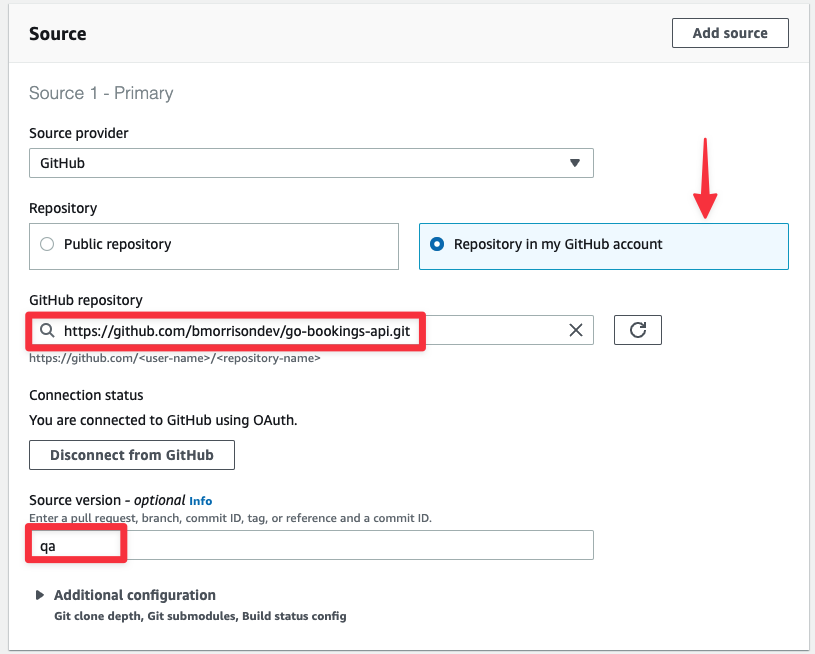
Once you’ve connected, you’ll get a few more options in this section. Select "Repository in my GitHub" account and use the search under GitHub repository to find the forked version of the code we’ve been using throughout this guide. Set Source version to “qa” since this is the branch we want to build in this project.
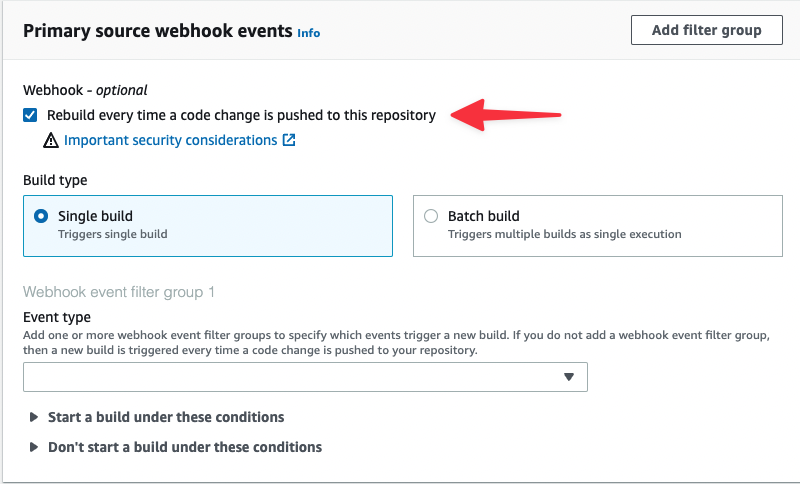
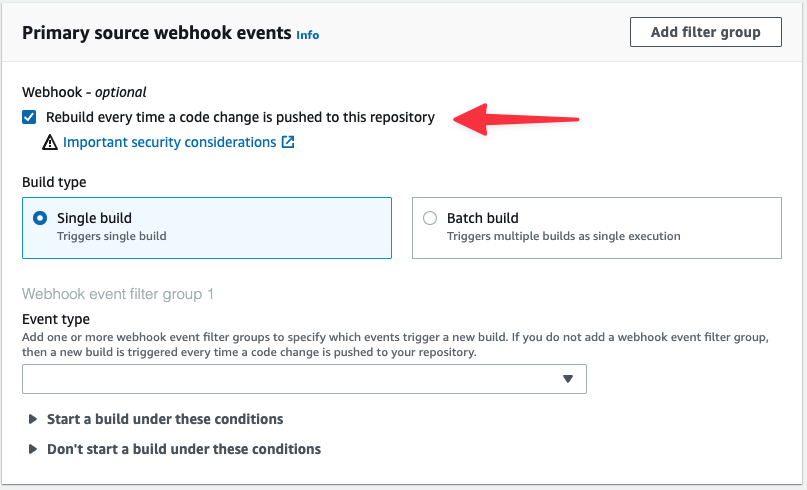
In the Primary source webhook events, check the box labeled "Rebuild every time a code change is pushed to this repository". This will allow AWS to configure GitHub to notify AWS when a change is made to the QA branch and to trigger a build on it.
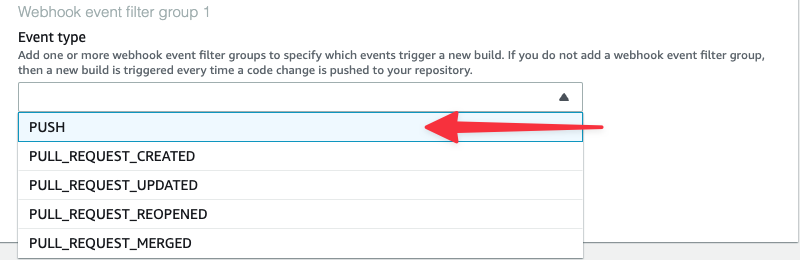
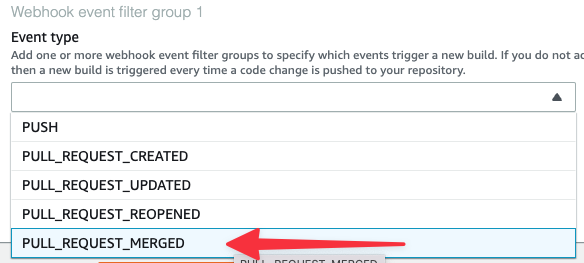
Under Event type, select "PUSH" from the list, which will set up the webhook in GitHub to only send a message when commits are pushed to the repository.
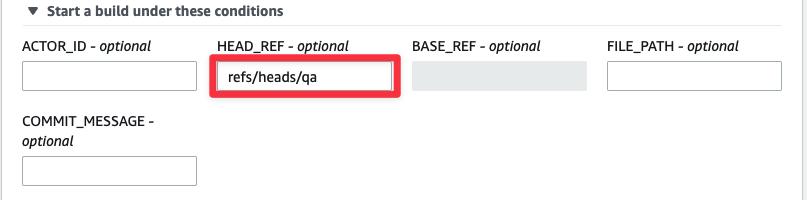
Expand the Start a build under these conditions toggle and add “refs/head/qa” to the HEAD_REF field. This will tell CodeBuild to only execute this build if a commit was pushed to the qa branch.
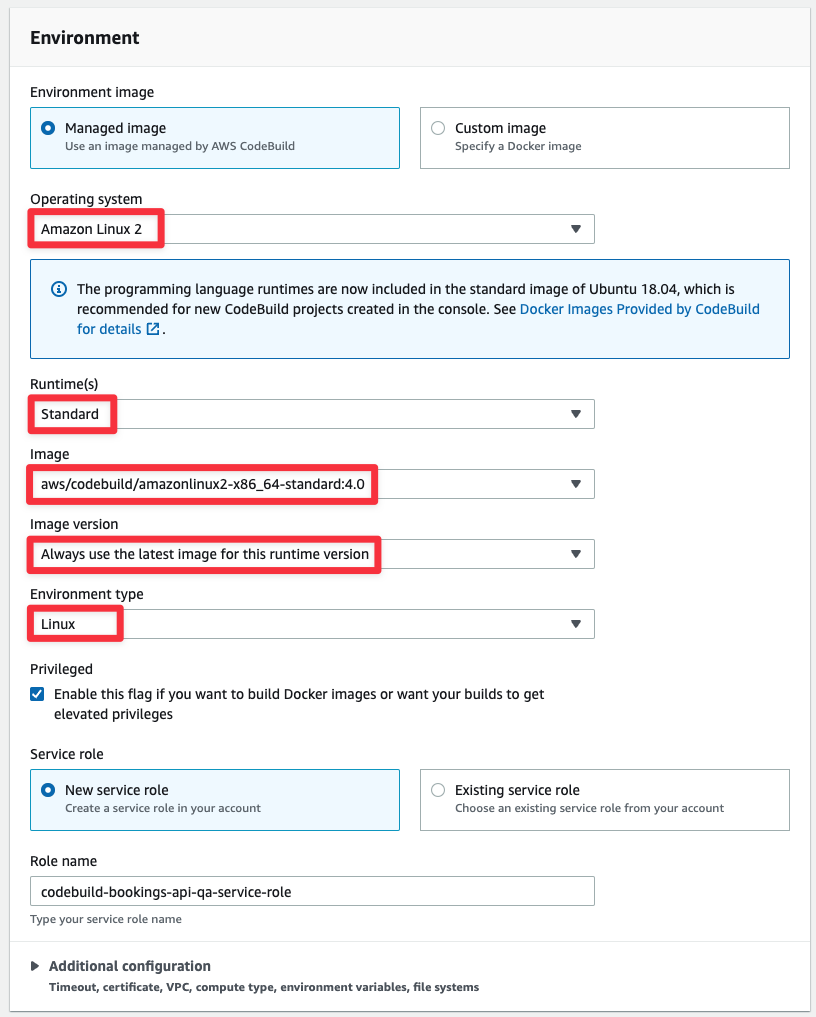
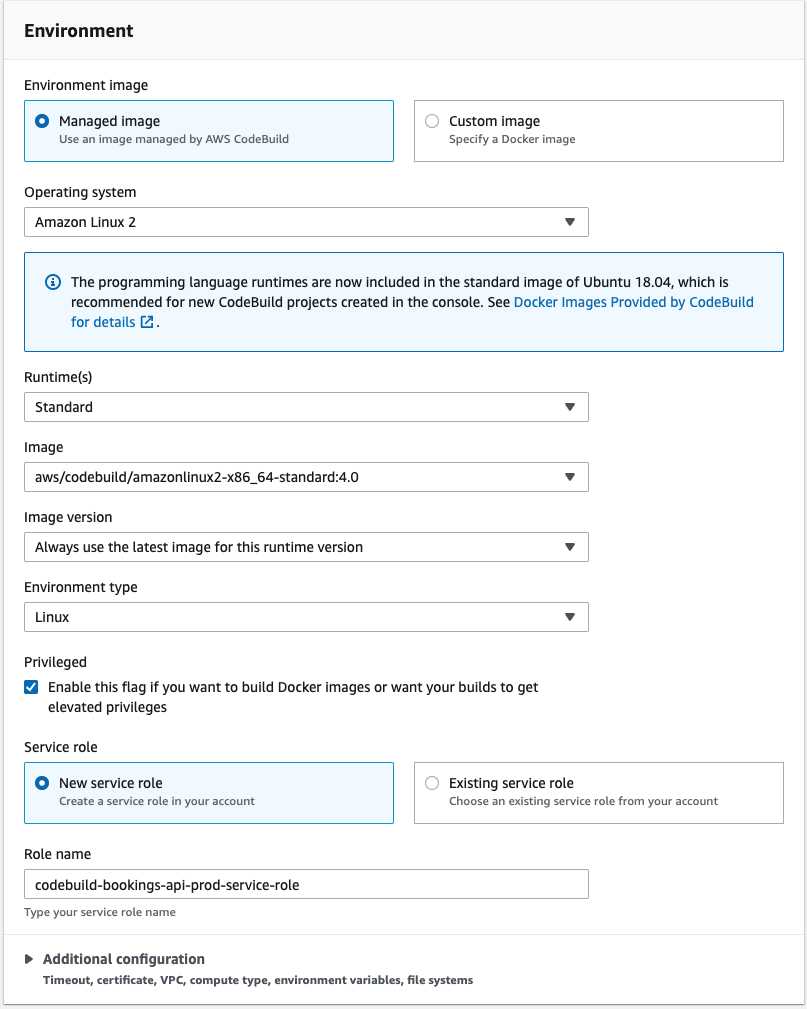
The Environment section has a number of items that need to be configured. Here is what each of these should be:
- Environment image: Managed image — Uses a provided AWS container image to build the code.
- Runtime(s): Standard - The default Standard runtime.
- Operating system: Amazon Linux 2 — Since the code should target Linux to be built for Lightsail.
- Image: aws/codebuild/amazonlinux2-x86_64-standard:4.0 — The latest Amazon Linux image.
- Image version: Always use the latest — Self-explanatory.
- Environment type: Linux - The standard Linux environment.
- Privileged: Checked — We’re building a docker container so this needs to be checked.
- Service role: New service role — Let CodeBuild create a role with the basic permissions for us.
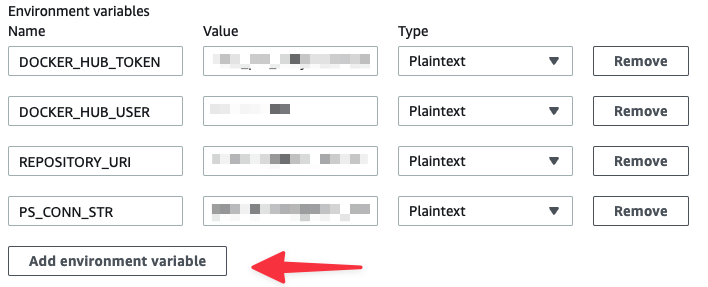
Stay in the Environments section and toggle the "Additional configuration" item to get more options for configuring the environment. Most of these options can remain as is, but we need to add a number of environment variables here so that when a build is triggered, AWS has the necessary info to build and deploy our container image. Find the Environment variables section, and add the following variables. Click "Add environment variable" to add more to the list.
DOCKER_HUB_TOKEN— The token you retrieved from Docker Hub.DOCKER_HUB_USER— Your Docker Hub username.REPOSITORY_URI— The ECR repository URI.PS_CONN_STR— The PlanetScale connection string of thedevbranch.
We will be storing these variables as plain text for the purpose of this article. In a real production environment, sensitive credentials should be stored in a more secure system like AWS Secrets Manager
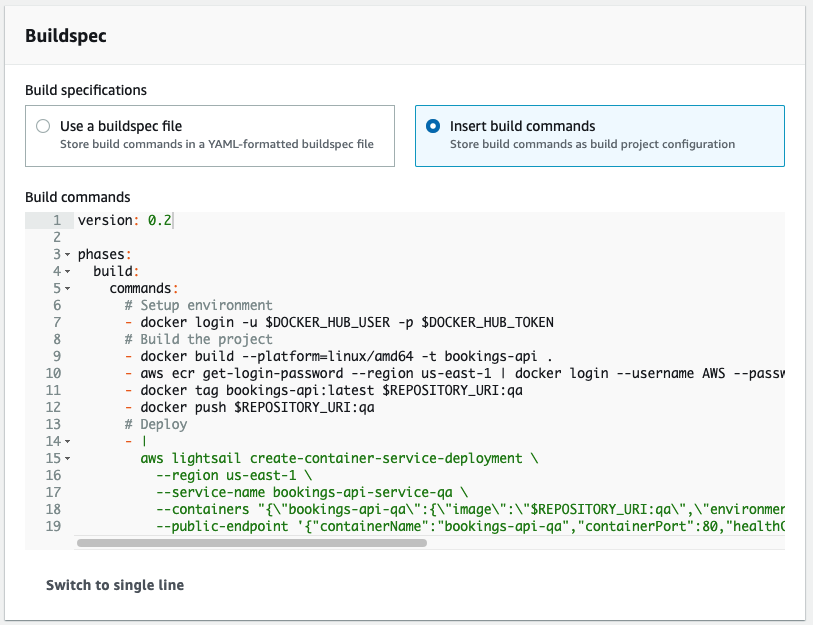
Now onto the Buildspec section. This is where we need to define the steps required to build the image. Since we want to handle the QA and Production build steps a bit differently (specifically when it comes to updating the schema in the PlanetScale database), we need to select "Insert build commands" so we can provide build steps that are not stored with the repository.
Once you’ve selected that, click on "Switch to editor" to get a larger text box and paste the below code in. Click "Update buildspec" when done.
version: 0.2
phases:
  build:
    commands:
      # Setup environment
      - docker login -u $DOCKER_HUB_USER -p $DOCKER_HUB_TOKEN
      # Build the project
      - docker build --platform=linux/amd64 -t bookings-api .
      - aws ecr get-login-password --region us-east-1 | docker login --username AWS --password-stdin $REPOSITORY_URI
      - docker tag bookings-api:latest $REPOSITORY_URI:qa
      - docker push $REPOSITORY_URI:qa
      # Deploy
      - |
        aws lightsail create-container-service-deployment \
          --region us-east-1 \
          --service-name bookings-api-service-qa \
          --containers "{\"bookings-api-qa\":{\"image\":\"$REPOSITORY_URI:qa\",\"environment\":{\"LISTEN\":\"0.0.0.0:80\", \"DSN\":\"$PS_CONN_STR\"},\"ports\":{\"80\":\"HTTP\"}}}" \
          --public-endpoint '{"containerName":"bookings-api-qa","containerPort":80,"healthCheck":{"path":"/"}}'
The rest of the settings can be left as they are. Scroll to the bottom and click "Create build project".
Updating IAM permissions for QA
Although we’ve been allowing AWS to manage permissions for us up to this point, there is a bit of manual configuration that needs to be done before we can build and deploy the container to AWS. Here are the permissions that need to be added to the role for each CodeBuild project:
- Permit CodeBuild to pull from the ECR instance.
- Permit CodeBuild to create a service deployment in Lightsail.
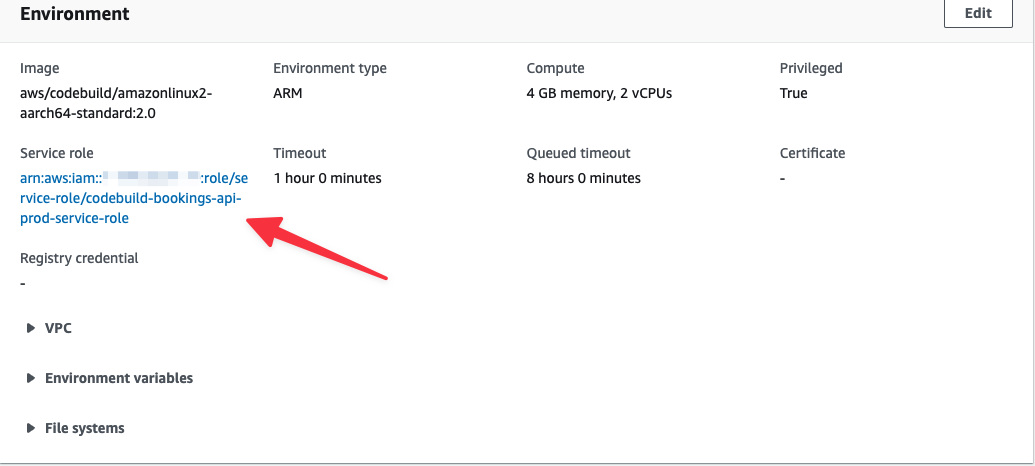
From within the CodeBuild project, select the Build details tab.
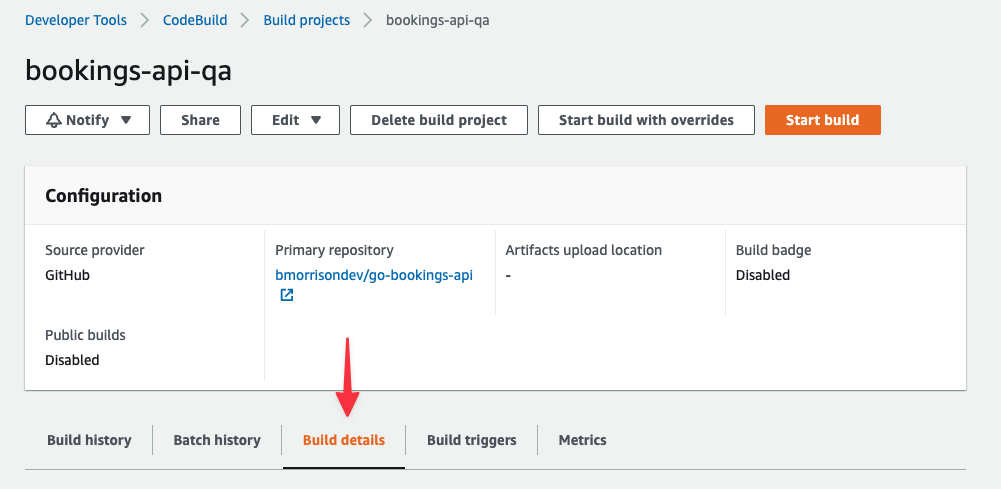
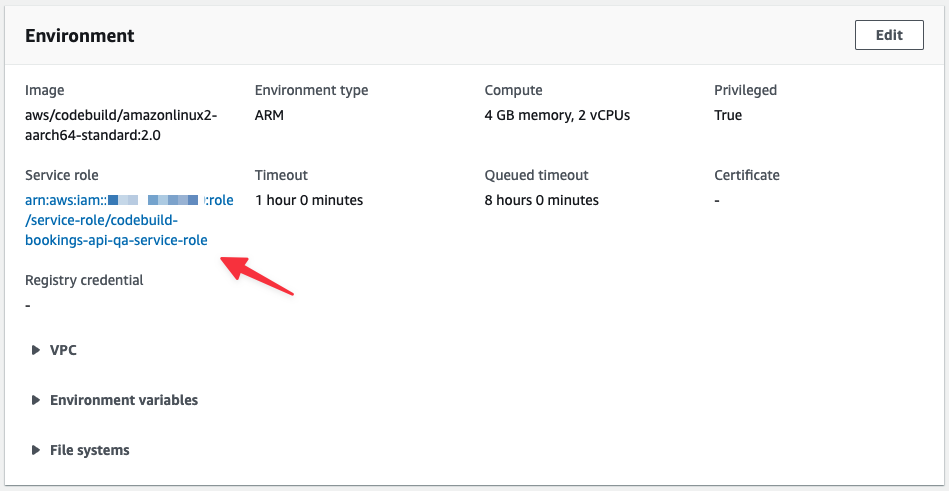
Scroll to the Environment section and click the link under Service role. You’ll be redirected to the Role definition in IAM.
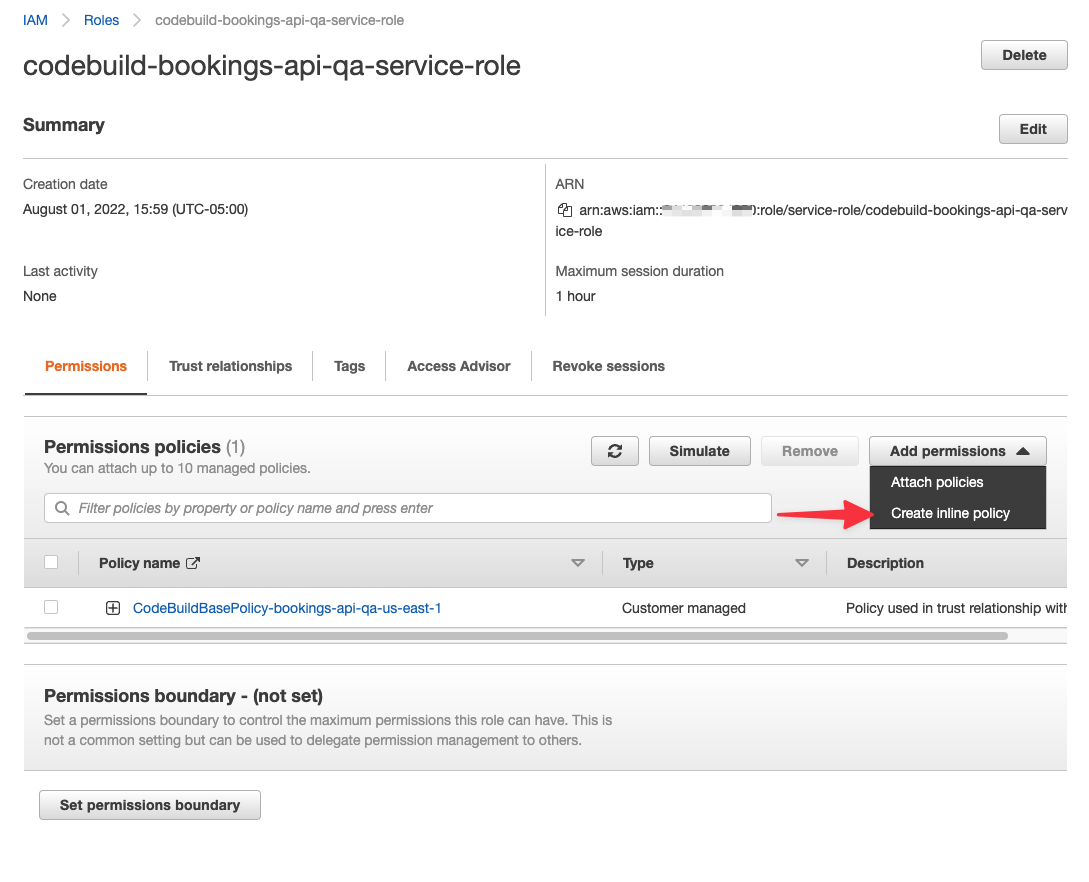
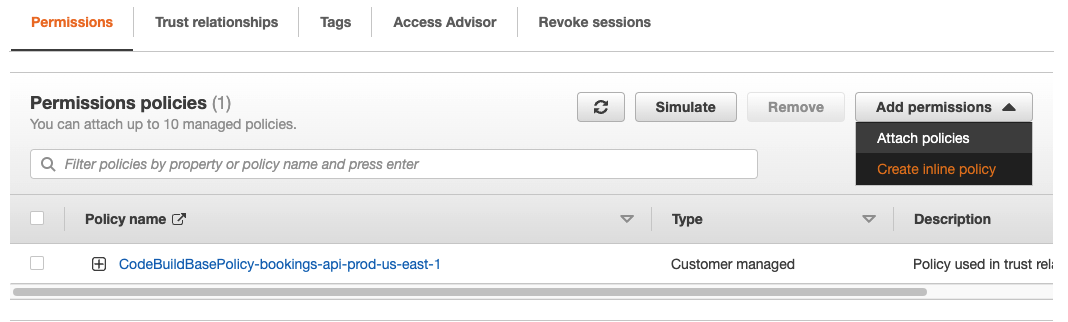
Under Permissions policies, click "Add permissions" > "Create inline policy".
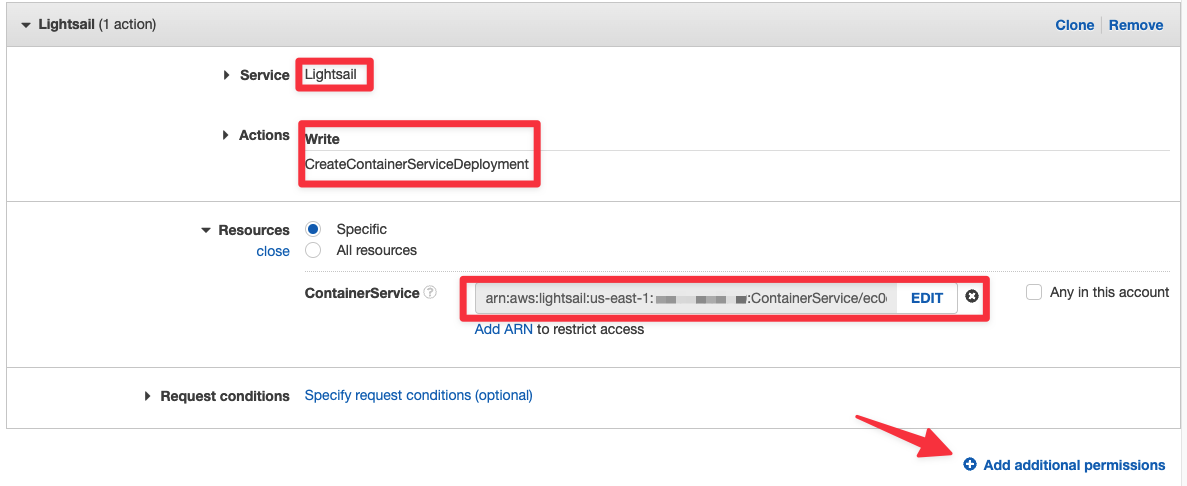
In Create policy view, start with the Service section. Search for “Lightsail” and select it from the results.

Under Actions, search for “CreateContainerServiceDeployment” and select it from the list of results.

Now to limit the boundaries of the policy to ONLY the QA version of our container service, you’ll need to get the ARN of the container service. The only way to do this at the moment is using the AWS CLI. Open a terminal on your computer and run the following command to get a list of the container services and their ARNs:
aws lightsail get-container-services --query 'containerServices[*].[containerServiceName,arn]' --region us-east-1
Your output should show the name of the container service followed by its ARN in a JSON structure.

Make sure to note the ARNs of both container services in your tracking document
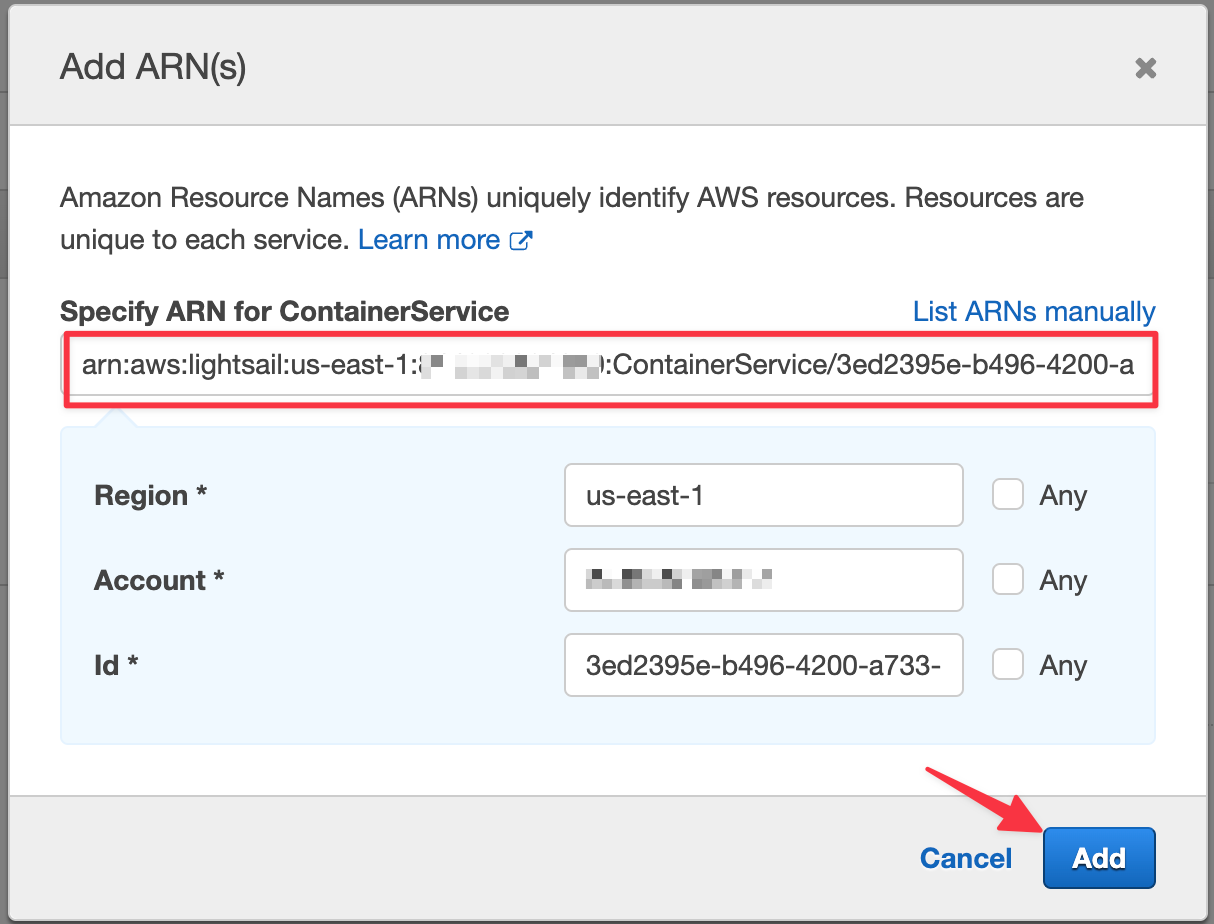
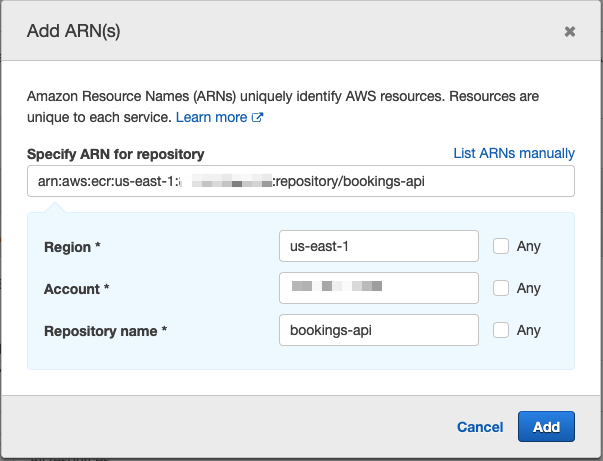
Back in IAM, under the Resources section, make sure "Specific" is checked and click "Add ARN". A modal should appear with a field to paste in the ARN we grabbed from the terminal.

Paste the qa ARN in and the other fields should automatically populate. Click "Add" to apply the changes.
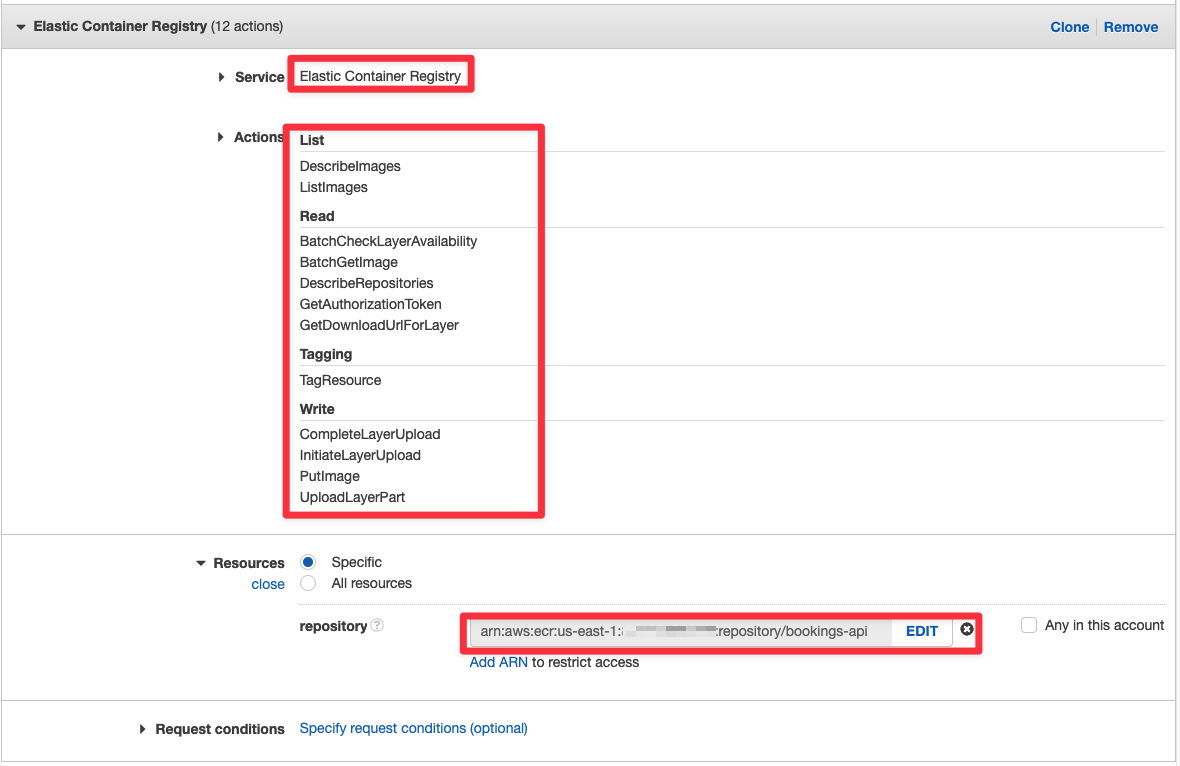
You can collapse the Lightsail section and click "Add additional permissions" to get a blank form to add more permissions. Select Elastic Container Registry from the list of services. Under Actions, select the following:
- List
- DescribeImages
- ListImages
- Read
- BatchCheckLayerAvailability
- BatchGetImage
- DescribeRepositories
- GetAuthorizationToken
- GetDownloadUrlForLayer
- Tagging
- TagResource
- Write
- CompleteLayerUpload
- InitiateLayerUpload
- PutImage
- UploadLayerPart
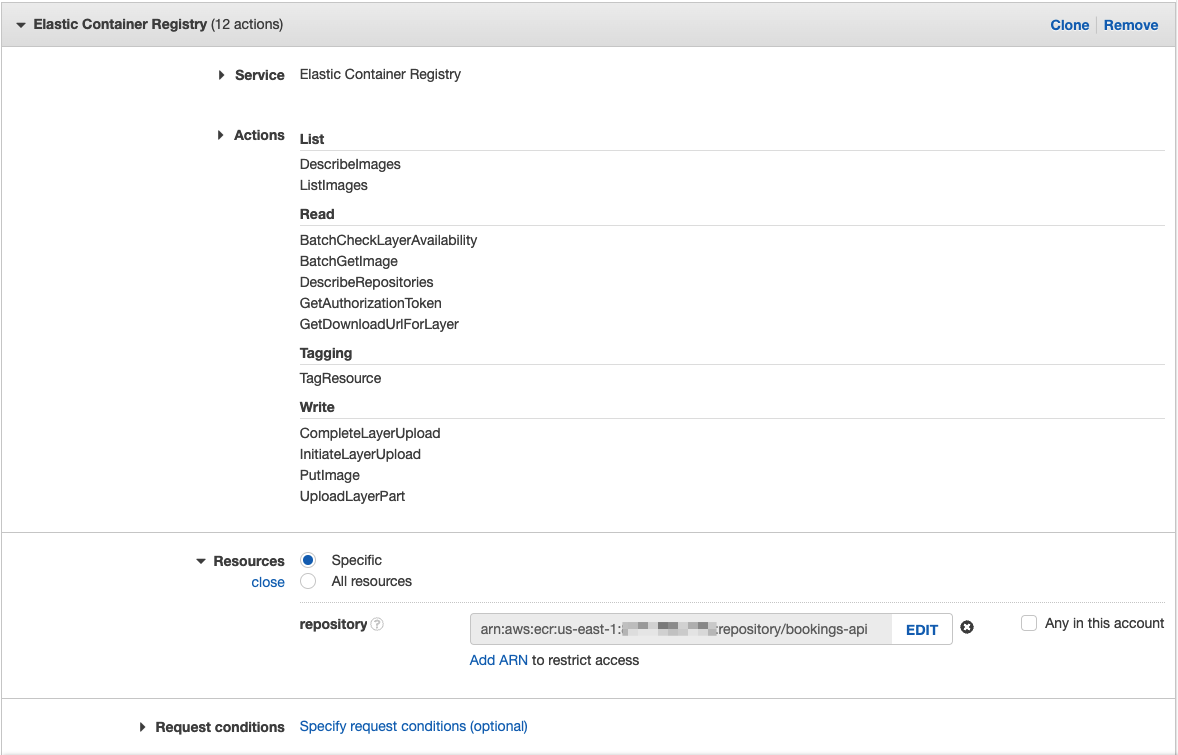
The Resources section is a bit more straightforward for ECR. Simply click "Add ARN" and populate the region and repository name.
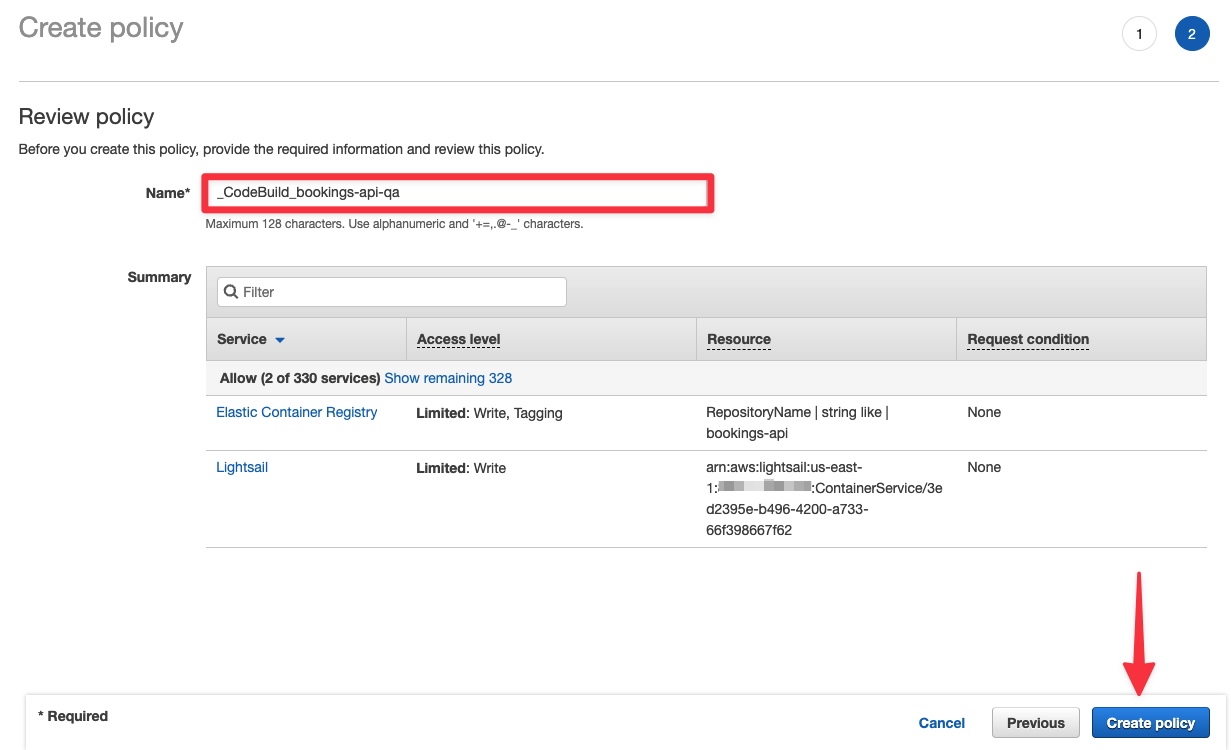
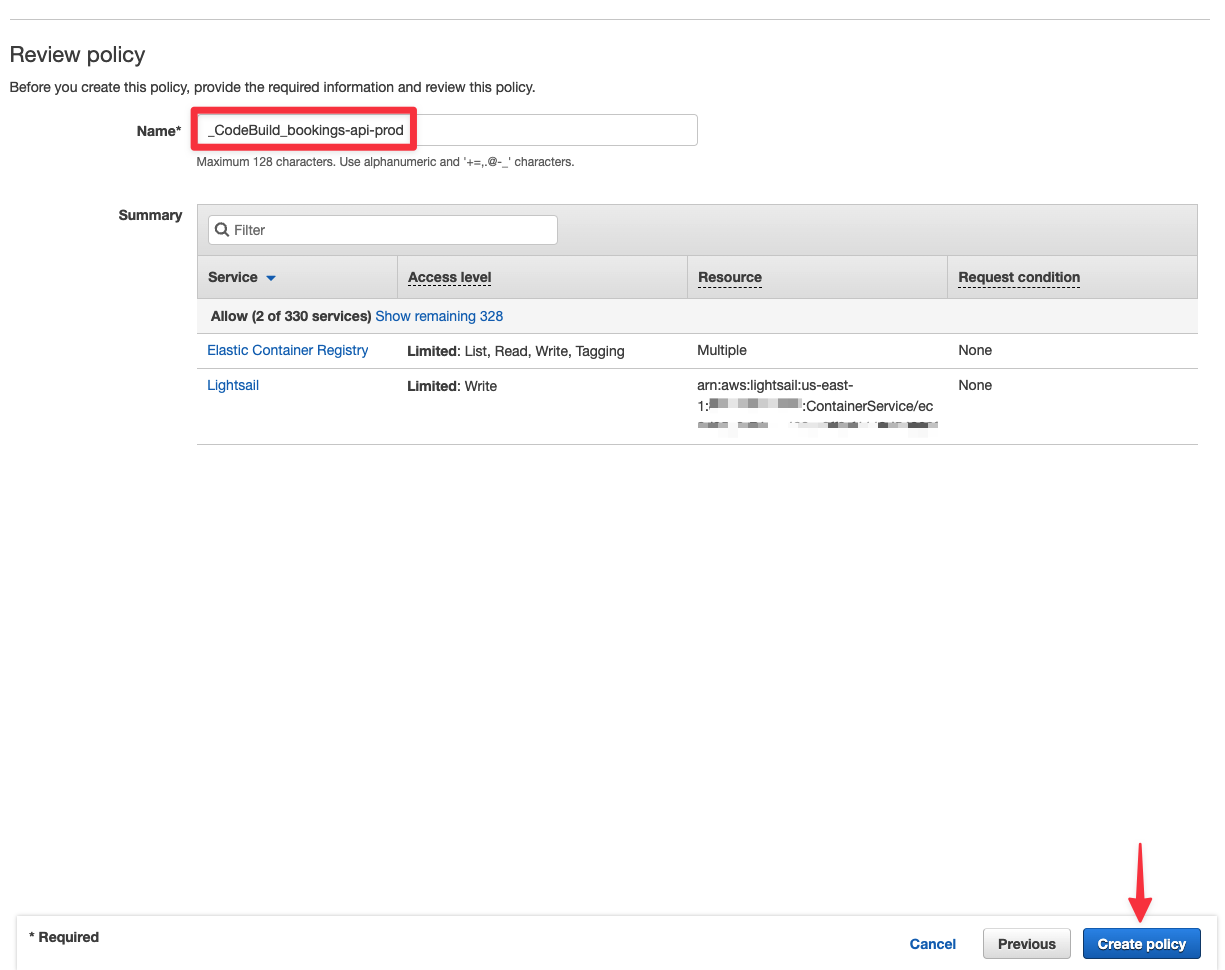
Once you are done, click "Review policy" at the bottom of the page. Give your policy a name and finish by clicking "Create policy".
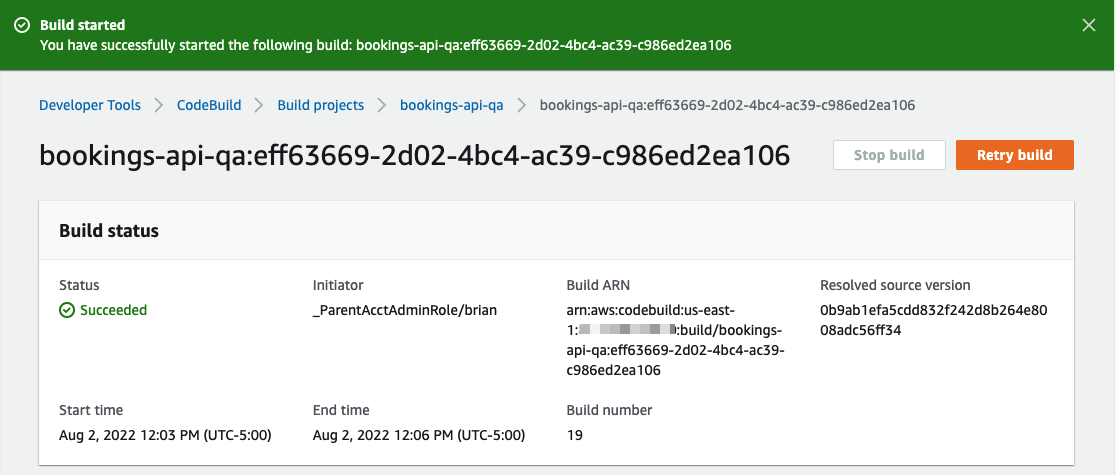
Now that everything is set up, let’s run the build. From the CodeBuild project, click on "Start build".
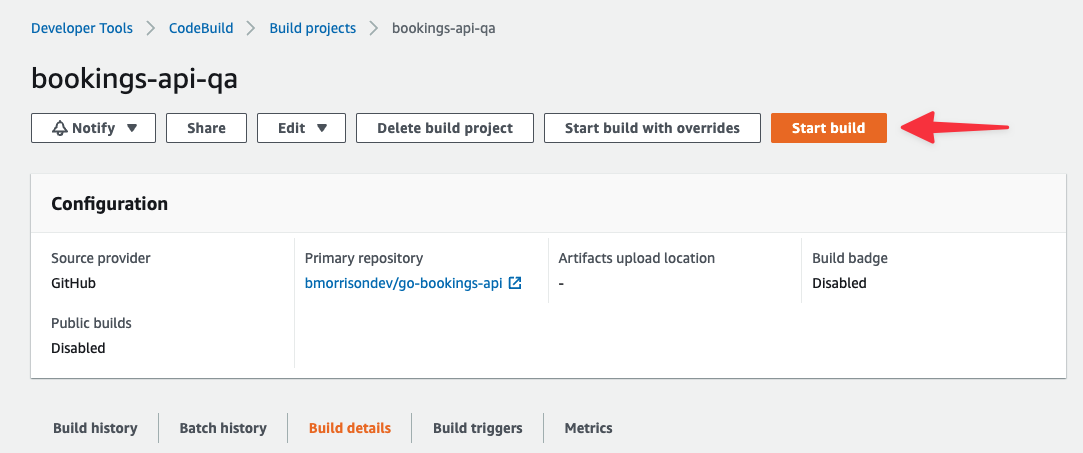
Provided everything is set up properly, you should receive a Succeeded status after the build completes. If not, check the logs below to determine if anything is not set up properly.
Production
Now that QA is set up and ready to go, we need to set up the production pipeline. Since we will also be creating and approving a Deploy Request in PlanetScale, we need to create a service token in PlanetScale first which will allow the CodeBuild project to access our database using the PlanetScale CLI.
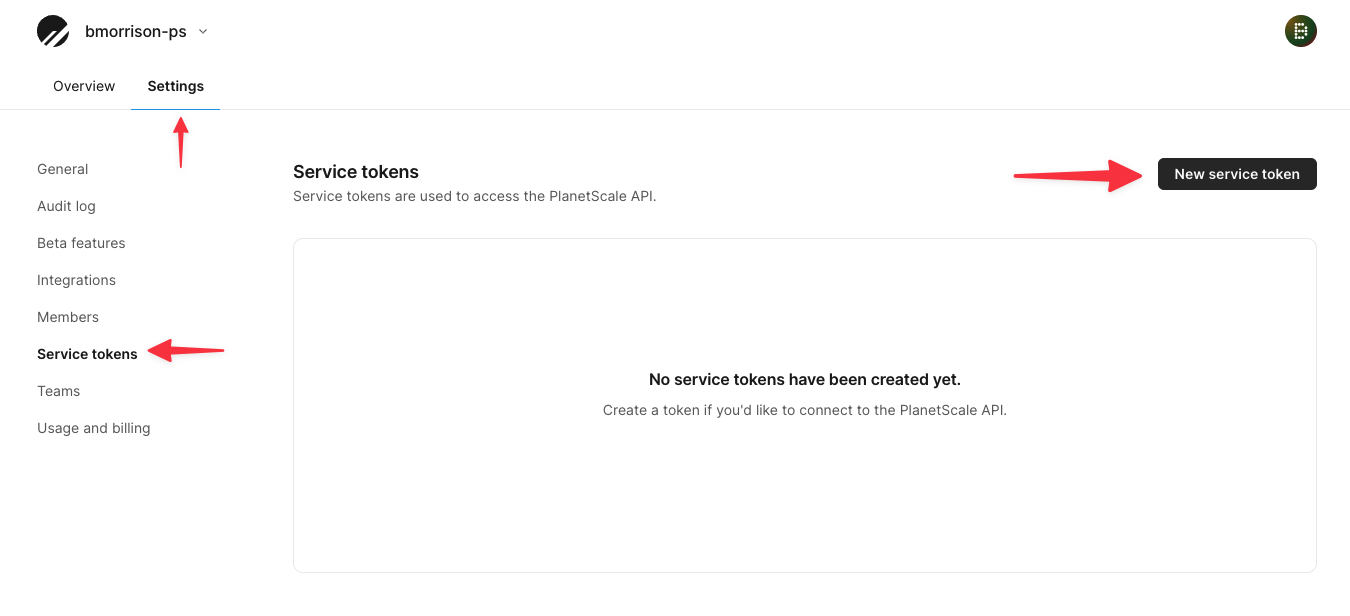
In PlanetScale at the root of your organization, click the Settings tab, then "Service tokens". Click "New service token" to open the modal to create a service token.
Give your token a name and click "Create service token". The name is for your reference and does not affect the token in any way.
Your token will be displayed this one time, so make sure to note it down before moving on. Click "Edit token permissions".
Now the next page will show the ID of that token. Note that down as you’ll need it to be set in CodeBuild. Click "Add database access" next.
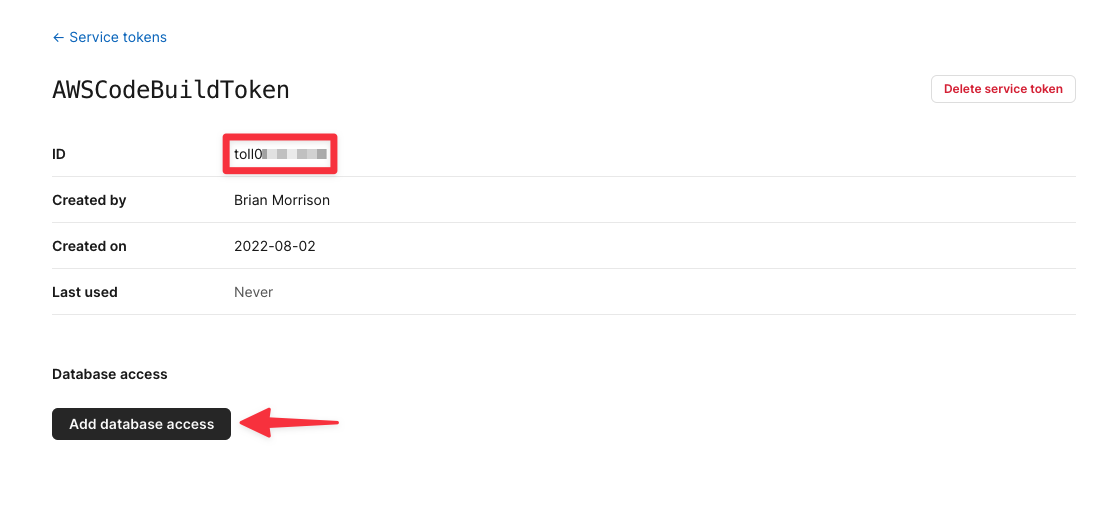
Make sure to add the PlanetScale service token and service token ID to your tracking document
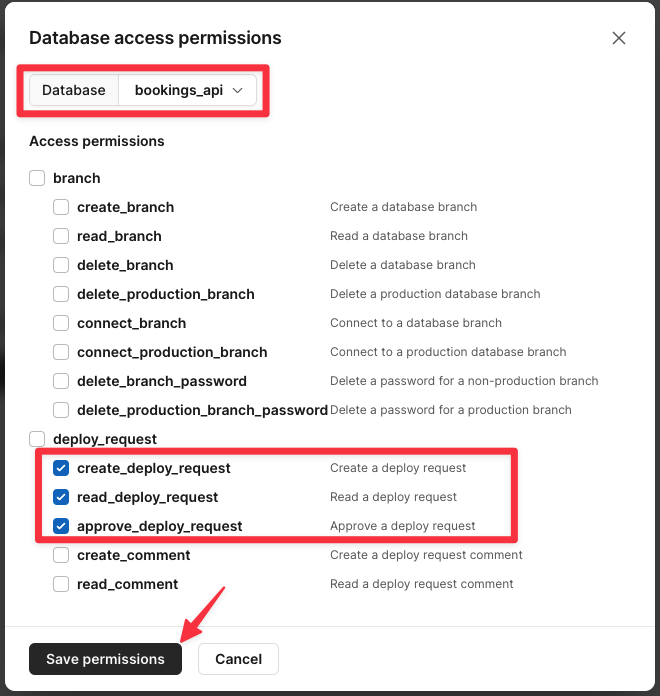
Now select your database from the dropdown and check the following options:
- create_deploy_request
- read_deploy_request
- approve_deploy_request
Click "Save permissions" once you are done.
Now we can head back to AWS to configure CodeBuild. Most of the steps from the previous section will be carried over with a few minor tweaks. Start by creating a new CodeBuild project named bookings-api-prod.
Under Source, use all the same settings from QA but set the Source version to main to use the main branch from GitHub.
Check the box under Primary source webhook events to "Rebuild every time a code change is pushed".
Set the Event type to "PULL_REQUEST_MERGED".
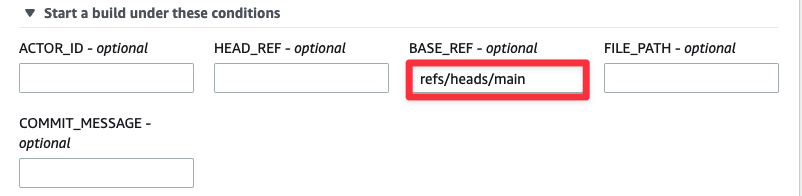
Pull Requests have the branch data in the BASE_REF field, so expand "Start a build under these conditions" and set BASE_REF to “ref/heads/main”.
Use all the same settings for Environment that were used in QA.
Expand the additional options and find Environment variables. Add the same variables you did for the QA pipeline with the following changes:
PS_CONN_STR— The PlanetScale connection string for themainbranch.PS_TOKEN_ID— The PlanetScale service token ID.PS_TOKEN— The PlanetScale service token.PS_ORG— Your PlanetScale org name.

Under Buildspec, select "Insert build commands", then expand the editor to paste the following.
version: 0.2
phases:
  build:
    commands:
      # Setup environment
      - docker login -u $DOCKER_HUB_USER -p $DOCKER_HUB_TOKEN
      - curl -LO https://github.com/planetscale/cli/releases/download/v0.112.0/pscale_0.112.0_linux_amd64.deb
      - dpkg -i ./pscale_0.112.0_linux_amd64.deb
      - pscale --version
      # Build the project
      - docker build --platform=linux/amd64 -t bookings-api .
      - aws ecr get-login-password --region us-east-1 | docker login --username AWS --password-stdin $REPOSITORY_URI
      - docker tag bookings-api:latest $REPOSITORY_URI:prod
      - docker push $REPOSITORY_URI:prod
      # Deploy PlanetScale schema changes
      - |
        DR_NUM=$(pscale deploy-request create bookings_api dev --service-token $PS_TOKEN --service-token-id $PS_TOKEN_ID --org $PS_ORG --format json | jq '.number' )
        DR_STATE=$(pscale deploy-request show bookings_api $DR_NUM --service-token $PS_TOKEN --service-token-id $PS_TOKEN_ID --org $PS_ORG --format json | jq -r '.deployment.state')
        while [ "$DR_STATE" = "pending" ];
        do
          sleep 5
          DR_STATE=$(pscale deploy-request show bookings_api $DR_NUM --service-token $PS_TOKEN --service-token-id $PS_TOKEN_ID --org $PS_ORG --format json | jq -r '.deployment.state')
          echo "State: $DR_STATE"
        done
        if [ "$DR_STATE" = "no_changes" ]; then
          pscale deploy-request close bookings_api $DR_NUM --service-token $PS_TOKEN --service-token-id $PS_TOKEN_ID --org $PS_ORG
        else
          pscale deploy-request deploy bookings_api $DR_NUM --service-token $PS_TOKEN --service-token-id $PS_TOKEN_ID --org $PS_ORG
        fi
      # Deploy
      - |
        aws lightsail create-container-service-deployment \
          --region us-east-1 \
          --service-name bookings-api-service-prod \
          --containers "{\"bookings-api-prod\":{\"image\":\"$REPOSITORY_URI:prod\",\"environment\":{\"LISTEN\":\"0.0.0.0:80\", \"DSN\":\"$PS_CONN_STR\"},\"ports\":{\"80\":\"HTTP\"}}}" \
          --public-endpoint '{"containerName":"bookings-api-prod","containerPort":80,"healthCheck":{"path":"/"}}'
Before we move on, let’s take a moment and examine the script directly under # Deploy PlanetScale schema changes. I’ve added a commented version to explain exactly what each line is doing:
# This line will create a deploy request from the dev branch, and is outputting JSON.
# It's piping the JSON to `jq`, which is reading the Deploy Request number to the DR_NUM variable.
DR_NUM=$(pscale deploy-request create bookings_api dev --service-token $PS_TOKEN --service-token-id $PS_TOKEN_ID --org $PS_ORG --format json | jq '.number' )

# This line grabs the Deploy Request and stores the state in DR_STATE
DR_STATE=$(pscale deploy-request show bookings_api $DR_NUM --service-token $PS_TOKEN --service-token-id $PS_TOKEN_ID --org $PS_ORG --format json | jq -r '.deployment.state')

# This loop will wait until PlanetScale has finished checking to see if changes can be applied before moving forward.
while [ "$DR_STATE" = "pending" ];
do
  sleep 5
  DR_STATE=$(pscale deploy-request show bookings_api $DR_NUM --service-token $PS_TOKEN --service-token-id $PS_TOKEN_ID --org $PS_ORG --format json | jq -r '.deployment.state')
  echo "State: $DR_STATE"
done

# Once the state has been updated, we're going to check the state to decide how to proceed.
if [ "$DR_STATE" = "no_changes" ]; then
	# If the state is "no_change", close the request without applying changes.
  pscale deploy-request close bookings_api $DR_NUM --service-token $PS_TOKEN --service-token-id $PS_TOKEN_ID --org $PS_ORG
else
	# If its anything else, attempt to deploy (merge) the changes into the `main` branch.
  pscale deploy-request deploy bookings_api $DR_NUM --service-token $PS_TOKEN --service-token-id $PS_TOKEN_ID --org $PS_ORG
fi
Scroll to the bottom and click "Create build project".
Updating Prod IAM permissions
Now we need to update the permissions for the role that was created for this project just like we did for QA. Select the Build details tab, find the Environment section, and click the link under Service role.
Click "Add permissions" > "Create inline policy".
Select "Lightsail" as the service, check "CreateContainerServiceDeployent" under Actions, and set the ARN of the production container service for Lightsail. Click "Add additional permissions" to add the ECR entry.
Select "Elastic Container Registry" as the service, add the same list of actions (see below), and set the ARN just as we did in the QA pipeline. Click Review policy once you are finished.
- List
- DescribeImages
- ListImages
- Read
- BatchCheckLayerAvailability
- BatchGetImage
- DescribeRepositories
- GetAuthorizationToken
- GetDownloadUrlForLayer
- Tagging
- TagResource
- Write
- CompleteLayerUpload
- InitiateLayerUpload
- PutImage
- UploadLayerPart
Give your policy a name and click "Create policy".
Now head back to CodeBuild and run the new project that was created just to make sure it deploys successfully. You can also monitor the dashboard in PlanetScale to see the deploy request being created and then closed due to no changes needing to be applied to the database.
Testing the entire flow#
Now that everything has been configured and we’ve tested everything manually, it's time to see this entire thing in action! In this section, we will:
- Add a new column to the
devbranch in our PlanetScale database. - Add a new field to the model in the API.
- Push the code to the
qabranch in GitHub, triggering a deployment to QA in AWS. - Create and merge a PR to the
mainbranch in GitHub, triggering a deployment to Production in AWS. This will also handle merging thedevbranch of our PlanetScale database intomain.
First log into PlanetScale, navigate to the dev branch of your database, and open the "Console" tab. Run the following commands individually in the console:
ALTER TABLE hotels ADD description VARCHAR(400);
DESCRIBE hotels;
You should see the new column that was added.

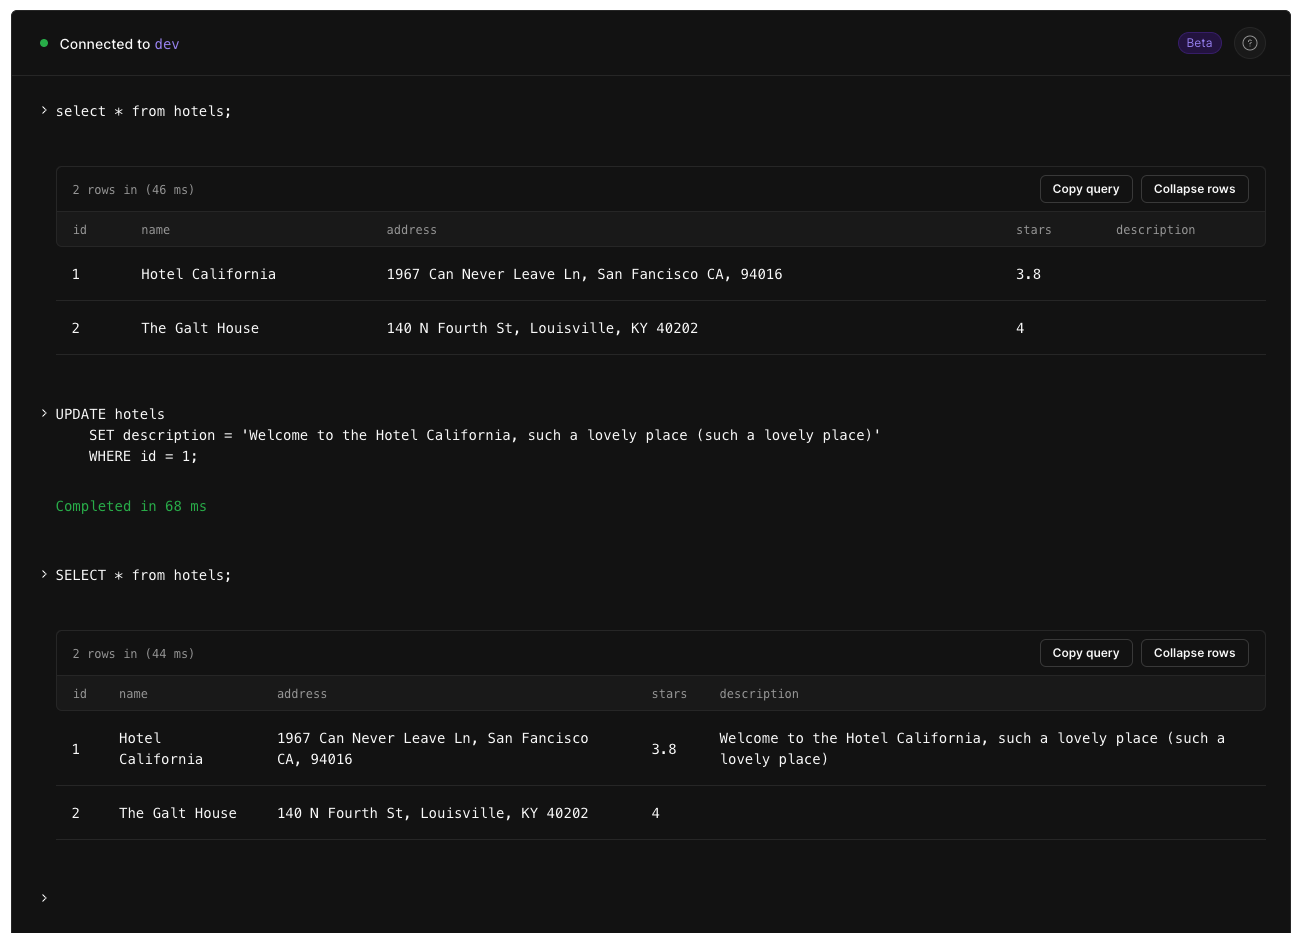
Now run the following script to populate the new description field for the first hotel.
UPDATE hotels
	SET description = 'Welcome to the Hotel California, such a lovely place (such a lovely place)'
	WHERE id = 1;
Here is the script being run, as well as SELECT statements both before and after the UPDATE statement above.
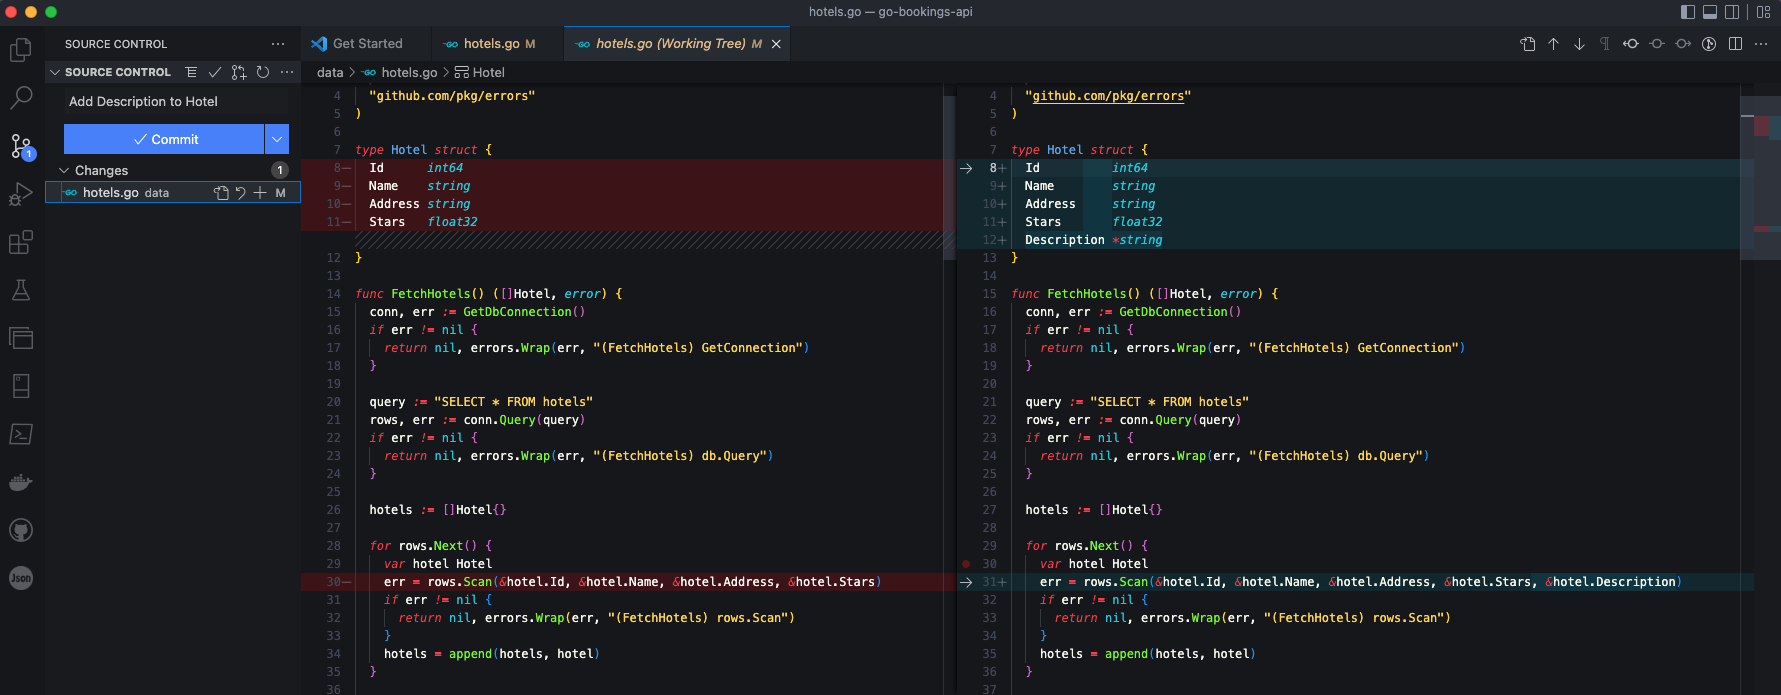
Now we need to make a change to the code. Make sure you're on the qa branch. Open data/hotels.go and update the Hotel type to have a Description field. Make sure the type is *string so it can handle NULL values since we only added a description to one hotel.
type Hotel struct {
	Id          int64
	Name        string
	Address     string
	Stars       float32
	Description *string // Add Description field
}
Scroll down a bit to the FetchHotels method and update the line with rows.Scan and add a ref to that new Description field.
func FetchHotels() ([]Hotel, error) {
	conn, err := GetDbConnection()
	if err != nil {
		return nil, errors.Wrap(err, "(FetchHotels) GetConnection")
	}
	query := "SELECT * FROM hotels"
	rows, err := conn.Query(query)
	if err != nil {
		return nil, errors.Wrap(err, "(FetchHotels) db.Query")
	}
	hotels := []Hotel{}
	for rows.Next() {
		var hotel Hotel
		// Add `&hotels.Description` to the end of the following line, within the parens
		err = rows.Scan(&hotel.Id, &hotel.Name, &hotel.Address, &hotel.Stars, &hotel.Description)
		if err != nil {
			return nil, errors.Wrap(err, "(FetchHotels) rows.Scan")
		}
		hotels = append(hotels, hotel)
	}
	return hotels, nil
}
As an example, here is what the diff looks like in VSCode after the changes were made.
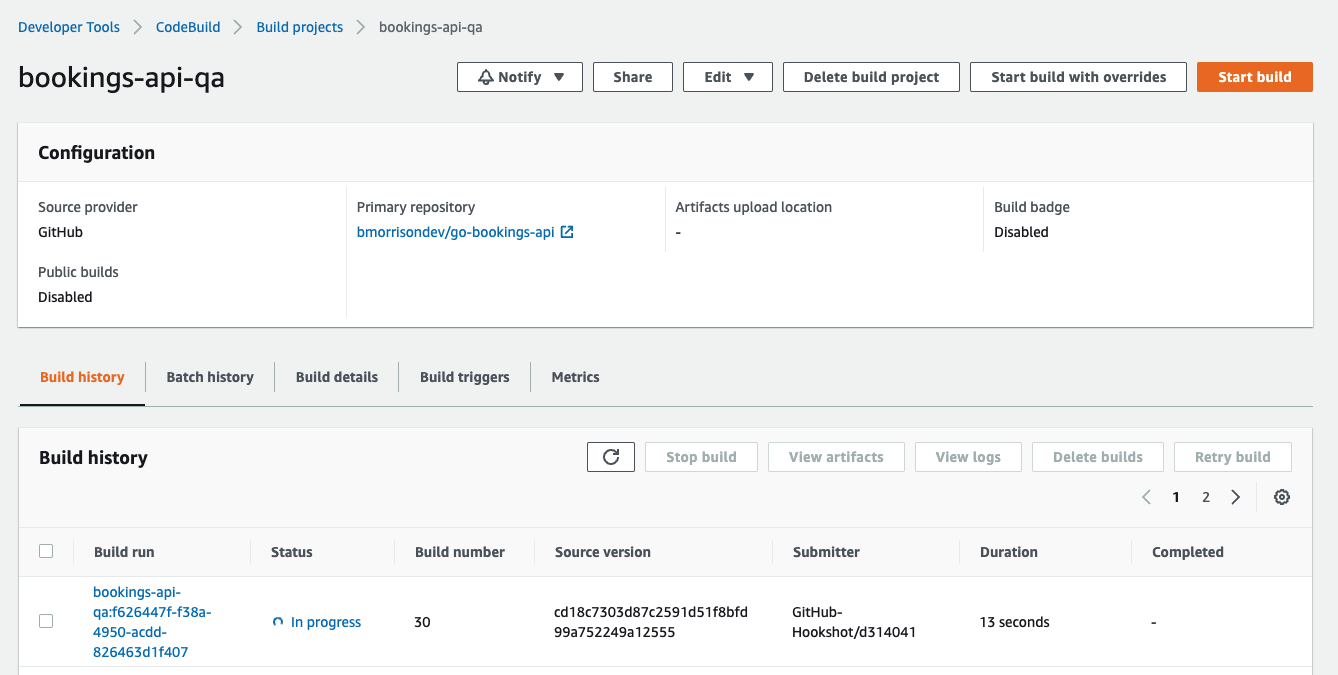
Now commit the code and push it to the repository. Check with CodeBuild and a build on QA should be in progress, triggered from the commit.
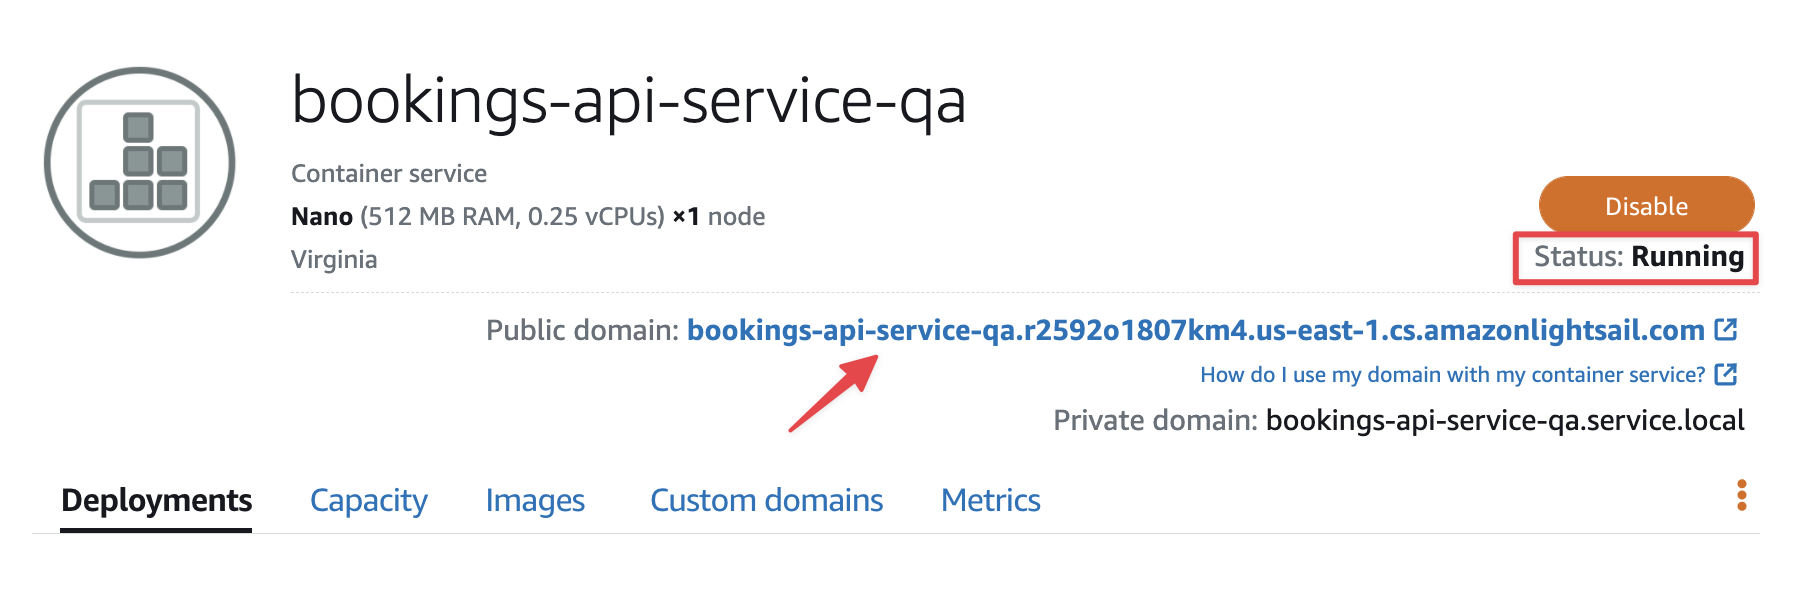
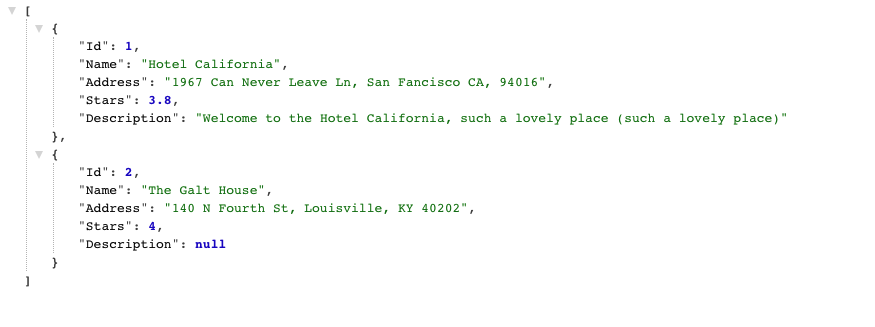
Once the build is finished, check in with the QA container service in Lightsail. Provided the status is Running, you can use the Public domain URL to test the changes. Since we’ve updated the FetchHotels function, add /hotels to the end of the URL to see the list of hotels with the new Description field added.
You should see the same list of hotels, with the first one having the description we added earlier in this section.
Head back into GitHub and create a pull request, comparing qa and main. By default, GitHub will try to create a Pull Request comparing your repository with the upstream PlanetScale version, make sure to set the base repository to your version.

Give your pull request a name and click "Create pull request".
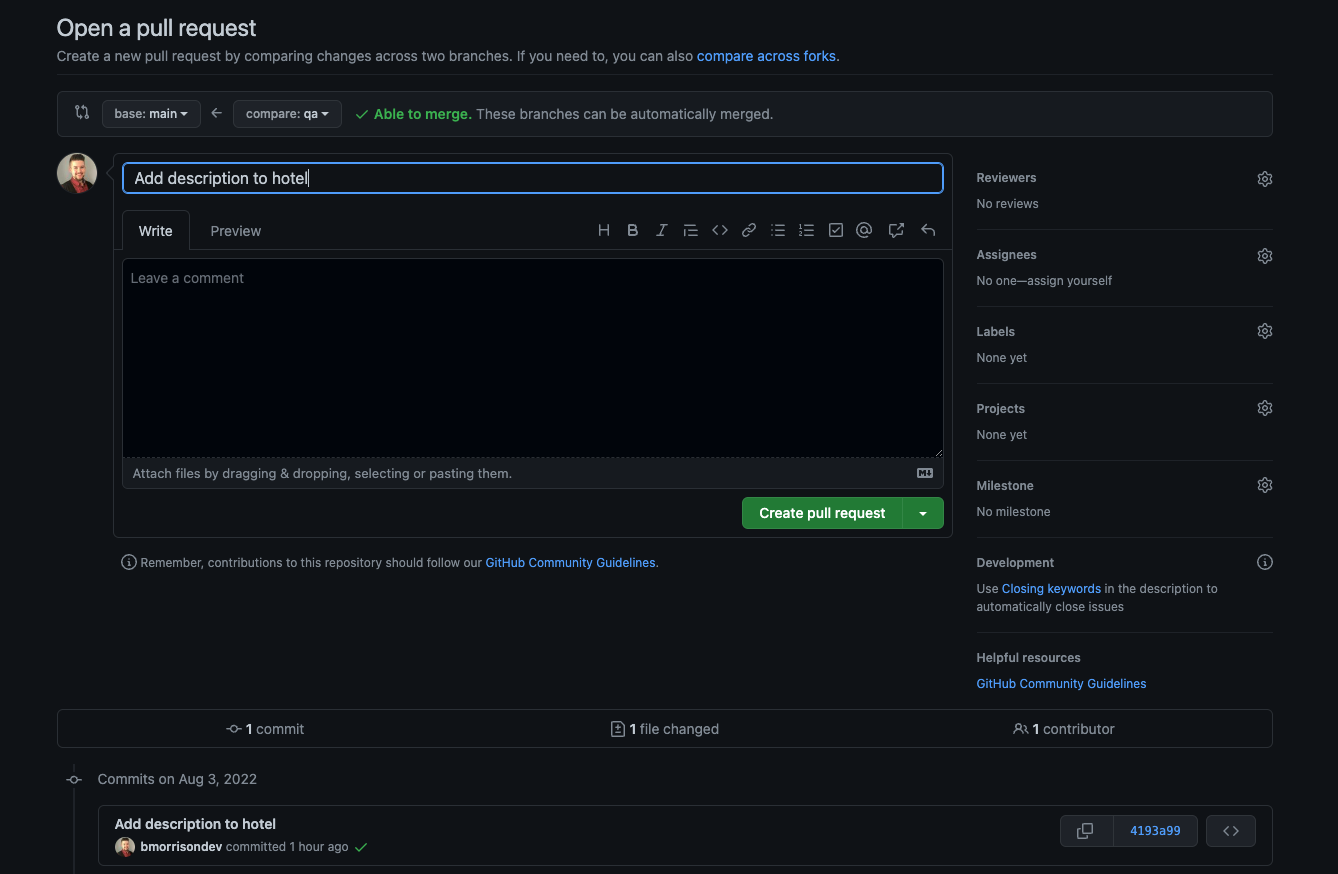
Go ahead and merge the pull request.

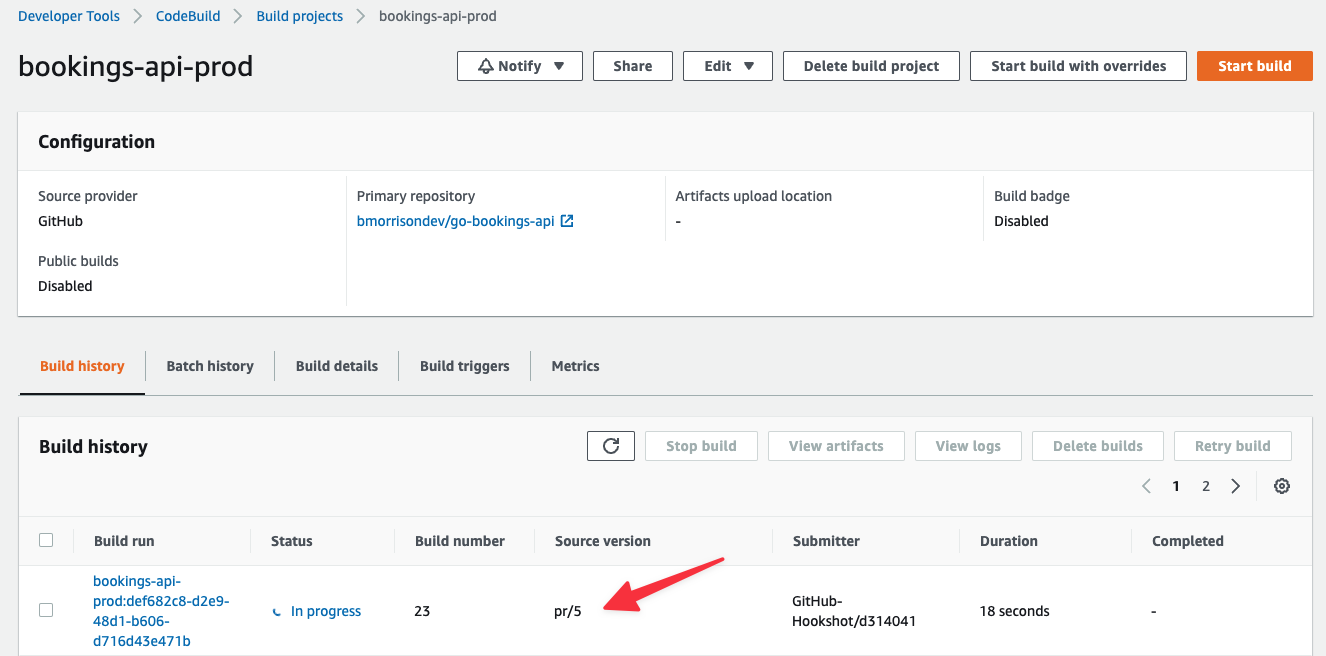
Head back into CodeBuild, and you’ll notice that the bookings-qa-prod project has a new build. Note that the Source version for the build is pr/5, referring to Pull Request #5, which was the PR number that I had created in my repo.
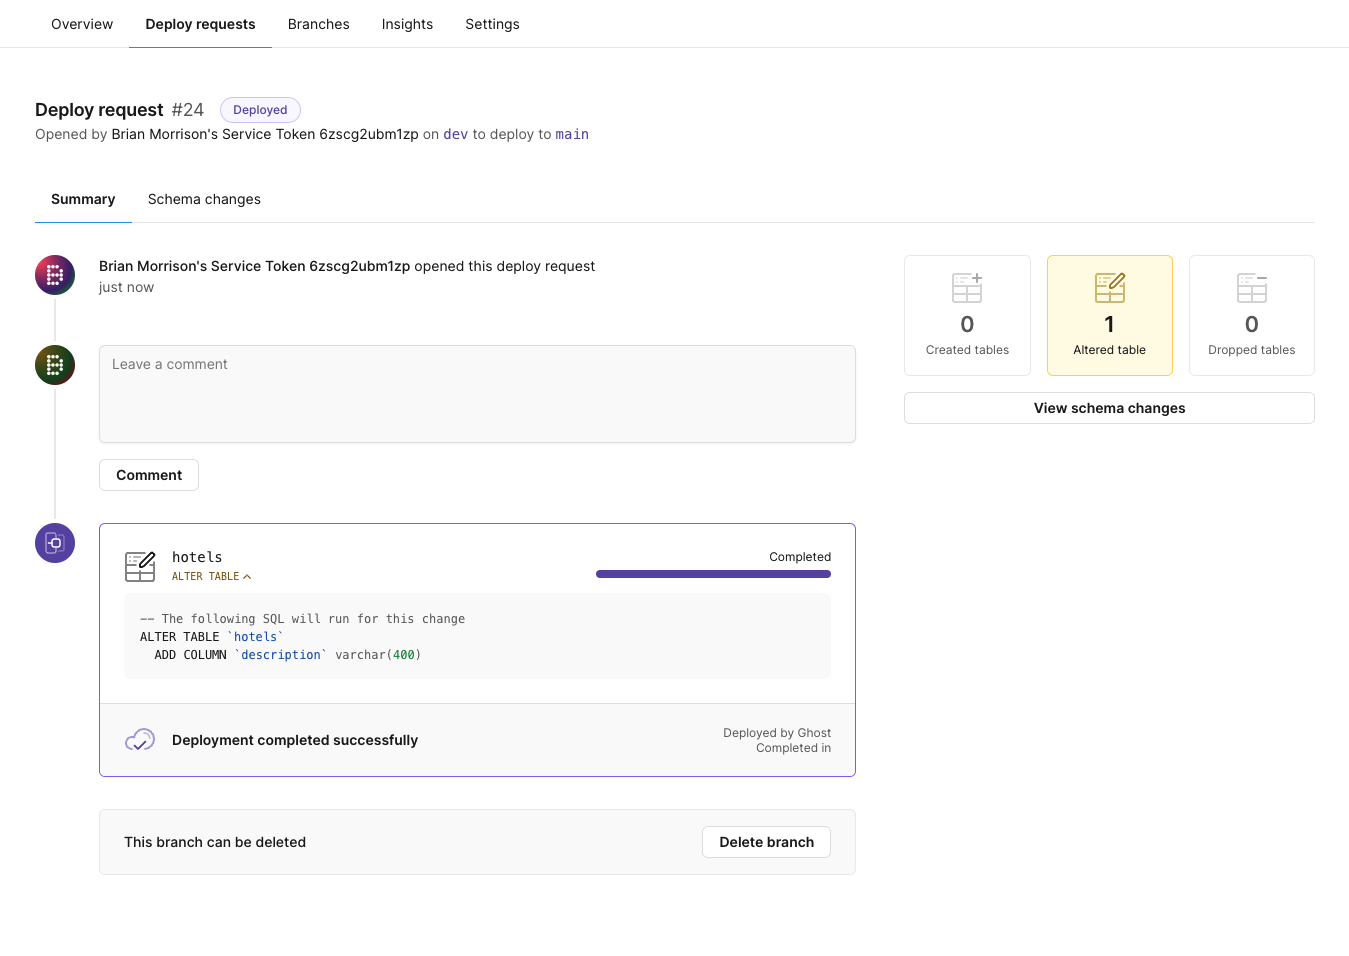
Over in the PlanetScale dashboard, you can also see that a Deploy Request was created and deployed from the CodeBuild project automatically.
Conclusion#
While that was certainly a lot of ground to cover in a single article, building a pipeline from the ground up will have many moving parts and there is often quite a bit of configuration to get them all talking properly.
The goal was to create a realistic example of how branching in PlanetScale can help speed up development by automating the process of testing and merging changes between two instances of a database.
Did you enjoy this article? Do us a favor and share it with someone awesome!